
Web SDK Face Authentication
Incode Face authentication is a process in which a previously onboarded user's face is captured using the Incode Web SDK. Incode then compares this selfie to the user's Incode Identity.
Overview
Incode face authentication is a process in which a previously onboarded end user's face is captured using the Incode Web SDK. Incode then compares this selfie to the user's Incode Identity.
Face authentication is used to Identify a user and grant access to your application.
This diagram shows a typical face authentication implementation:
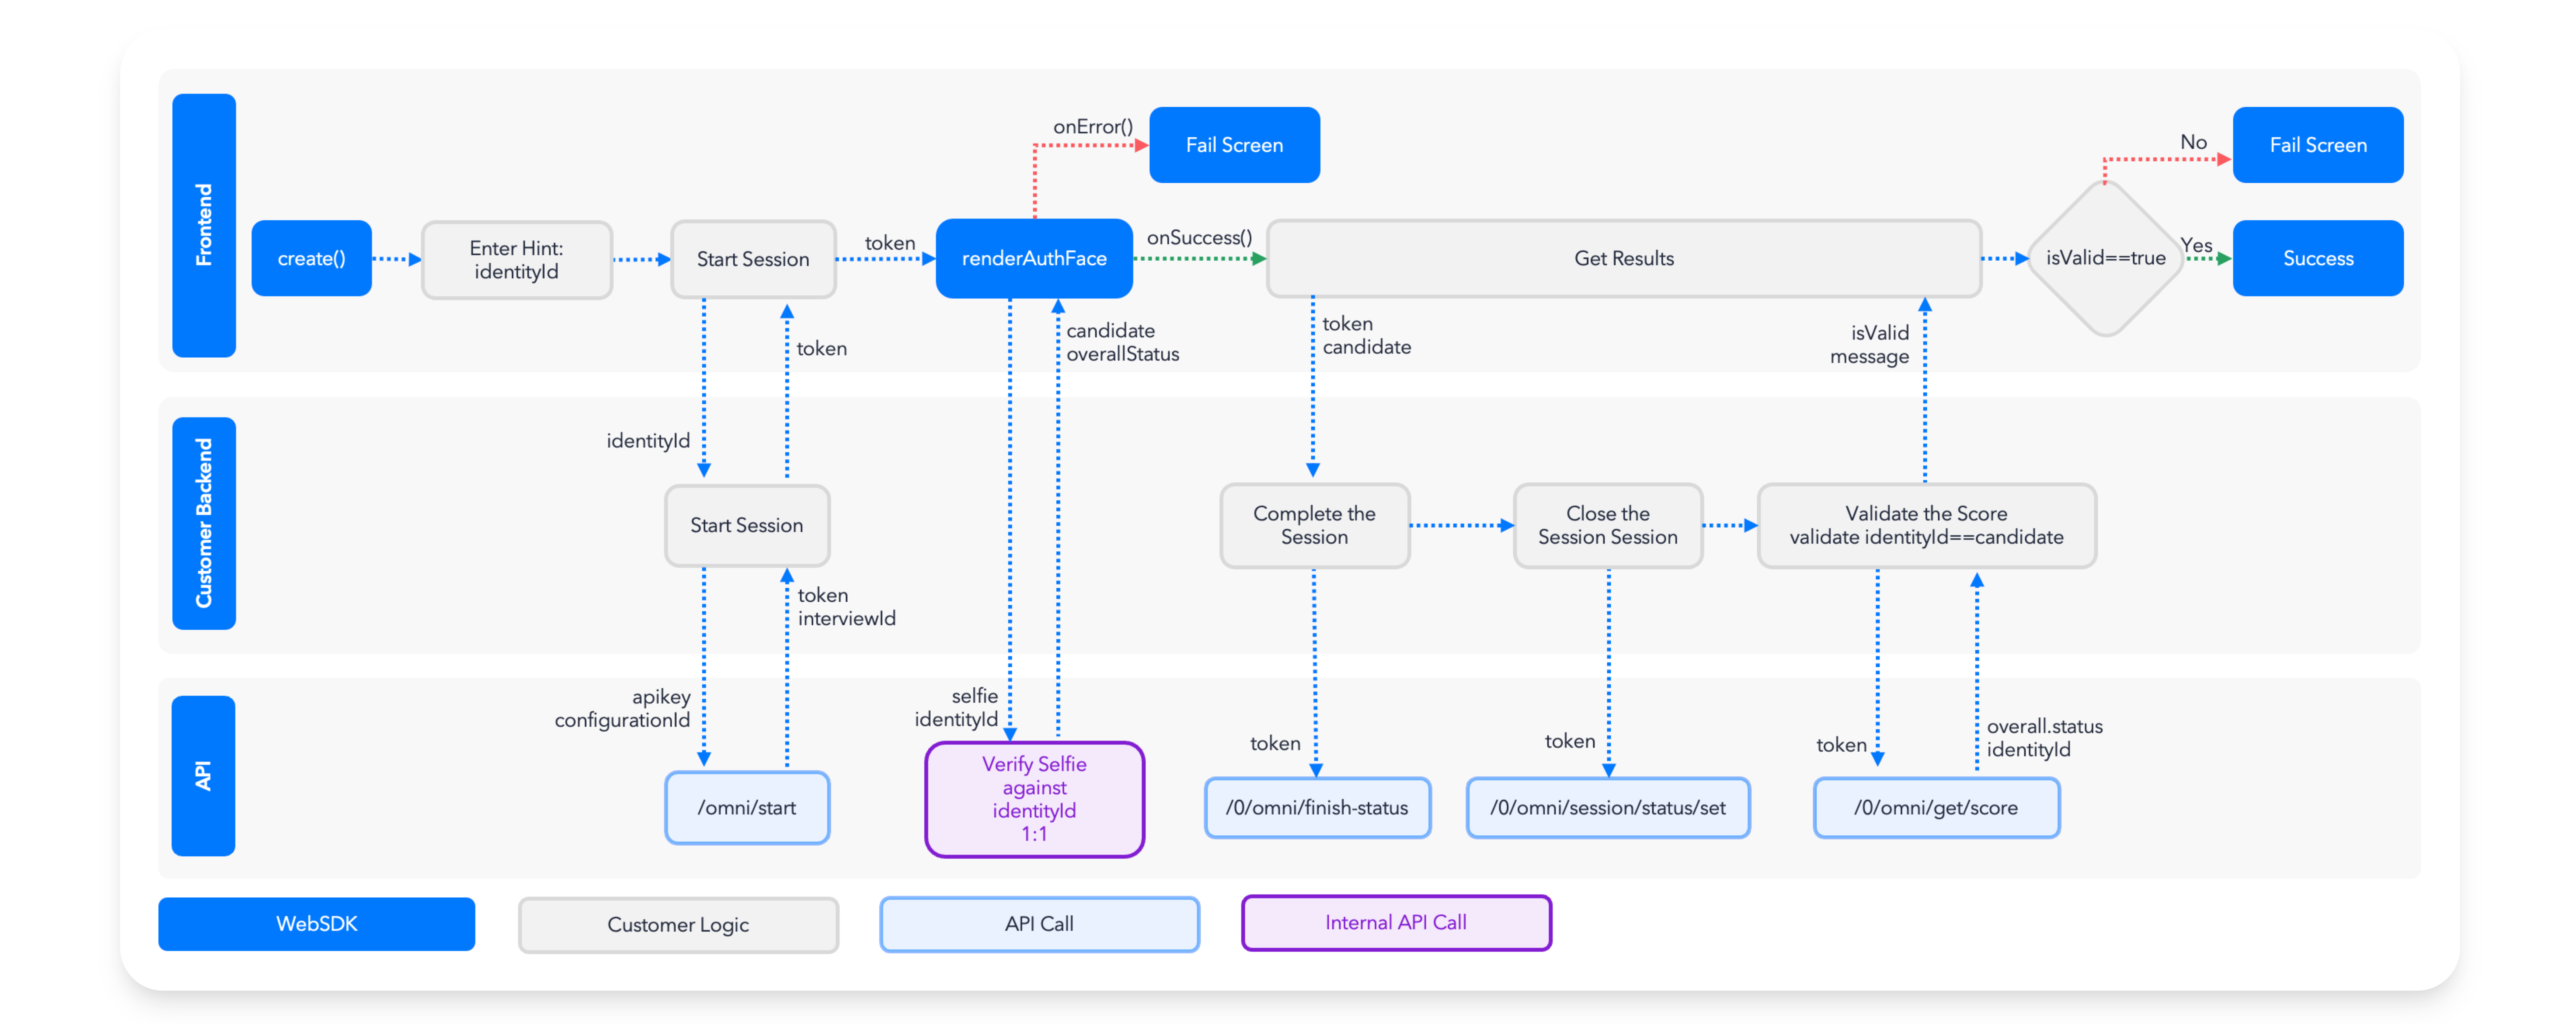
- Your application provide an unique identification for 1:1 authentication, ideally the identityId generated during a previous onboarding and that should be stored in the database (in our example we will ask it to the user directly).
- Your application starts the authentication session in backend returns a
token. - Your application uses renderAuthFace method to present the authentication UI, it will verify the face template against Incode API and then call either the
onErroror theonSuccesscallbacks.
On Success it returns theoverallStatusandcandidate(identityId). - Your application mark the session as completed to run all relevant business rules and closes it to avoid furter modifications.
- Your application get the score of the authentication and does basic validations making sure the
candidatein the frontend matches theidentityIdin the score and makes sure the score isOK - Once validated the authentication can be taken as good.
Using Face Authentication for Authorizations
This documentation only explains how to use the Face Authentication, but depending on the type of resource your accessing and the actions you want to execute on it, you might need to harden the security of this implementation to protect against: Replay Attacks, Man in the Middle, Session Hijacking etc...
Pre-requisites
Before any coding, please make sure you are familiar with the following pre-requisites:
- Incode Face Authentication
- Web SDK Standard Integration
- Setup a flow with Face Authentication module Face Authentication Module
Implementation
Full Code Sample Available:
You can find a code sample that already has all this steps implemented in our github, you can kickstart your project with it and follow this guide to understand why it's implemented in this way:
Step 1: Import the WebSDK
Create an index.html file with the following content, it will
<!DOCTYPE html>

<html lang="en">
<head>
    <meta charset="UTF-8">
    <meta http-equiv="X-UA-Compatible" content="IE=edge">
    <meta name="viewport" content="width=device-width, initial-scale=1.0">
    <title>Incode Web SDK Demo 2024</title>
    <script src="https://sdk.incode.com/sdk/onBoarding-1.87.0.js" defer></script>
    <script src="main.js" defer></script>
</head>
<body>
    <main>
      <section id="incode-container"></section>
    </main>
</body>
</html>
Create the linked main.js file where we are going to run our frontend code with the basic incode initialization code.
let incodeSDKInstance;
let incodeSession;
let candidate;

const incodeContainer = document.getElementById("incode-container");

// 1.- Run this function as soon as you load the page.
document.addEventListener("DOMContentLoaded", app);
async function app() {
  // Create the incode instance
  incodeSDKInstance = window.OnBoarding.create({
    apiURL: "https://demo-api.incodesmile.com/0",
  });
  // Run initialize to load all the relevant libraries and models
  await incodeSDKInstance.initialize();
}
Step 2: Start the session in Backend
An Onboarding Session Token (or just "session token") is required to link all the user information and validation results read the How to Create an Onboarding Session guide, the result of that is an incodeSession object with a token.
At this step return only the token to the frontend.
Code example Available
The Authentication Core Javascript Sample has an
example_backend.jsfile with a full implementation in browser, it's meant to help you understand the full process, implement it in backend for the final production release.
Step 3: Render the authentication module
Implement the new renderAuthentication function and call it, in our example we do it right away, you might want to render some kind of welcome screen before actually rendering the authentication.
// 1.- Run this function as soon as you load the page.
async function app() {
  // Create the incode instance
  incodeSDKInstance = window.OnBoarding.create({
    apiURL: "https://demo-api.incodesmile.com/0",
  });
  // Run initialize to load all the relevant libraries and models
  await incodeSDKInstance.initialize();

 // 2. Call your backend to return the new session.
  incodeSession = startTheSessionInBackend();
  // In your full app you will need to retrieve the identityId from your database
  renderAuthentication('<your-example-identity-id>');
}

// 3.- Render the face authentication
function renderAuthentication(hint) {
  incodeSDKInstance.renderAuthFace(incodeContainer, {
    session: incodeSession,
    authHint: hint,
    onSuccess: getScore, // Called after the SDK completes a successful face recognition.
    onError: console.log, // Called after the user runs out of capture attempts.
  });
}
The hint can be phone, email or identityd, we recommend linking it to identityId for clarity.
If there is any error, or the user depletes his attempts, the onError callback will be called. If everything goes right onSuccess will be called with the following contents:
{
  "overallStatus": "PASS",
  "candidate": "68c851bedd5176f7d8bf4758",
  "imageBase64": "/9j/4AAQSkZ...9843n4=",
  "selfieEncryptedBase64": "/9j/4AAQSkZJ...RgAEj/9k=",
  "metadata": "eyJjYXB0dXJ...NzF9f82f"
}
Take notice of the candidate property, the value should be the same as identityId, we will validate it later during the get Scores step.
Step 4: Get the score in Backend
To verify the authentication, you will need to send the token and the candidate to your backend service, there you will check for several conditions.
- Finish the Session so scores are calculated and business rules applied: Mark Session as Completed .
- Set the session as
Closedso it cannot be changed anymore: Set session session Status - Fetch the score (
overall.statusandidentityId) using the/0/omni/get/scoreendpoint: Get Score. - Verify that the
identityIdreported by the/0/omni/get/scoreendpoint is the same as the candidate sent by the frontend. - The
overall.statusof the score should be"OK".
Here is an example code of the process in Javascript.
const getScoreInBackend = async function (token, candidate) {

  // On production you would not return such detailed error messages, this are only for
  // Development purposes.

  // 5.- Finish the session so the scores are calculated and business rules are applied.
  // Details of the implementation in:
  // https://developer.incode.com/docs/api-onboarding-complete-session
  await finishSession(session.token);

  // 5.- Set the session status to closed so it cannot be changed.
  // https://developer.incode.com/reference/setsessionstatus
  await closeSession(session.token);

  let identityId, scoreStatus;
  try {
    // At this point we already verified that the token matches, but
    // to be clear about our intentions, we use the token stored in the
    // database to get the identityId and compare it with the candidate.
    const scoreResponse = await fakeBackendGetScore(session.token);
    identityId = scoreResponse.authentication.identityId;
    scoreStatus = scoreResponse.overall.status;
  } catch (e) {
    return {
      message: "Error validating authentication for candidate " + candidate + ": " + e.message,
      isValid: false,
    };
  }

  // renderFaceAuth returns candidate, which should match identityId from score,
  // this prevents tampering of the identityId in the frontend.
  if (identityId !== candidate) {
    return {
      message: "Session data doesn't match for candidate " + candidate,
      isValid: false,
    };
  }

  // If backend score overall status is not OK, validation fails.
  if (scoreStatus !== "OK") {
    return {
      message: "Face Validation failed for candidate " + candidate,
      isValid: false,
    };
  }

  // Only valid if all checks passed, we return the identityId that was validated.
  return {
    message: "Face Validation succeeded for candidate " + candidate,
    isValid: true,
    identityId: identityId,
  };
};
The corresponding code on the Frontend:
// 4.- Verify the authentication against the score
async function verifyAuthentication(response) {
  // Store the candidate globally, we will user next to validate
  candidate = response.candidate;

  // Do the verification in backend
  const validationResult = await verifyAuthenticationInBackend(incodeSession.token, candidate);
  if (validationResult.isValid===true){
    console.log('User sucessfully authenticated: ' + validationResult.identityId)
  } else {
    // On production you will not respond with a detailed error message, as it could
    // exploited by attackers to know how the verification works internally.
    console.log('Failed to authenticate user: ' + validationResult.message)
  }
}
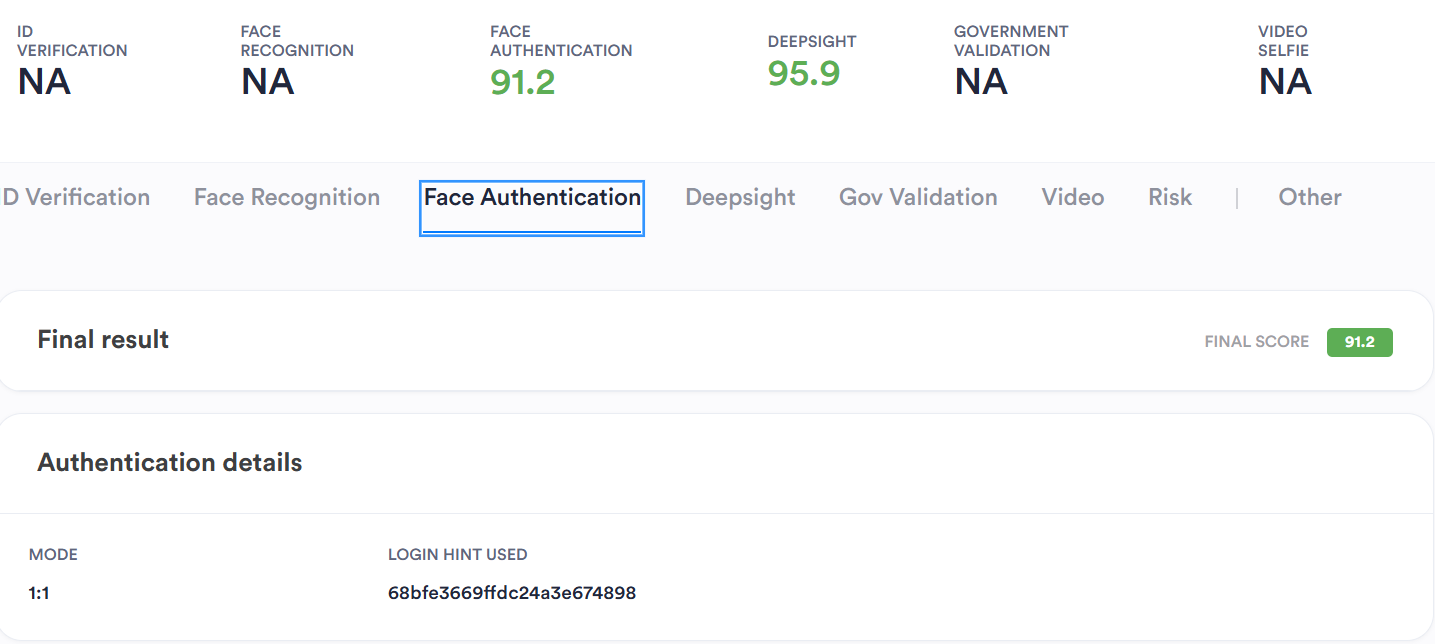
Face Authentication Dashboard Results
Adding Face Authentication module to the flow will enable an additional tab as well as the face authentication score in the session results. The new tab will contain the information about the authentication including all of the attempt's information.
Conclusions
Authentication is straightforward on the frontend, but it requires more careful handling on the backend to protect your application from attacks.
You can use the Authentication Core Javascript sample to kickstart your implementation process. It is a starting point which implements the listed concepts.
Updated 4 months ago