
Conditions
With the release of Workflows 2.0, the content in this section has been revised and moved to our new Dashboard > Workflows 2.0 section. This page will be removed within the next few weeks. You should update any bookmarks as soon as possible.
Conditions within the Workflows platform play a crucial role in designing customizable and dynamic user journeys. By utilizing these tools, administrators can create sophisticated verification flows that adapt to the data collected during the verification process. This flexibility ensures that each user's experience is optimized for efficiency and effectiveness.
Conditions
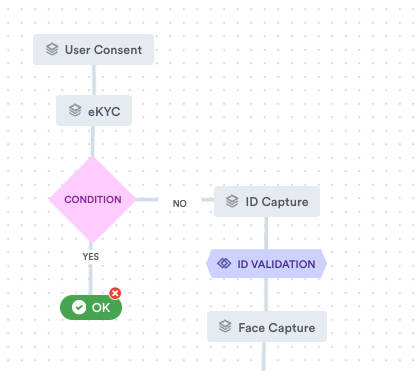
Conditions, or Condition Nodes, are used within workflows to branch the user journey based on the outcomes evaluated by the Rule Engine. They allow for the creation of dynamic paths where different sets of modules can be presented to the user based on specific criteria or user inputs.
The Rule Engine is a powerful feature that allows for the evaluation of complex logic based on the data collected during the verification process. It supports a wide range of rules that can assess the quality of data, the outcome of verification checks, and more.
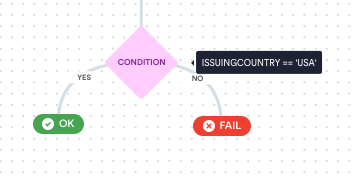
A simple condition to accept document only from United States
Conditions enable:
- Dynamic User Journeys: Tailor the verification process in real-time based on user inputs and verification outcomes.
Ask user to perform additional verification steps based on the risk
- Efficiency and Effectiveness: Direct users through the most appropriate verification path, optimizing both user experience and verification success rates.
- Custom Success Criteria: Define custom criteria for verification success, ensuring that the workflow aligns with specific business requirements.
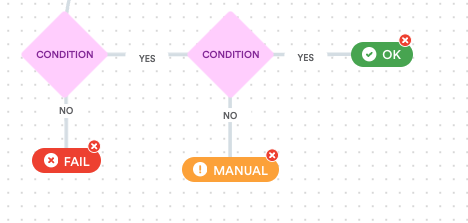
Decide session result based on custom conditions
Configuration
You configure a condition when you add it to a Workflow. This configuration determines what the condition is looking for and what the outcomes after the condition are.
-
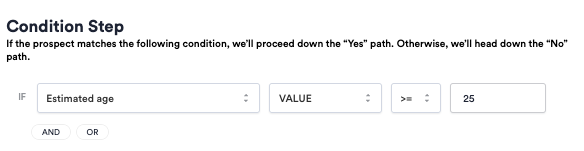
Differentiate user journey for user over and under 25 years
-
Click the + on the Module or Process you want to add the Condition under. On the left, click Condition.
-
Set up the rule expression for the "Yes" path. Anything matching this condition follows "Yes"; anything outside this condition follows "No".
- Use the first drop-down to select the data point the condition should look at. For example, Estimated age.
- Use the second and third drop-downs to select the operators for the expression. For example, VALUE and >=.
- The fourth step is either a drop-down or a text field, depending on the operators selected. Use this fourth step to set the constant for the expression. For example, 25.
- You can use the logical operators AND and OR to add more rule expressions to the Condition.
-
When you are satisfied with your Condition settings, click Save.
-
In the Workflow editor, click Y on the Condition node to add the next step in the "Yes" path. Click N to add the next step in the "No" path.
Continue building the Workflow, adding Modules, Conditions, and Processes until you are satisfied. Click Next, then configure the Workflow Settings.
Best Practices
- Keep Conditions Simple. Instead of creating a single complex condition, link multiple Condition Nodes one after another. This approach makes the workflow easier to understand and manage and gives a better view on which path user went through
- Utilize Logical Operators. If a simple condition doesn't quite meet your needs, use AND and OR operators to create exact conditions that reflect your specific requirements.
- Monitor and Adjust. Regularly review the performance of your workflows. Adjust rules and conditions based on real-world outcomes to continuously optimize the verification process.
- Plan for All Outcomes. Ensure that every possible path through the workflow leads to a clear result, avoiding any dead ends that could confuse users or disrupt the verification process.
Updated 21 days ago