
ID Capture (Old version)
Design overview of ID Capture, a module of the Incode identity verification platform
The Incode ID Capture module lets users scan and verify identification documents like driver's licenses and passports. The module uses advanced OCR technology to accurately extract data such as name, date of birth, and document number. It also includes built-in verification checks to ensure the presented ID is authentic.
ID Capture Module Flow
Overview
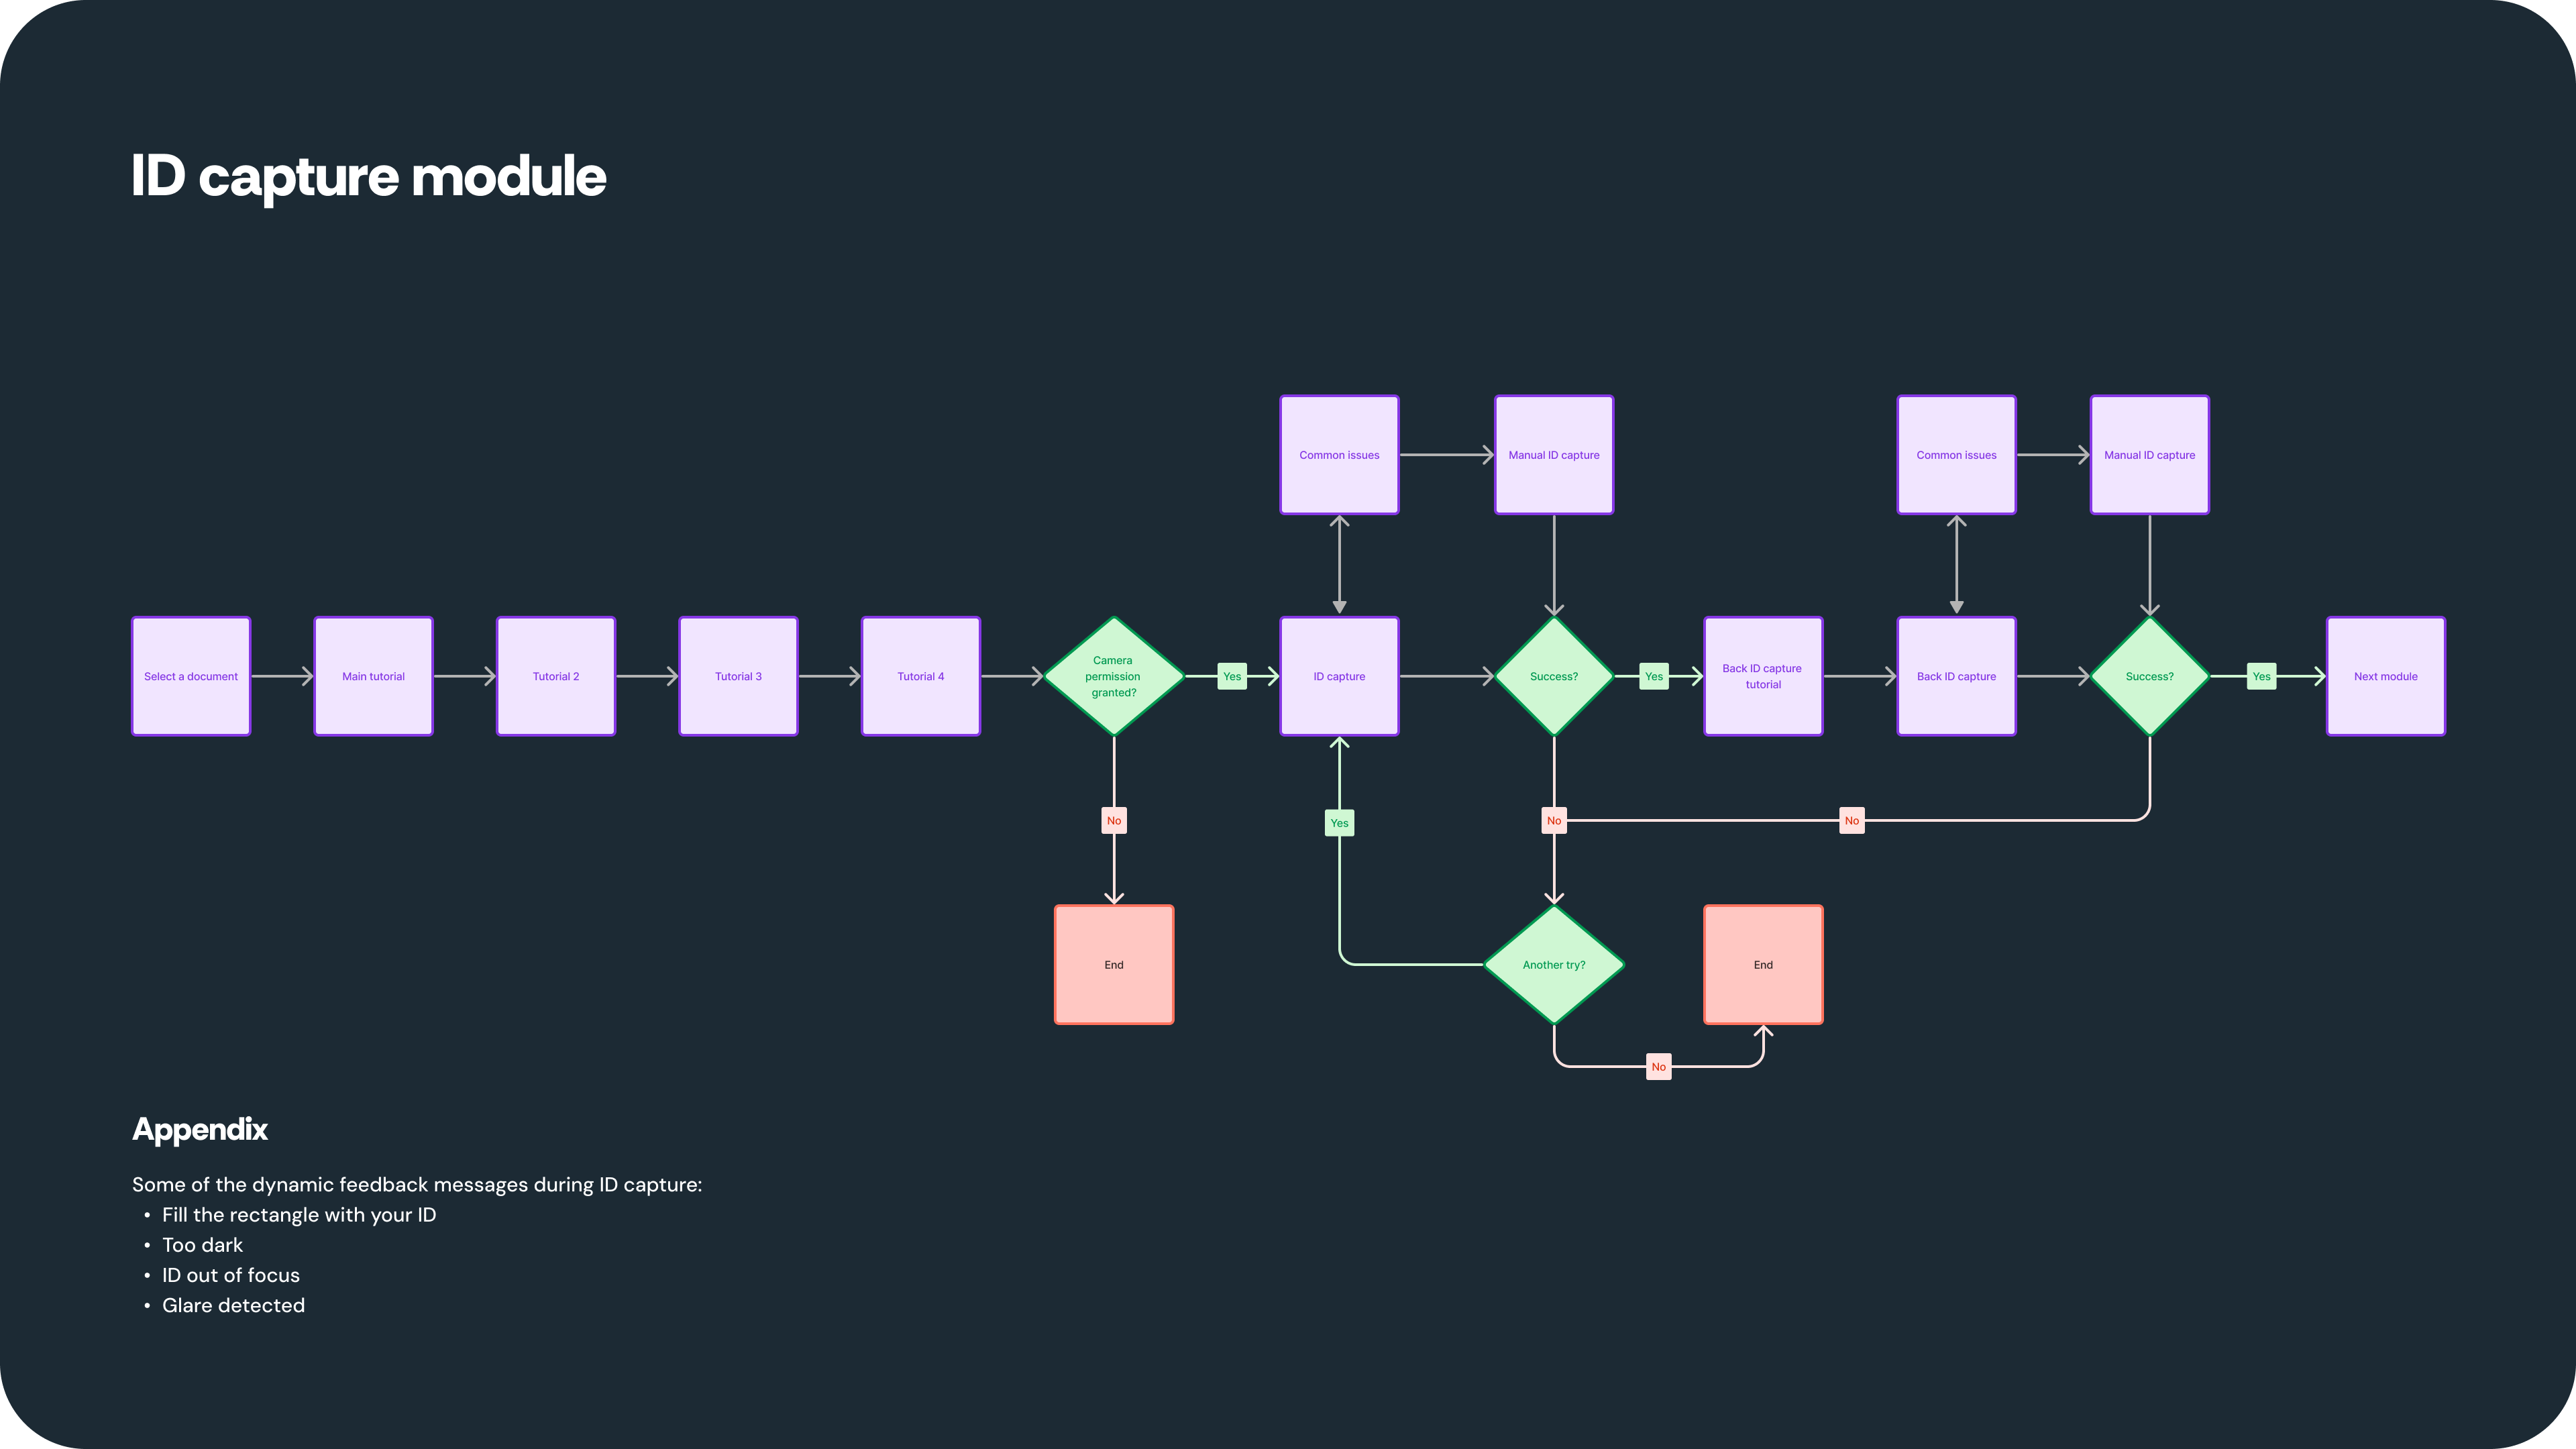
ID Capture module flow diagram
Successful capture
Watch the ID capture module in action:
Module Screens
Document Selection
The document selection screen displays options for supported documents and lets the user select the type of document they want to scan. The user's selection determines the tutorial shown in the next step. For a card-type ID, the tutorial shows front and back ID capture. For a passport or visa, the tutorial shows capture of a main page with photo.
The module doesn’t present more specific options, like type of ID, to the user. The document type is validated on the back end. If the ID type is not supported, the user receives that feedback during the capture.
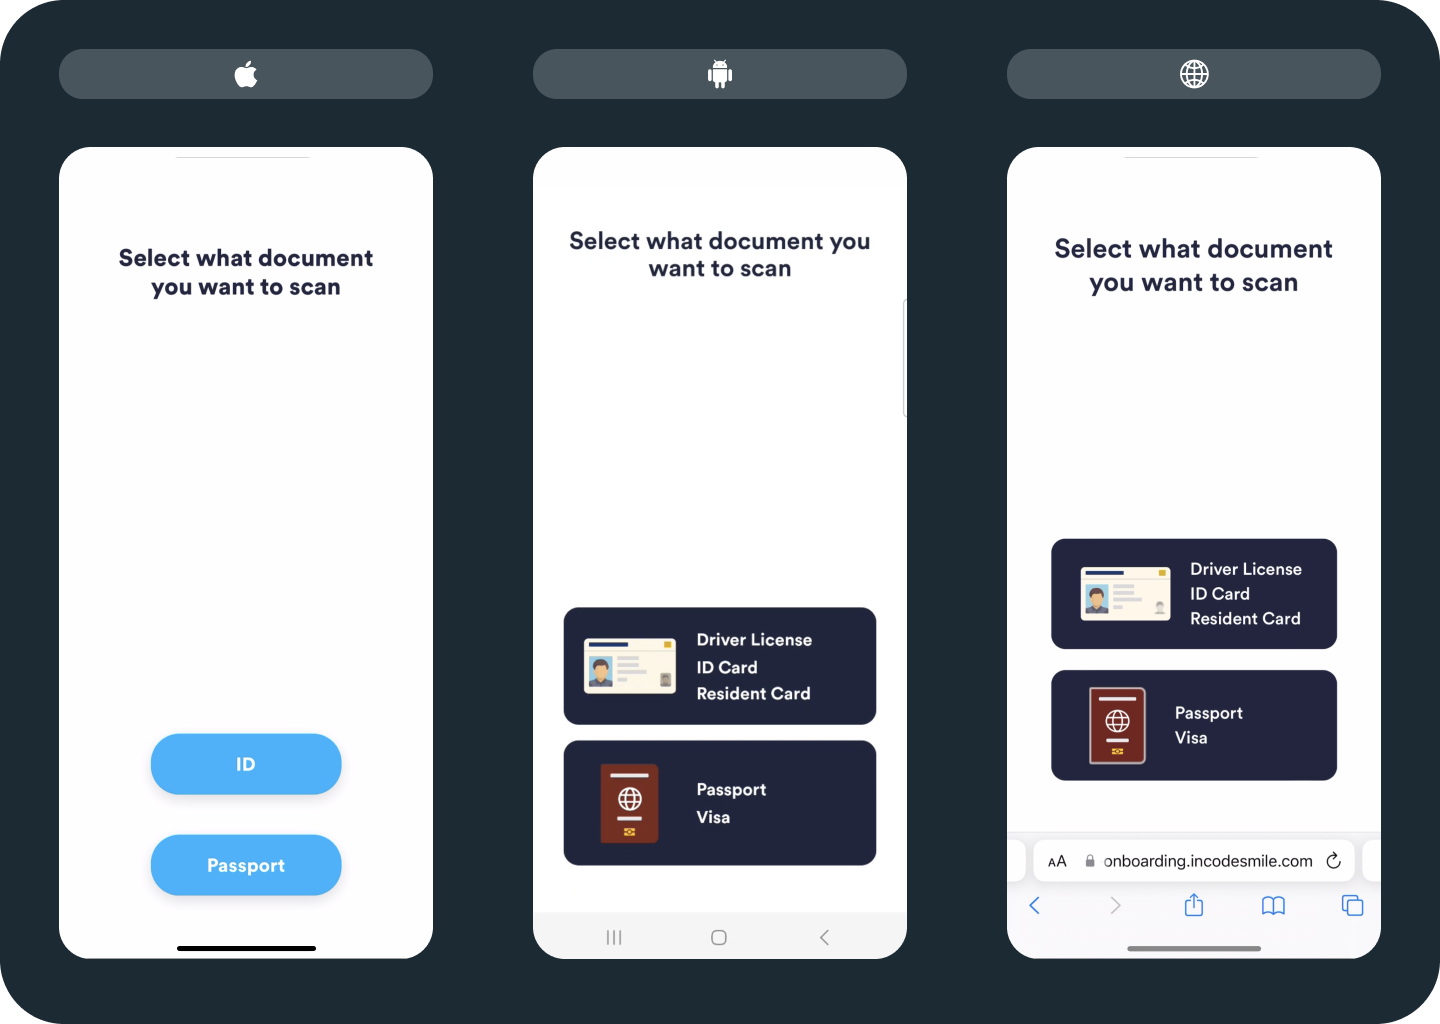
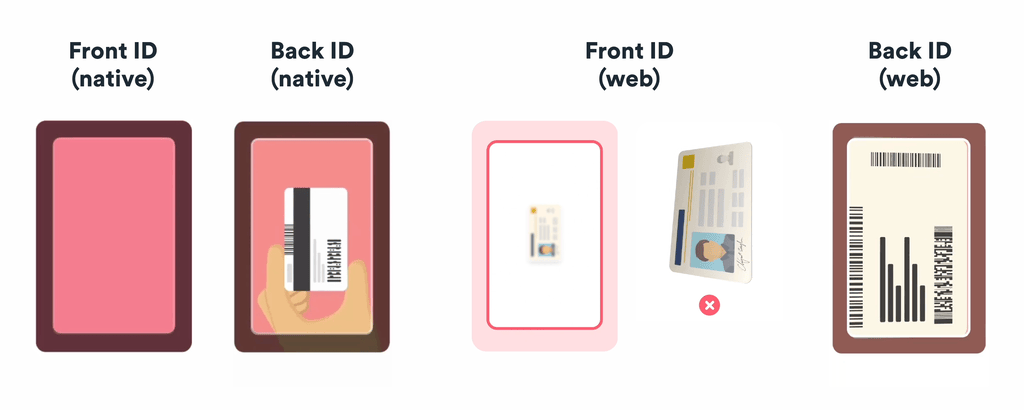
Difference between iOS, Android, and web (browser-based) screens
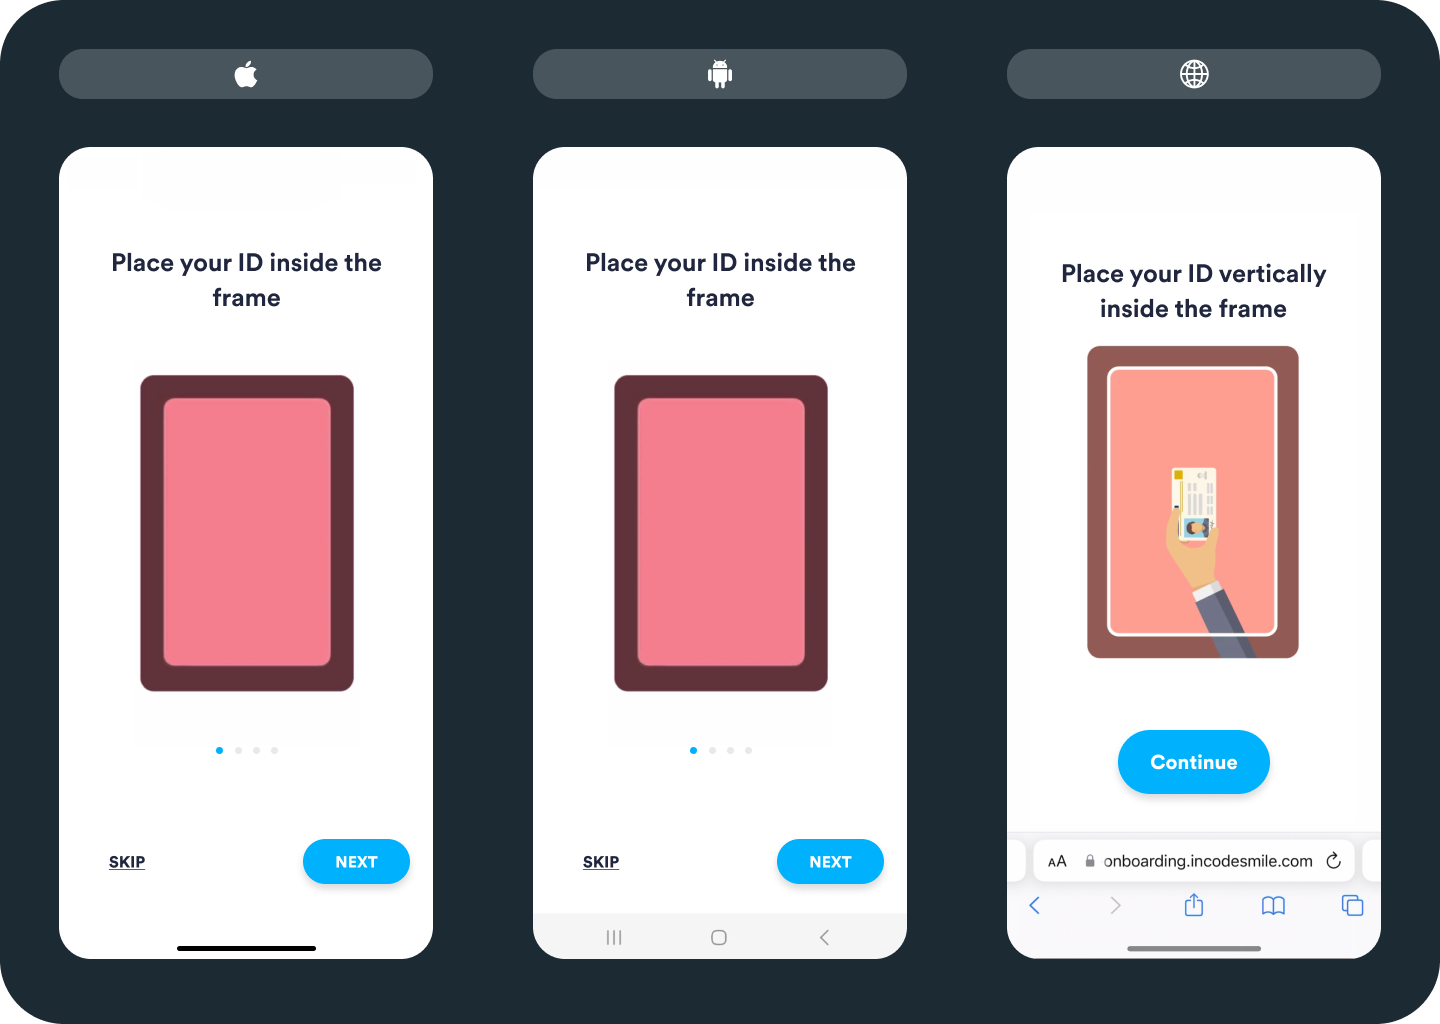
Tutorial Screens
The first ID Capture tutorial screen shows users an animated video demonstrating how to position their ID within the frame. After the initial loop of the video, users can choose to skip or proceed.
Additional tutorial screens highlight common issues during ID capture. Users have the option to skip these screens and proceed directly to the capture experience. The number of tutorial screens may vary depending on configuration and whether the capture is mobile or web-based.
The following images show these screens for iOS, Android, and web.

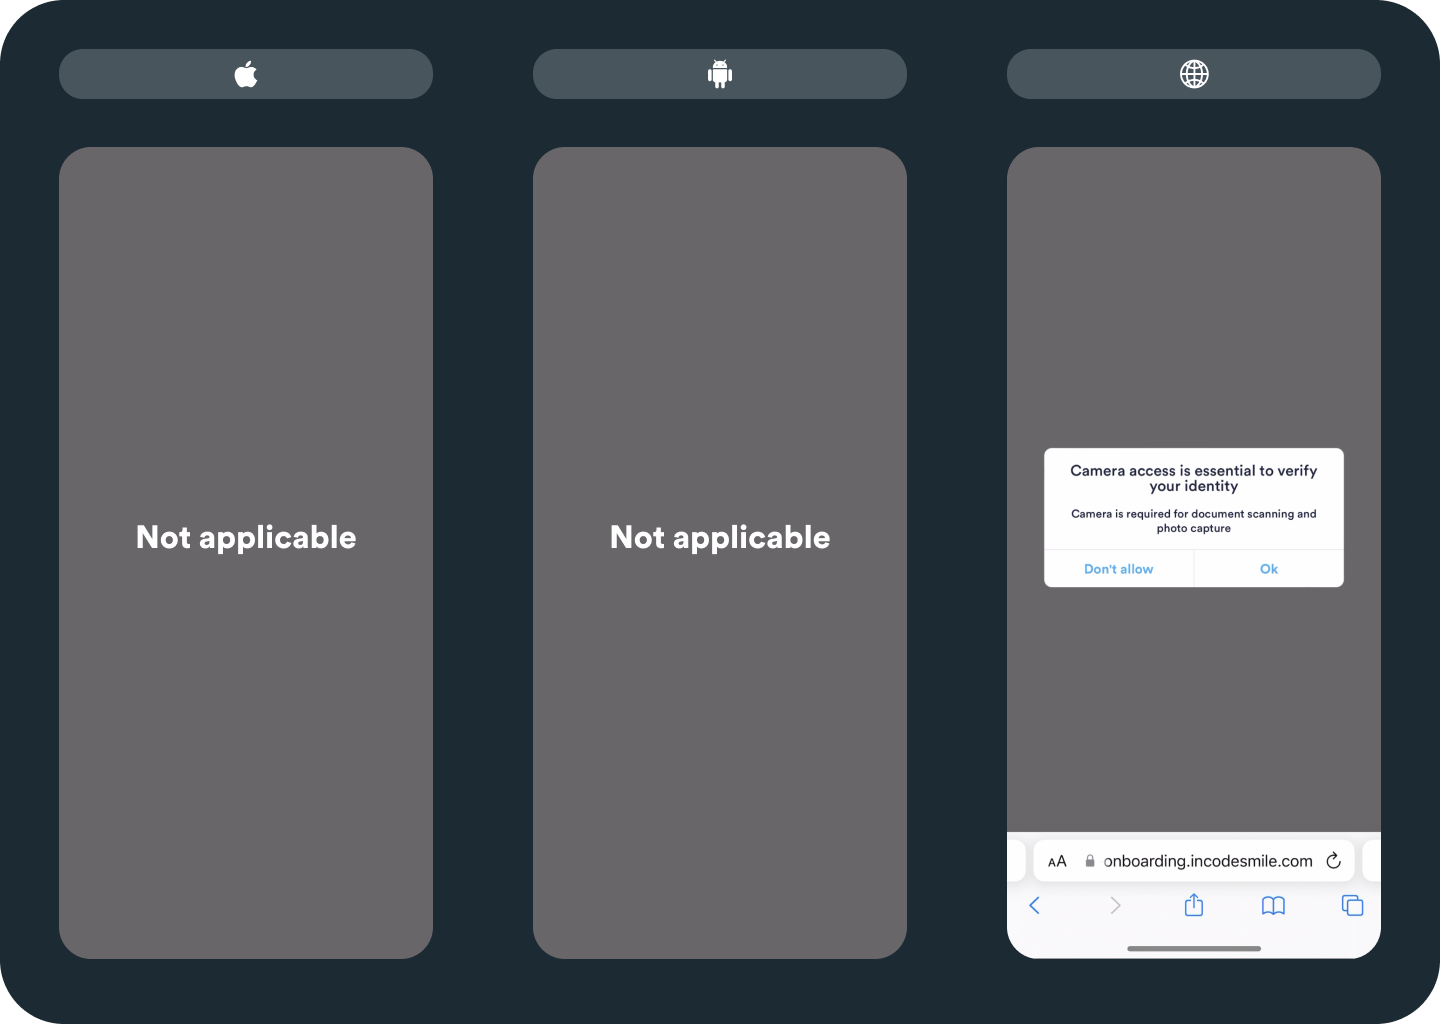
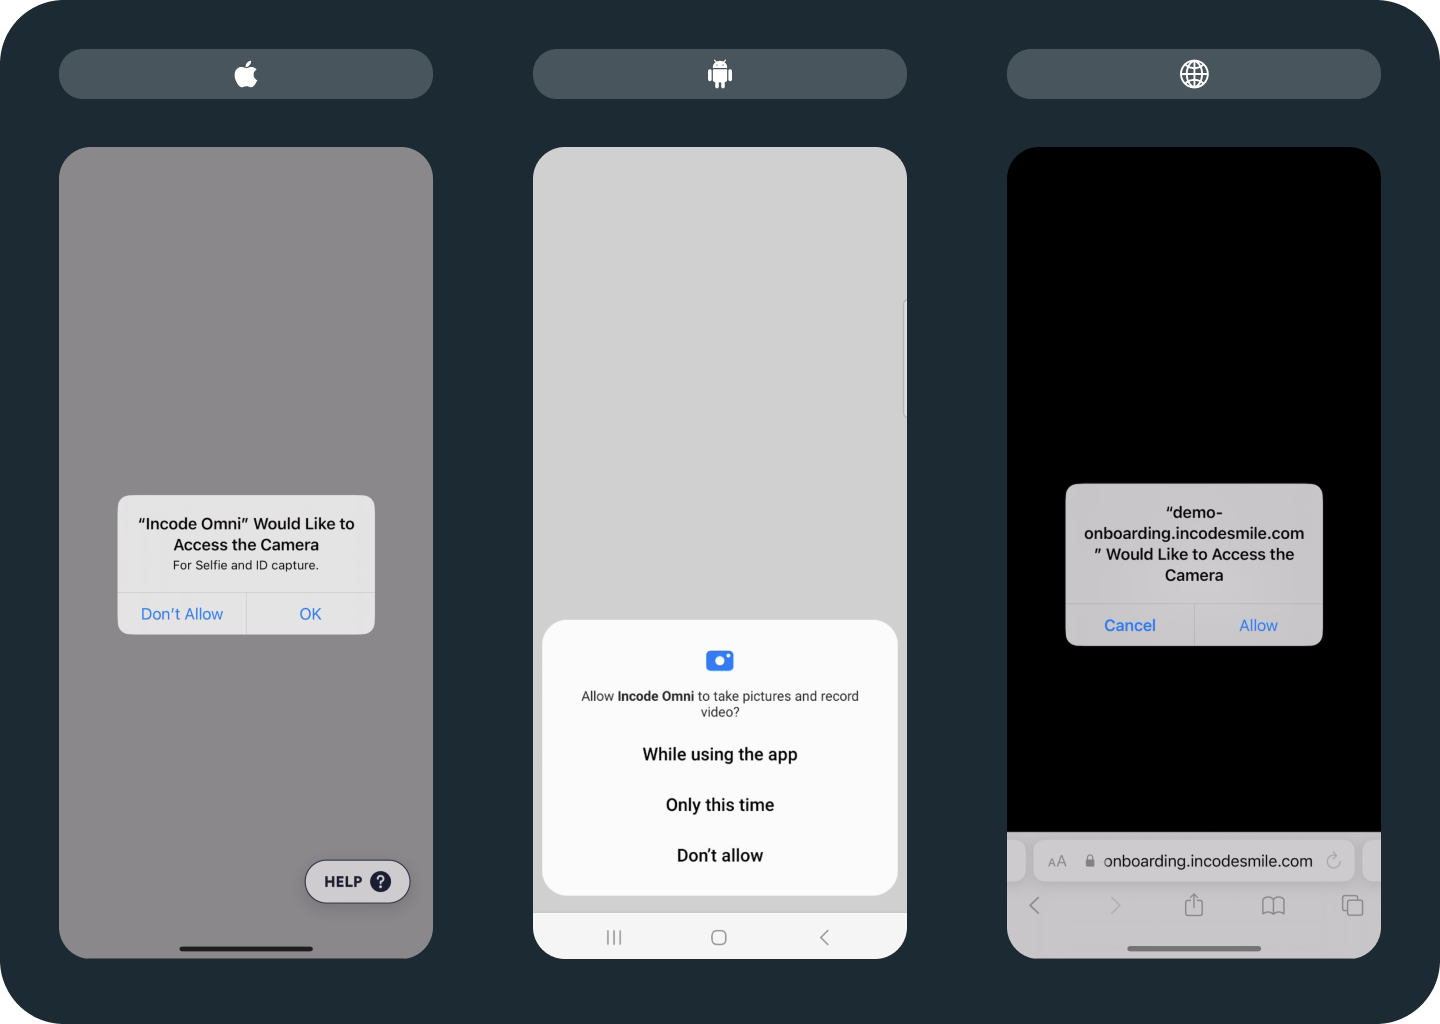
Permission screens
An optional screen can be enabled for web. It informs users about the importance of granting necessary permissions before proceeding with the actual permission prompt for the module.
The permission screen presents two options to the user. They can select “OK” allow Incode to use the device camera. If they select “Don’t allow", a screen opens so the user can enable the camera permission manually in their system settings.
The following images show the optional screen and then the permission screen.
Capture screen
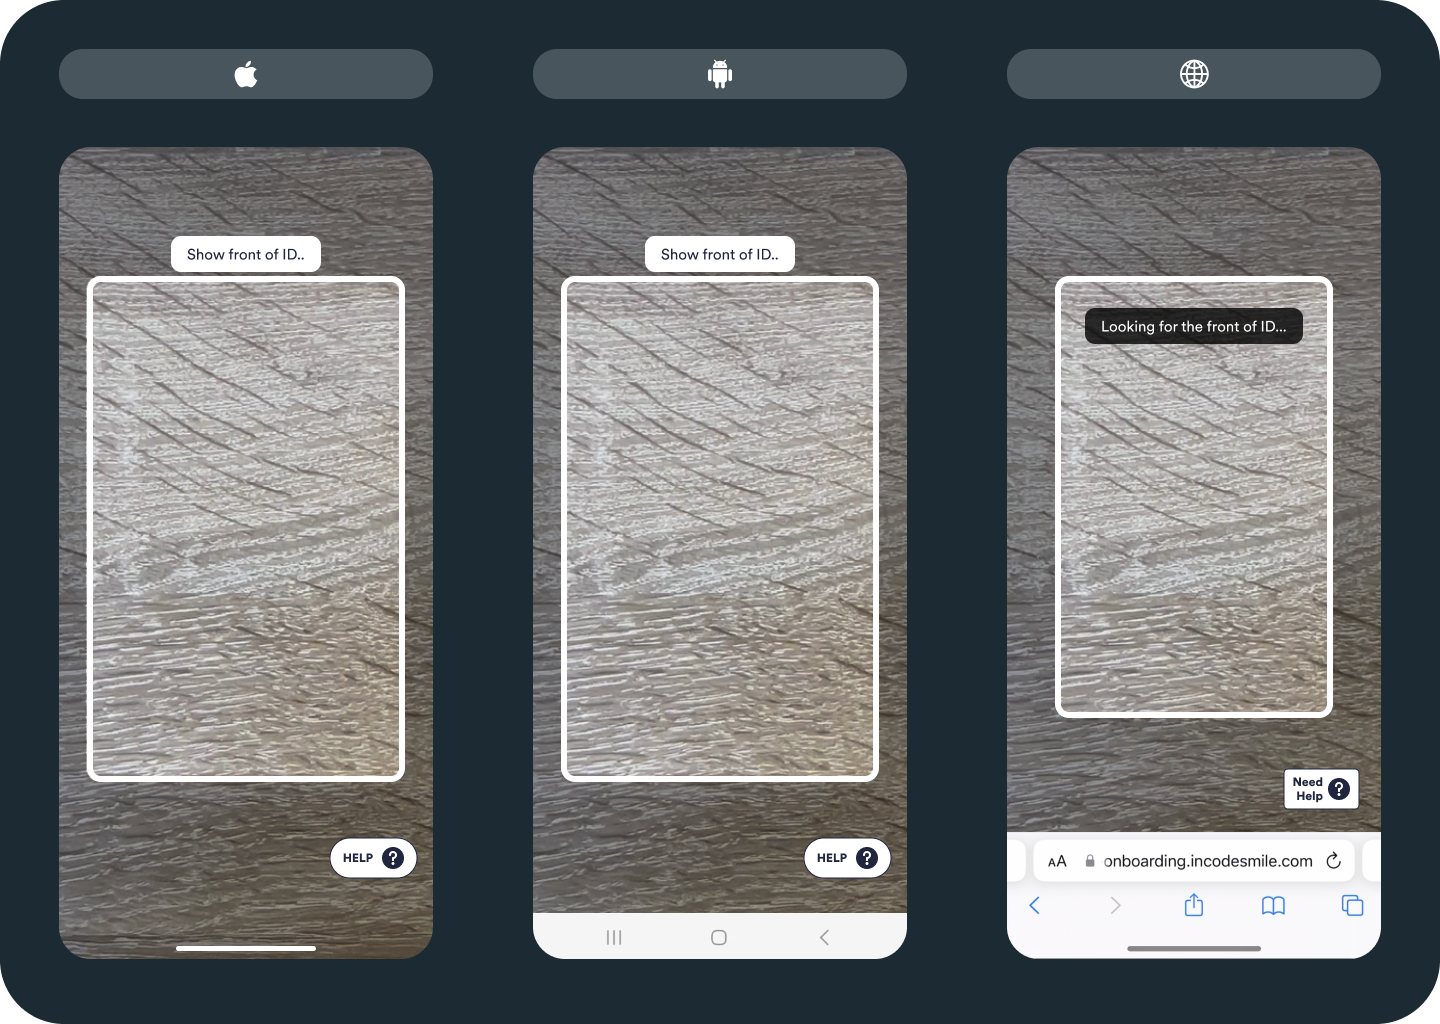
The main capture screen is illustrated in the preceding image. It consists of several elements:
- ID capture frame: Border changes as the capture progresses (see the "ID capture progress" section)
- Feedback message (top): Coaches the user through the experience with instructional phrases
- Feedback message (center): Dynamic feedback based on context (see the next section)
- Help button: Opens Common issues screen
- Overlay graphic (optional): Helps the user position the ID correctly. By default, positioning is vertical, but horizontal capture is also supported.
Feedback messages
The following image illustrates one of the dynamic, context-based messages a user might see. The table below the image provides additional examples of these messages.

| Message | Appears When... | Platform |
|---|---|---|
| Fill the rectangle with your ID | There is no ID in the camera feed. | All |
| ID out of focus | The camera is not focusing on the ID. | All |
| Glare detected | There is harsh light on the ID which makes the information on it hard to see. | All |
| Too dark | The ambient light is so low that the information on the ID is hard to distinguish. | All |
| Show the front of the ID | The back side of the ID shows when the front side was expected | All |
| Show the back of the ID | The front side of the ID shows when the back side was expected | All |
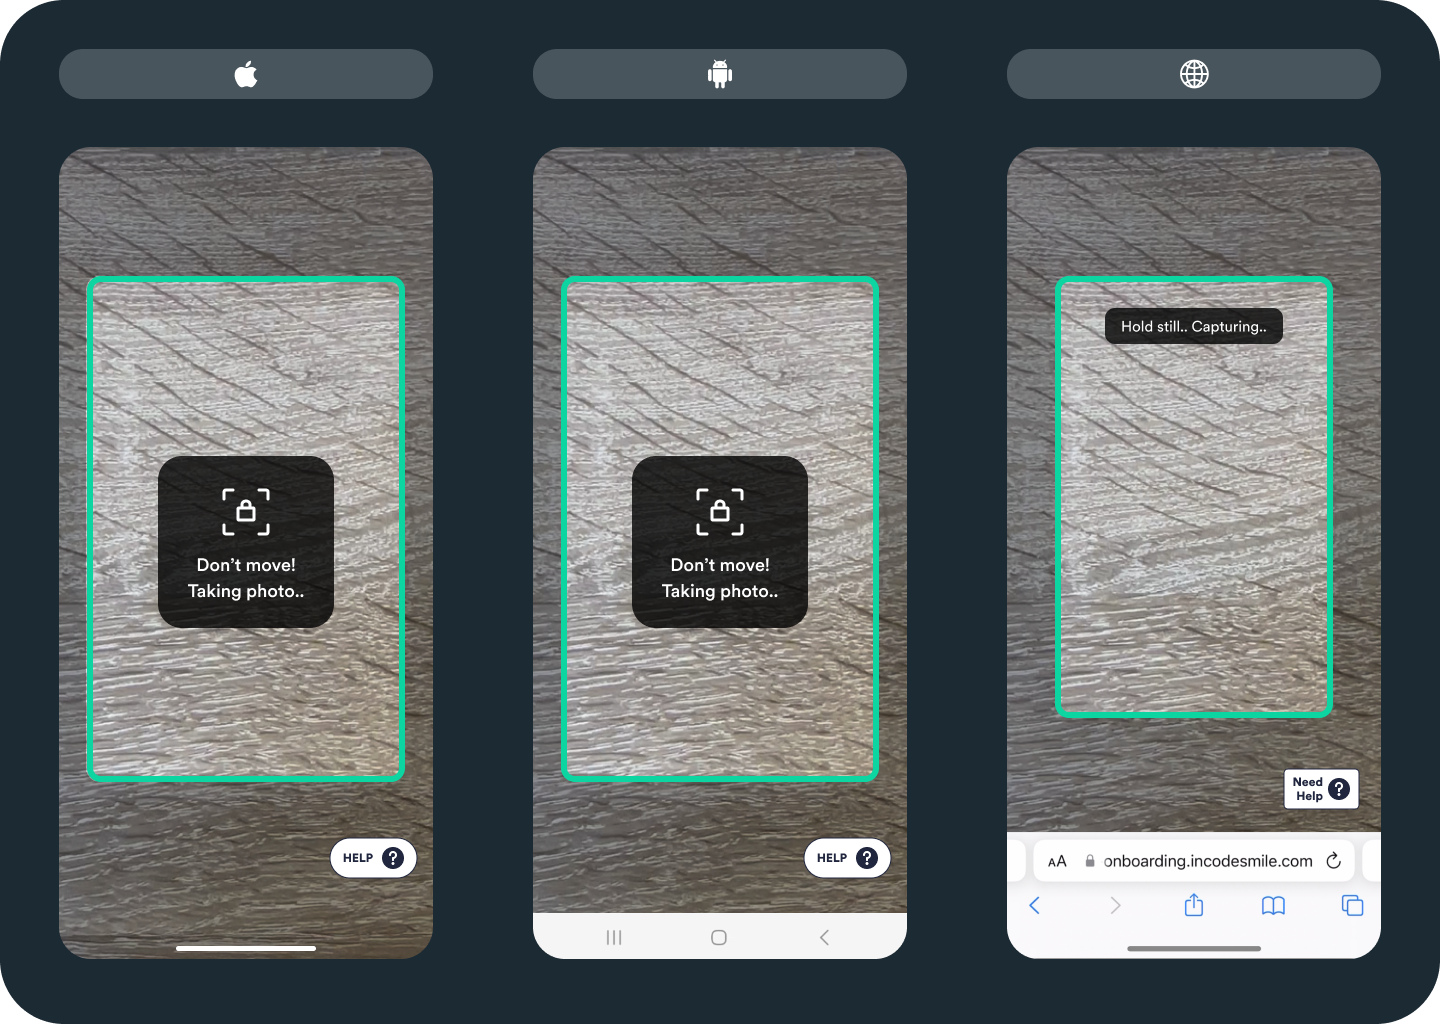
ID capture progress
The main capture screen waits while the user positions the ID within the capture frame. The border of the frame is initially white. When an ID is properly positioned, the border changes to blue, a message appears, and the capture process begins. The exact positioning and wording of the message may vary depending on configuration and whether the capture is mobile or web-based. The following image illustrates this screen when the ID is ready to capture.
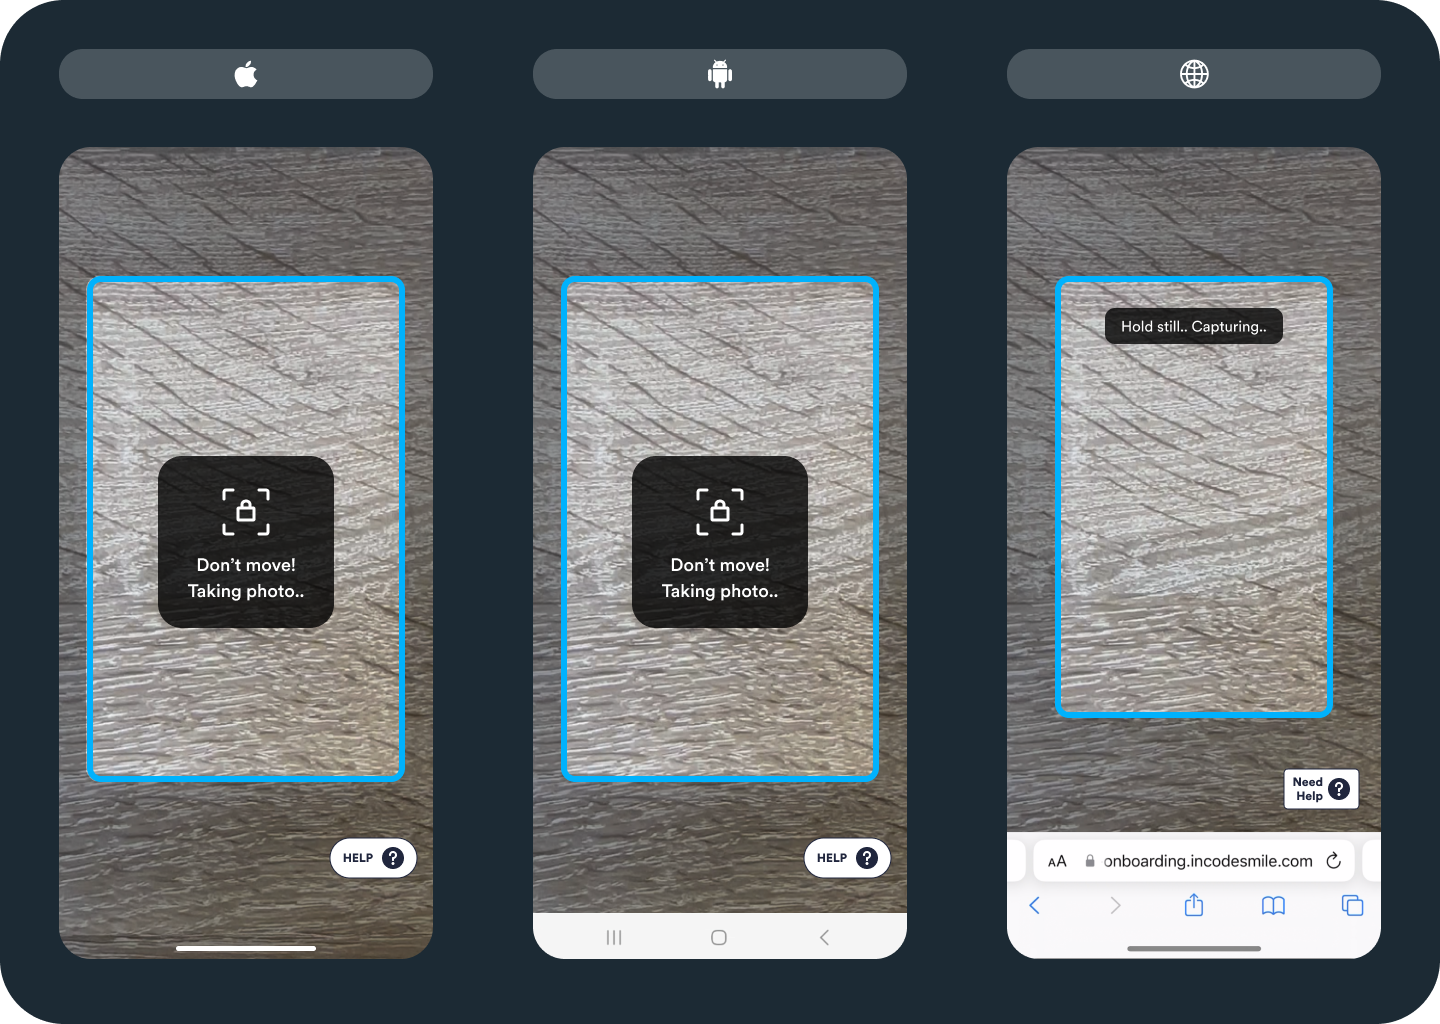
NoteYou can optionally show a countdown after automatically capturing the first frame of the ID, instead of the message.
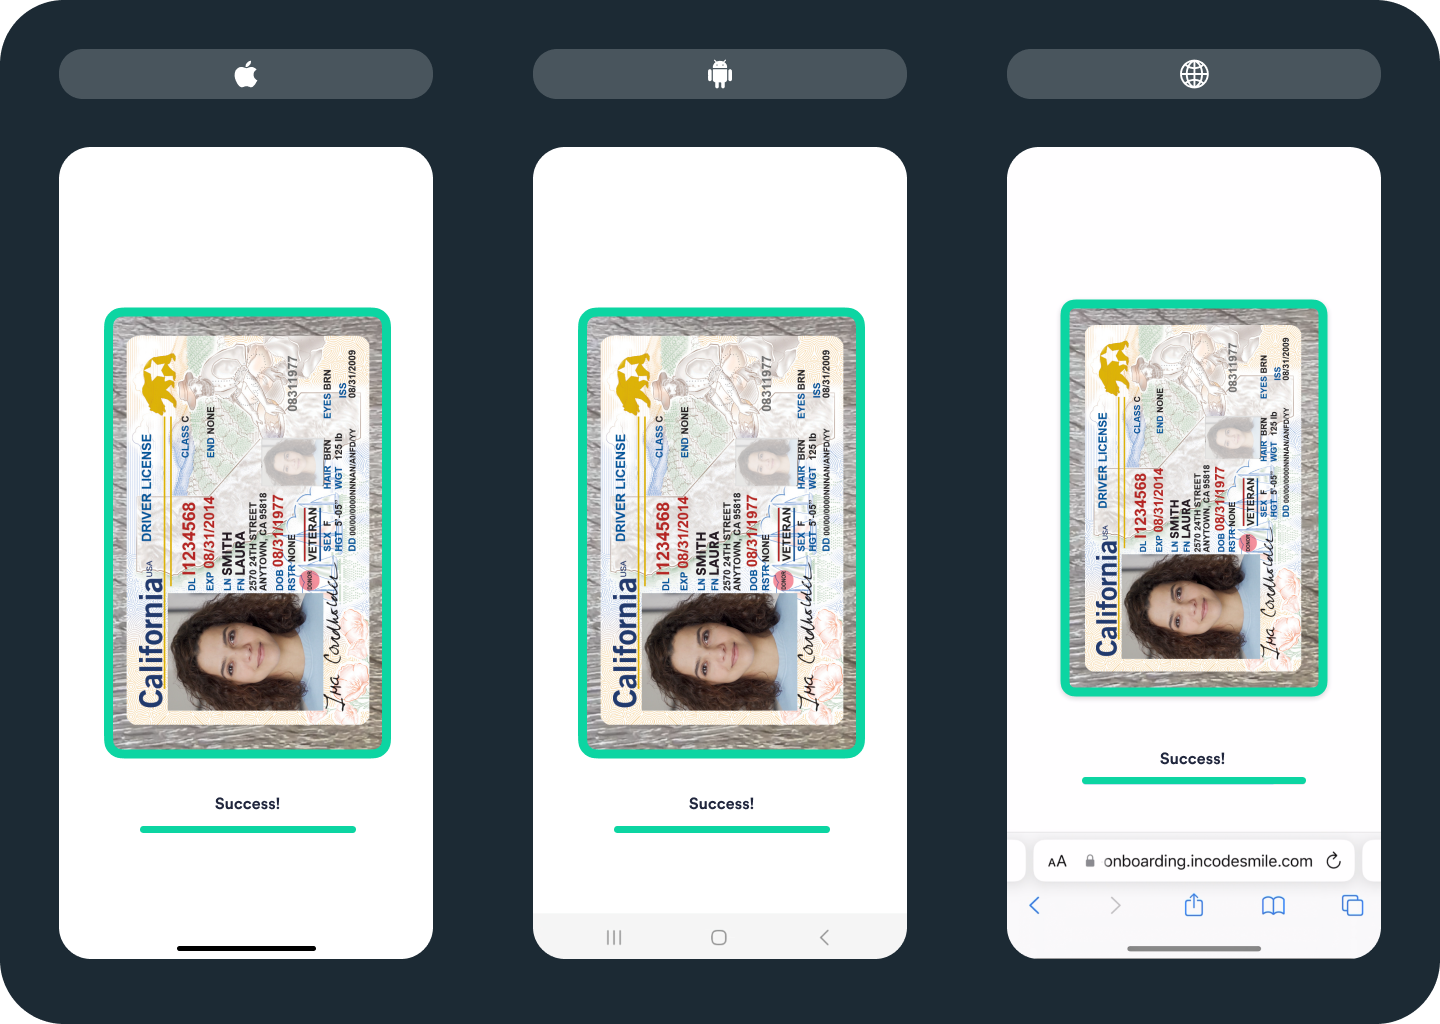
Once the ID capture module successfully captures and verifies the ID against image standards, the border briefly flashes green before progressing to the next screen, as shown in the following image. If the capture is not successful, the border turns red and a message appears.
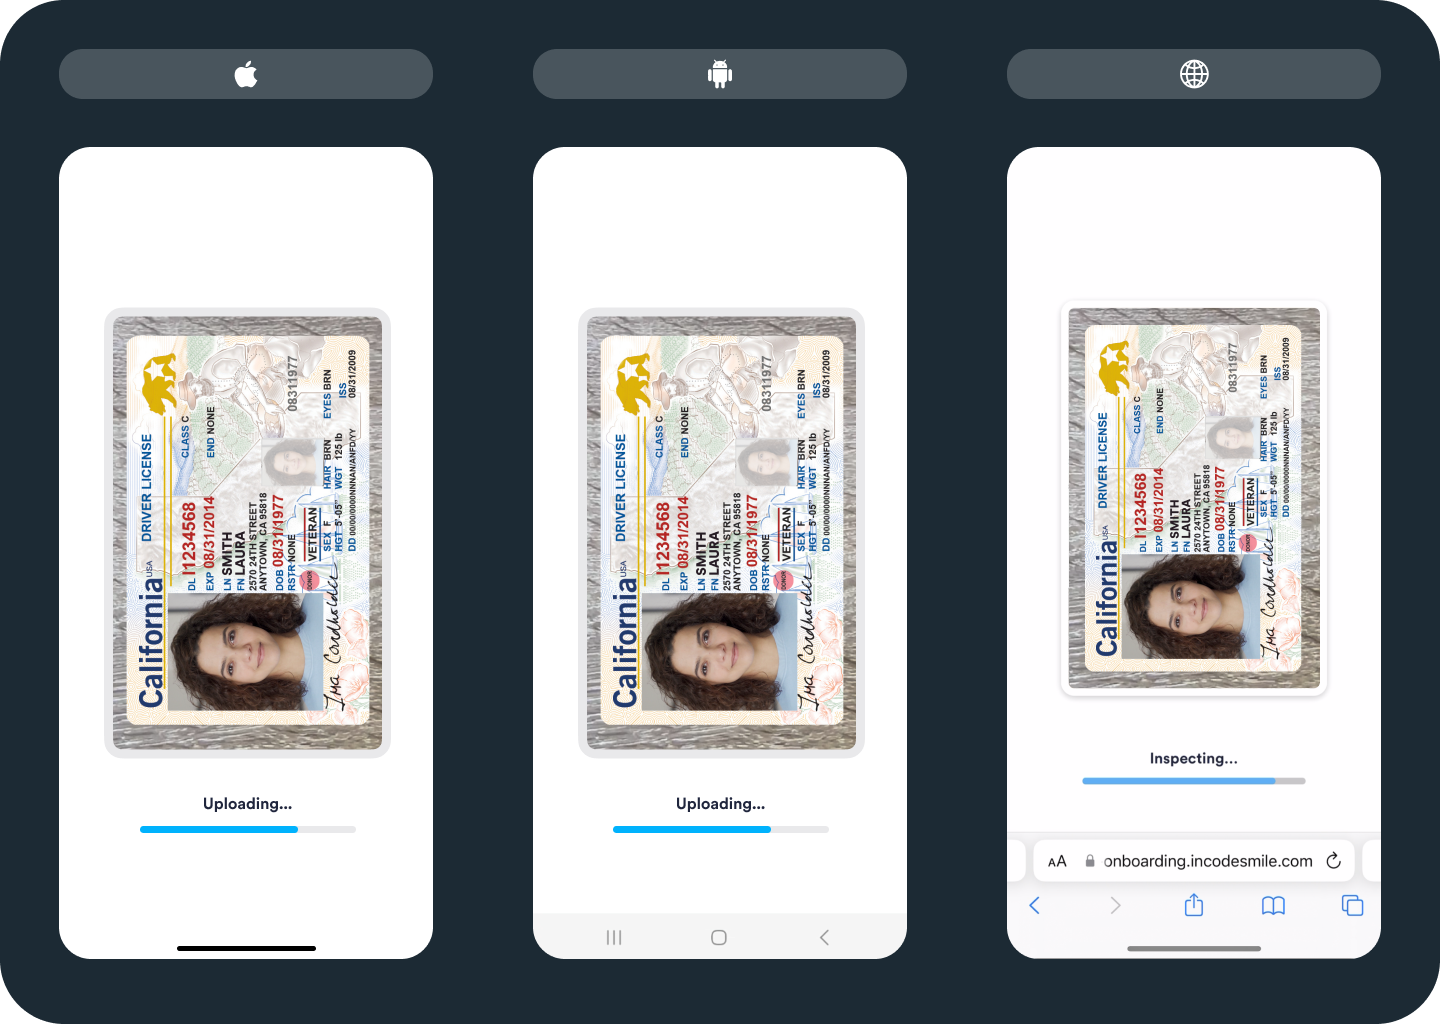
ID uploading
Throughout the upload process, users see continuous progress feedback, as shown in the following image.
The following image illustrates successful capture completion. The border color turns to green and a success message appears. This message improves feedback accessibility for users with red/green color blindness.
Review photo screen
You can optionally enable this screen, which prompts users to review the captured image before proceeding. This can enhance the likelihood of a successful capture. We recommend it for organizations where many users choose to capture images manually. This screen is illustrated in the following image.

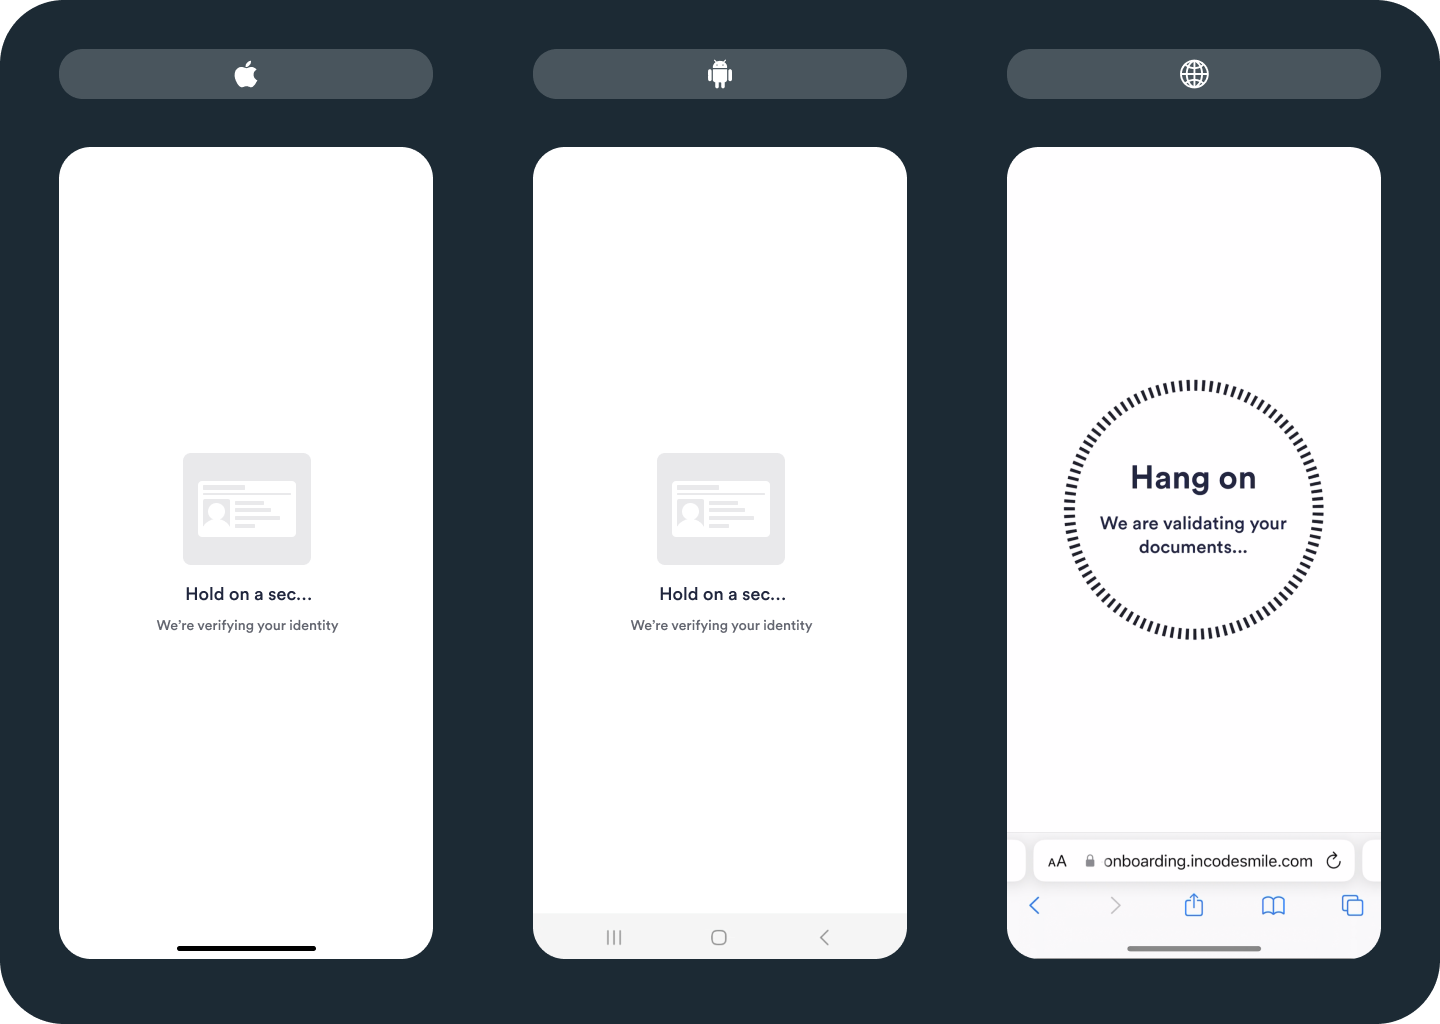
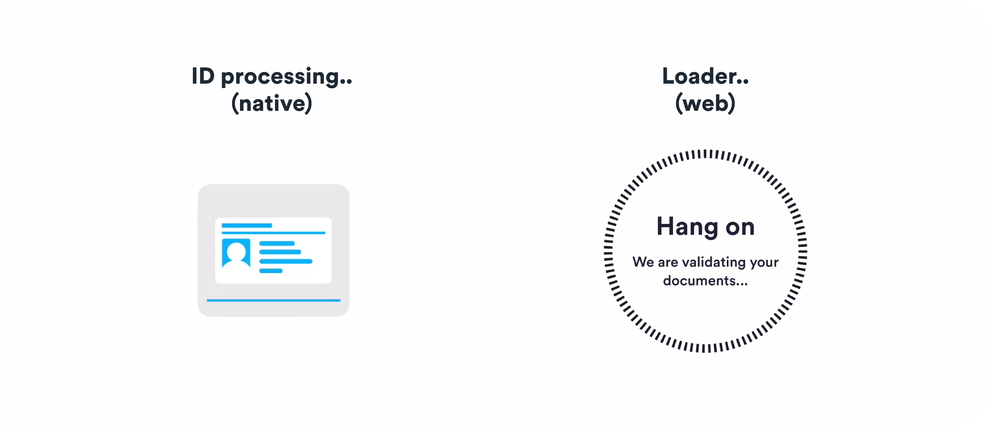
Verifying screen
This screen, known as a "custom loader", appears between the captures, while the data from captured images is being processed. It reassures users that the verification is progressing as intended. The following images show the on-screen images in both still and animated formats, so you can see how they differ depending on whether the capture is mobile or web-based.
Unsuccessful Attempts
While the majority of captures are completed successfully, some attempts are unsuccessful. This section explains the most common reasons for these edge cases.
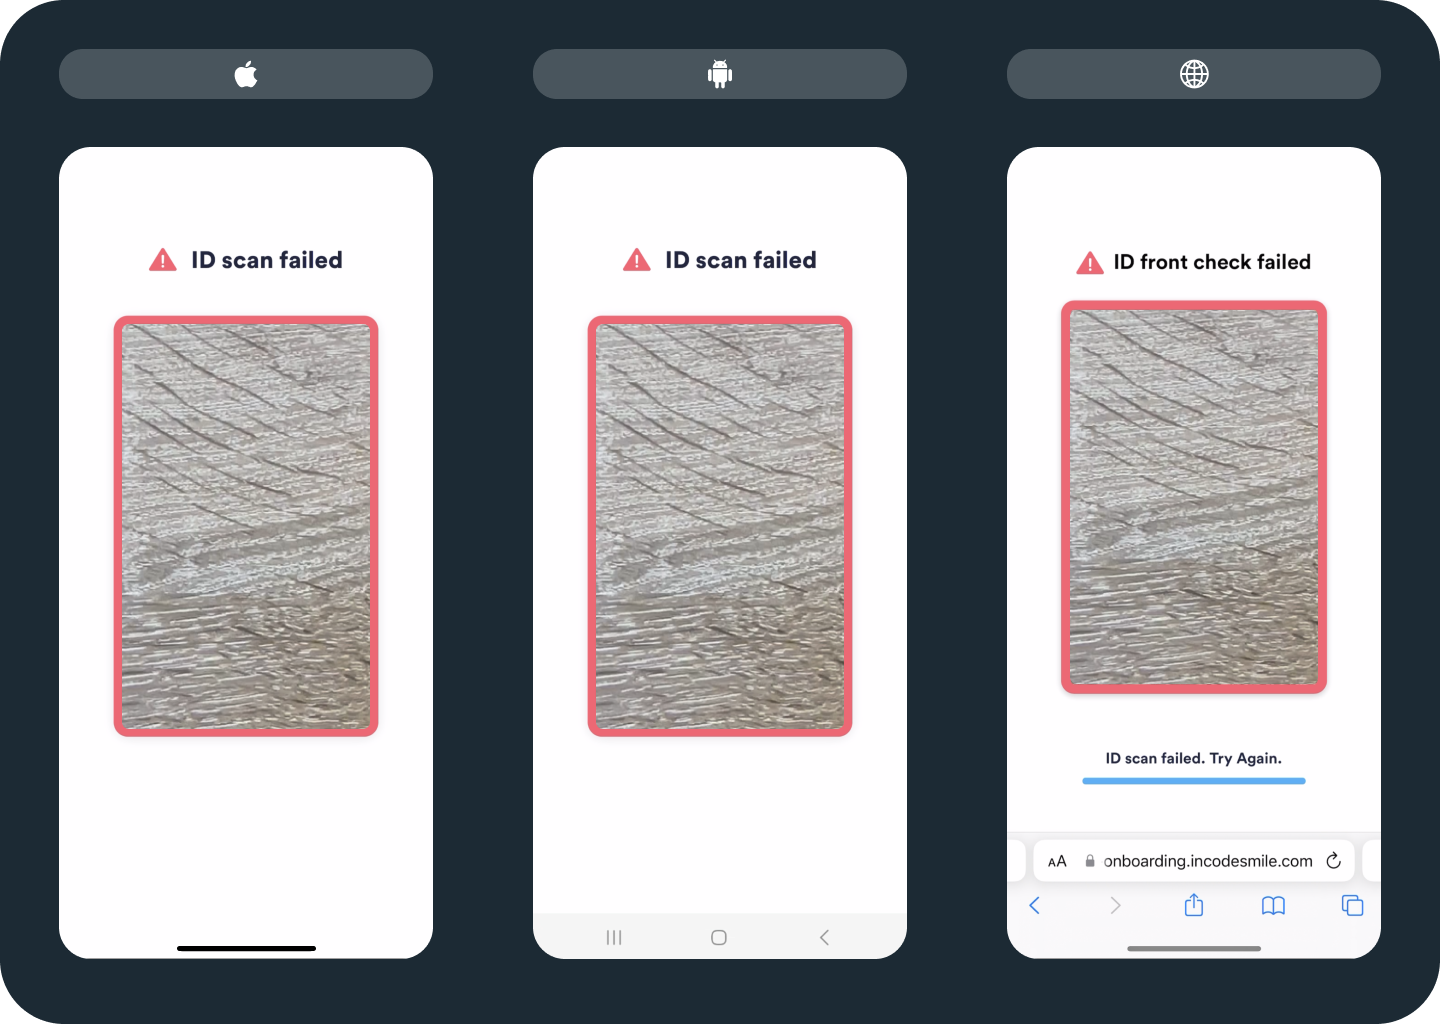
Uploading failure
There are several reasons why we might fail in processing the ID image. For example, there could have been uncorrected glare on the ID. It might have been too dark to take a good picture. Internet connection issues might have interrupted the attempt.
Incode also limits the number of attempts as a security feature. This limit can be configured from the Dashboard. If the user exhausts the number of configured attempts, onboarding stops. In this case, we show a screen telling the person they can’t continue the flow. The following image shows an unsuccessful attempt.
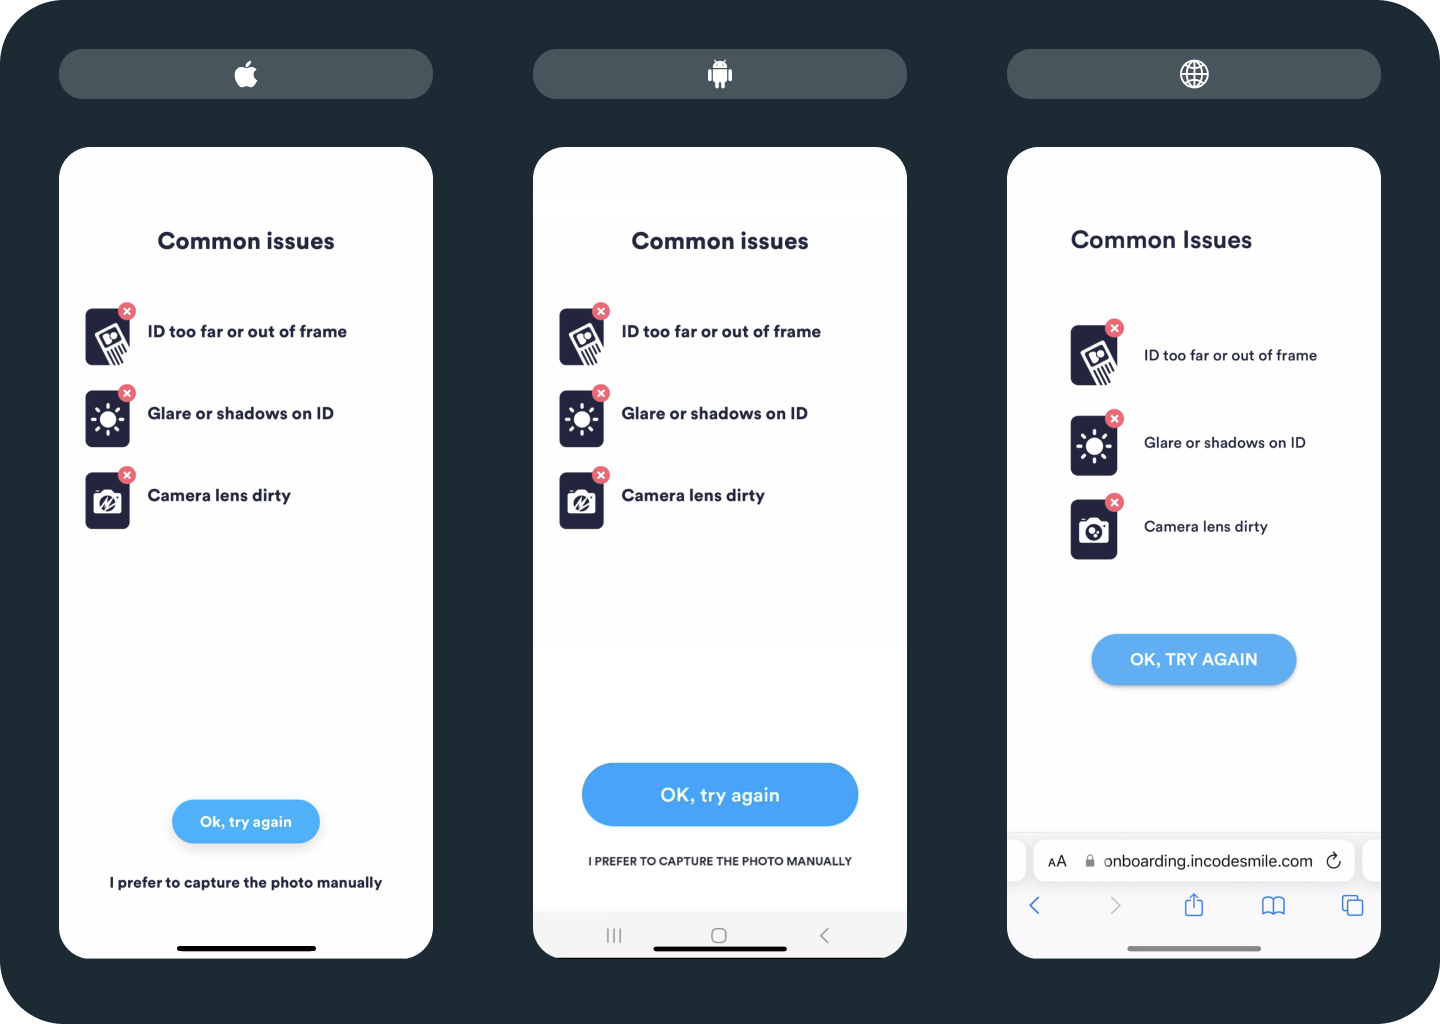
Common issues screen
Users see this screen when they press the “help” icon during the ID capture. Based on empirical data, the three main issues that occur during ID capture are:
- ID is too far out of the frame
- Glare or shadows on ID
- Camera lens dirty
These three issues are suggested to the user on the Common issues screen for possible correction. The user can press “Ok, try again” to return to the automatic ID capture. If they press “I prefer to capture the photo manually”, the module opens the manual capture screen (see the next section).
The Common issues screen is illustrated in the following image.
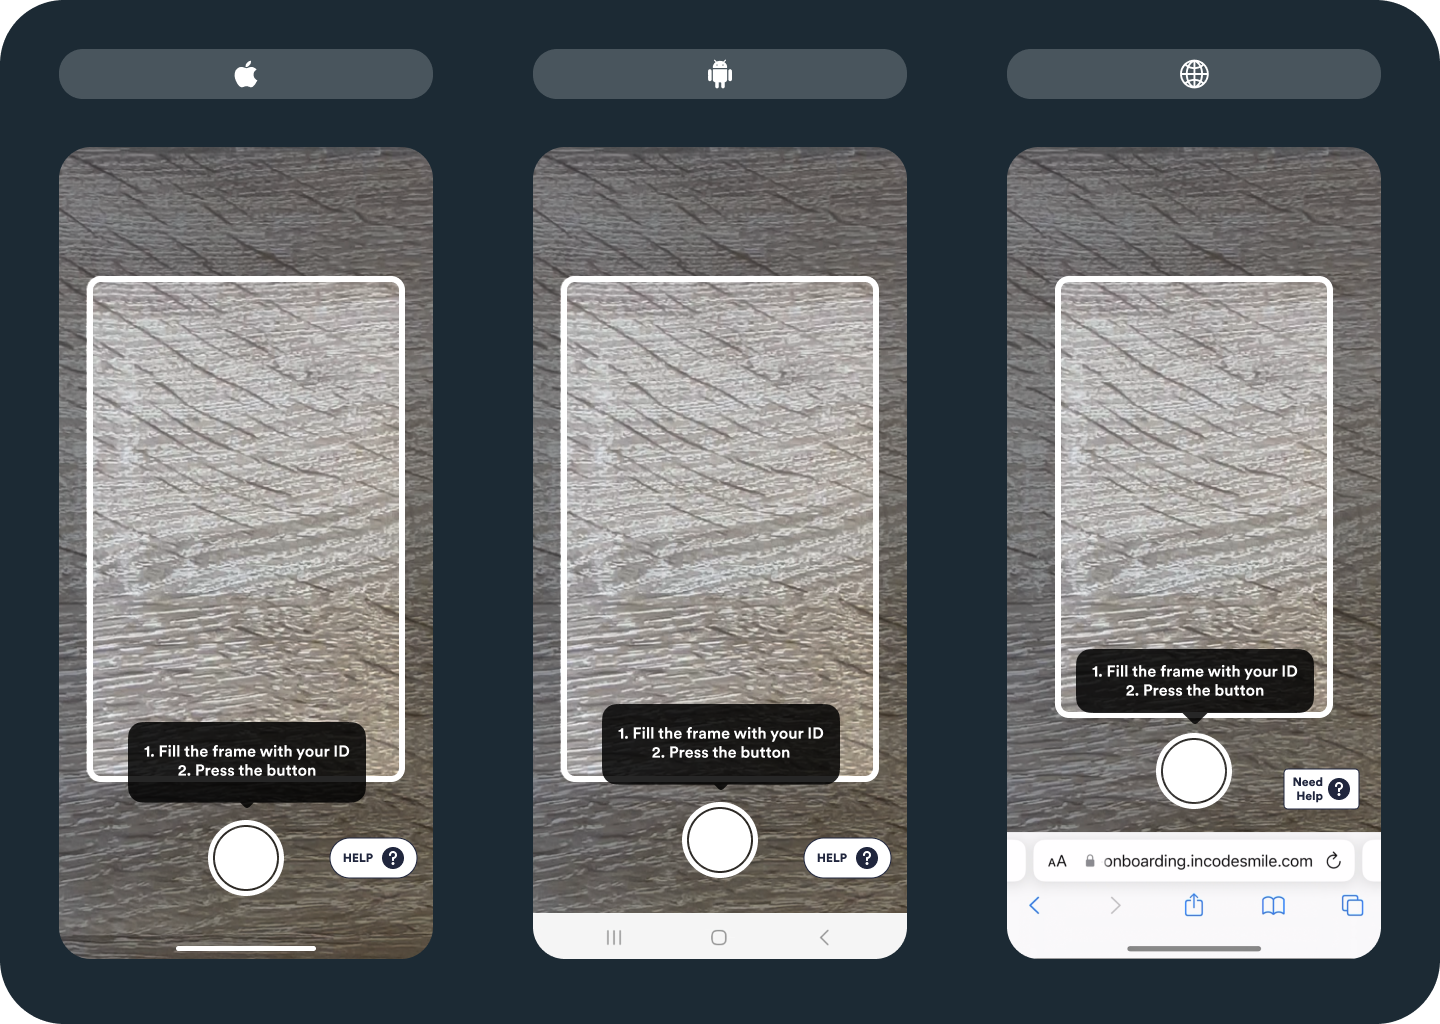
Manual capture screen
In the Incode Dashboard, you can configure the number of seconds that the default, automatic capture is enabled. When this time limit is reached, the capture changes to “manual capture mode.” The user is prompted with instructions for completing the capture manually. Manual mode can also be triggered manually from the “Common Issues” screen, as explained previously.
Redirecting to manual capture provides an alternative in cases where the automatic capture might not work for some reason. The following image illustrates the manual capture screen.
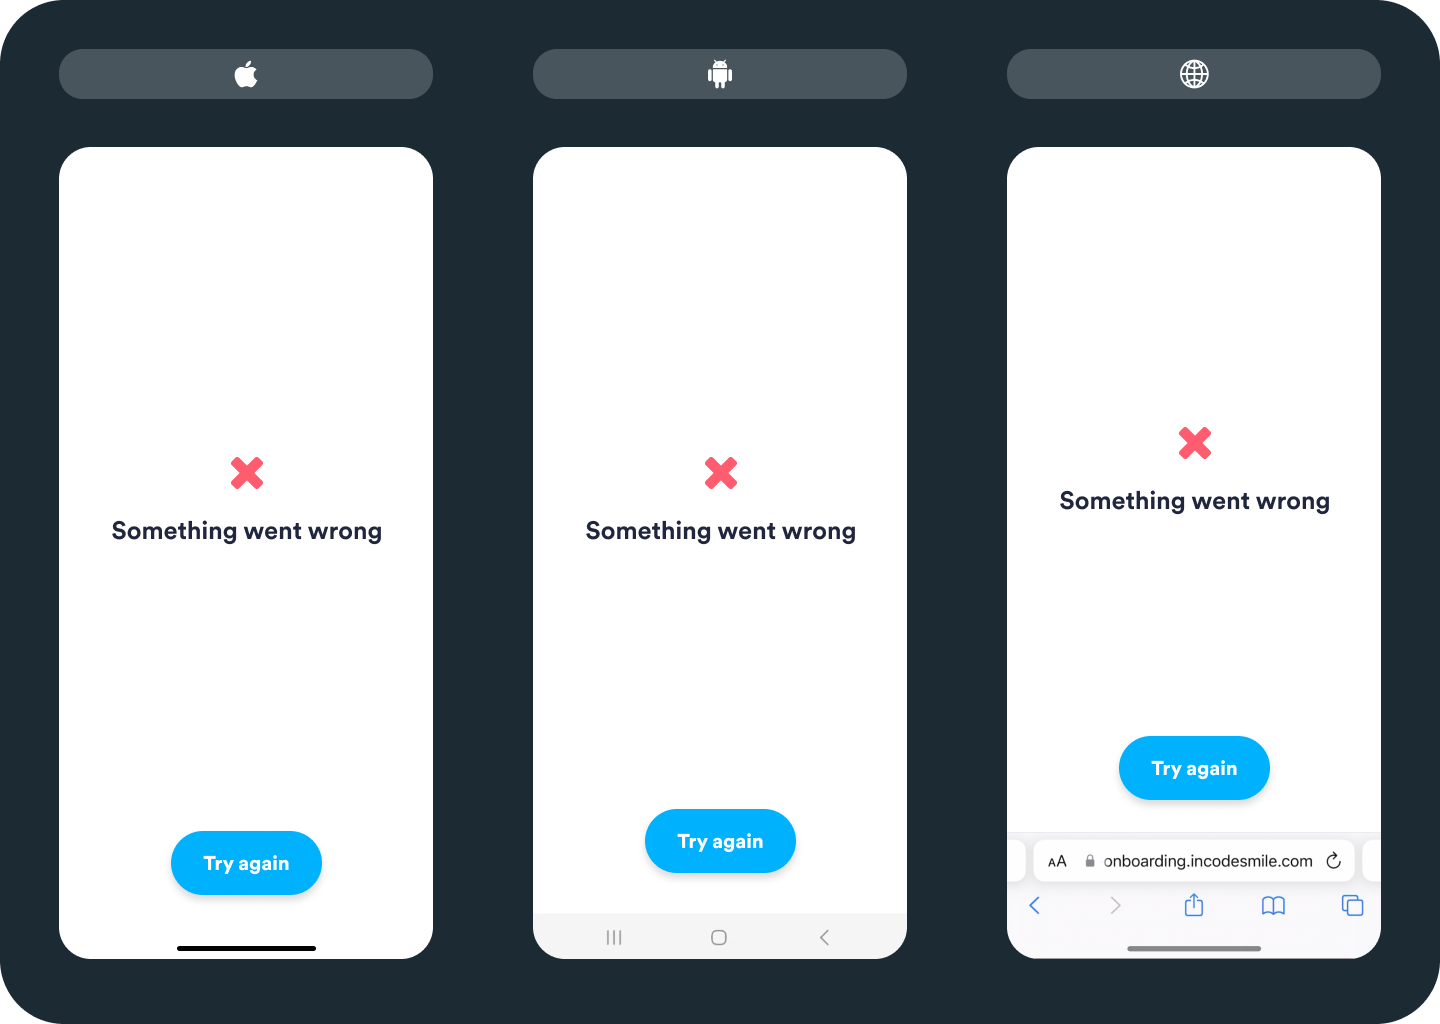
Verification failed
Sometimes an entire verification may fail if an error occurs during or after ID capture. Users may try again if your Incode implementation is configured to allow it. The following image illustrates the verification failure screen.
Customization
For this module, customization options vary across platforms and screens. Here are the customizable elements:
Global customization
| Elements | iOS | Android | Web | Comments |
|---|---|---|---|---|
| Page fill | ||||
| Background Color | 👍 | 👍 | 👍 | Limited to these specific screens: “Document selection”, “Tutorial”, “Common issues”, “Uploading”, and “Review”. On Android, possible for all screens except "Selfie" and "Video Selfie" screens. |
| Buttons | ||||
| Color | 👍 | 👍 | 👍 | Help button not customizable on Web |
| Corner Radius | 👍 | 👍 | 👍 | Limited customization on Web |
| Width | 👍 | 👍 | 👍 | |
| Border / Color | 👍 | 👍 | 👍 | Limited customization on Android and Web |
| Border / Size | 👍 | 👍 | 👍 | Limited customization on Android and Web |
| Text color | 👍 | 👍 | ⛔️ | |
| Text content | 👍 | 👍 | ⛔️ | |
| Text | ||||
| Copy | 👍 | 👍 | 👍 | |
| Color | 👍 | 👍 | 👍 | |
| Size | 👍 | 👍 | ⛔️ | |
| Font change | 👍 | 👍 | 👍 | |
| Icons | ||||
| Change | 👍 | ⛔️ | ⛔️ | Limited customization on Android |
Updated about 2 months ago