
Redirect and Back
In this approach you redirect your user to the onboarding url, and then back to complete the process.
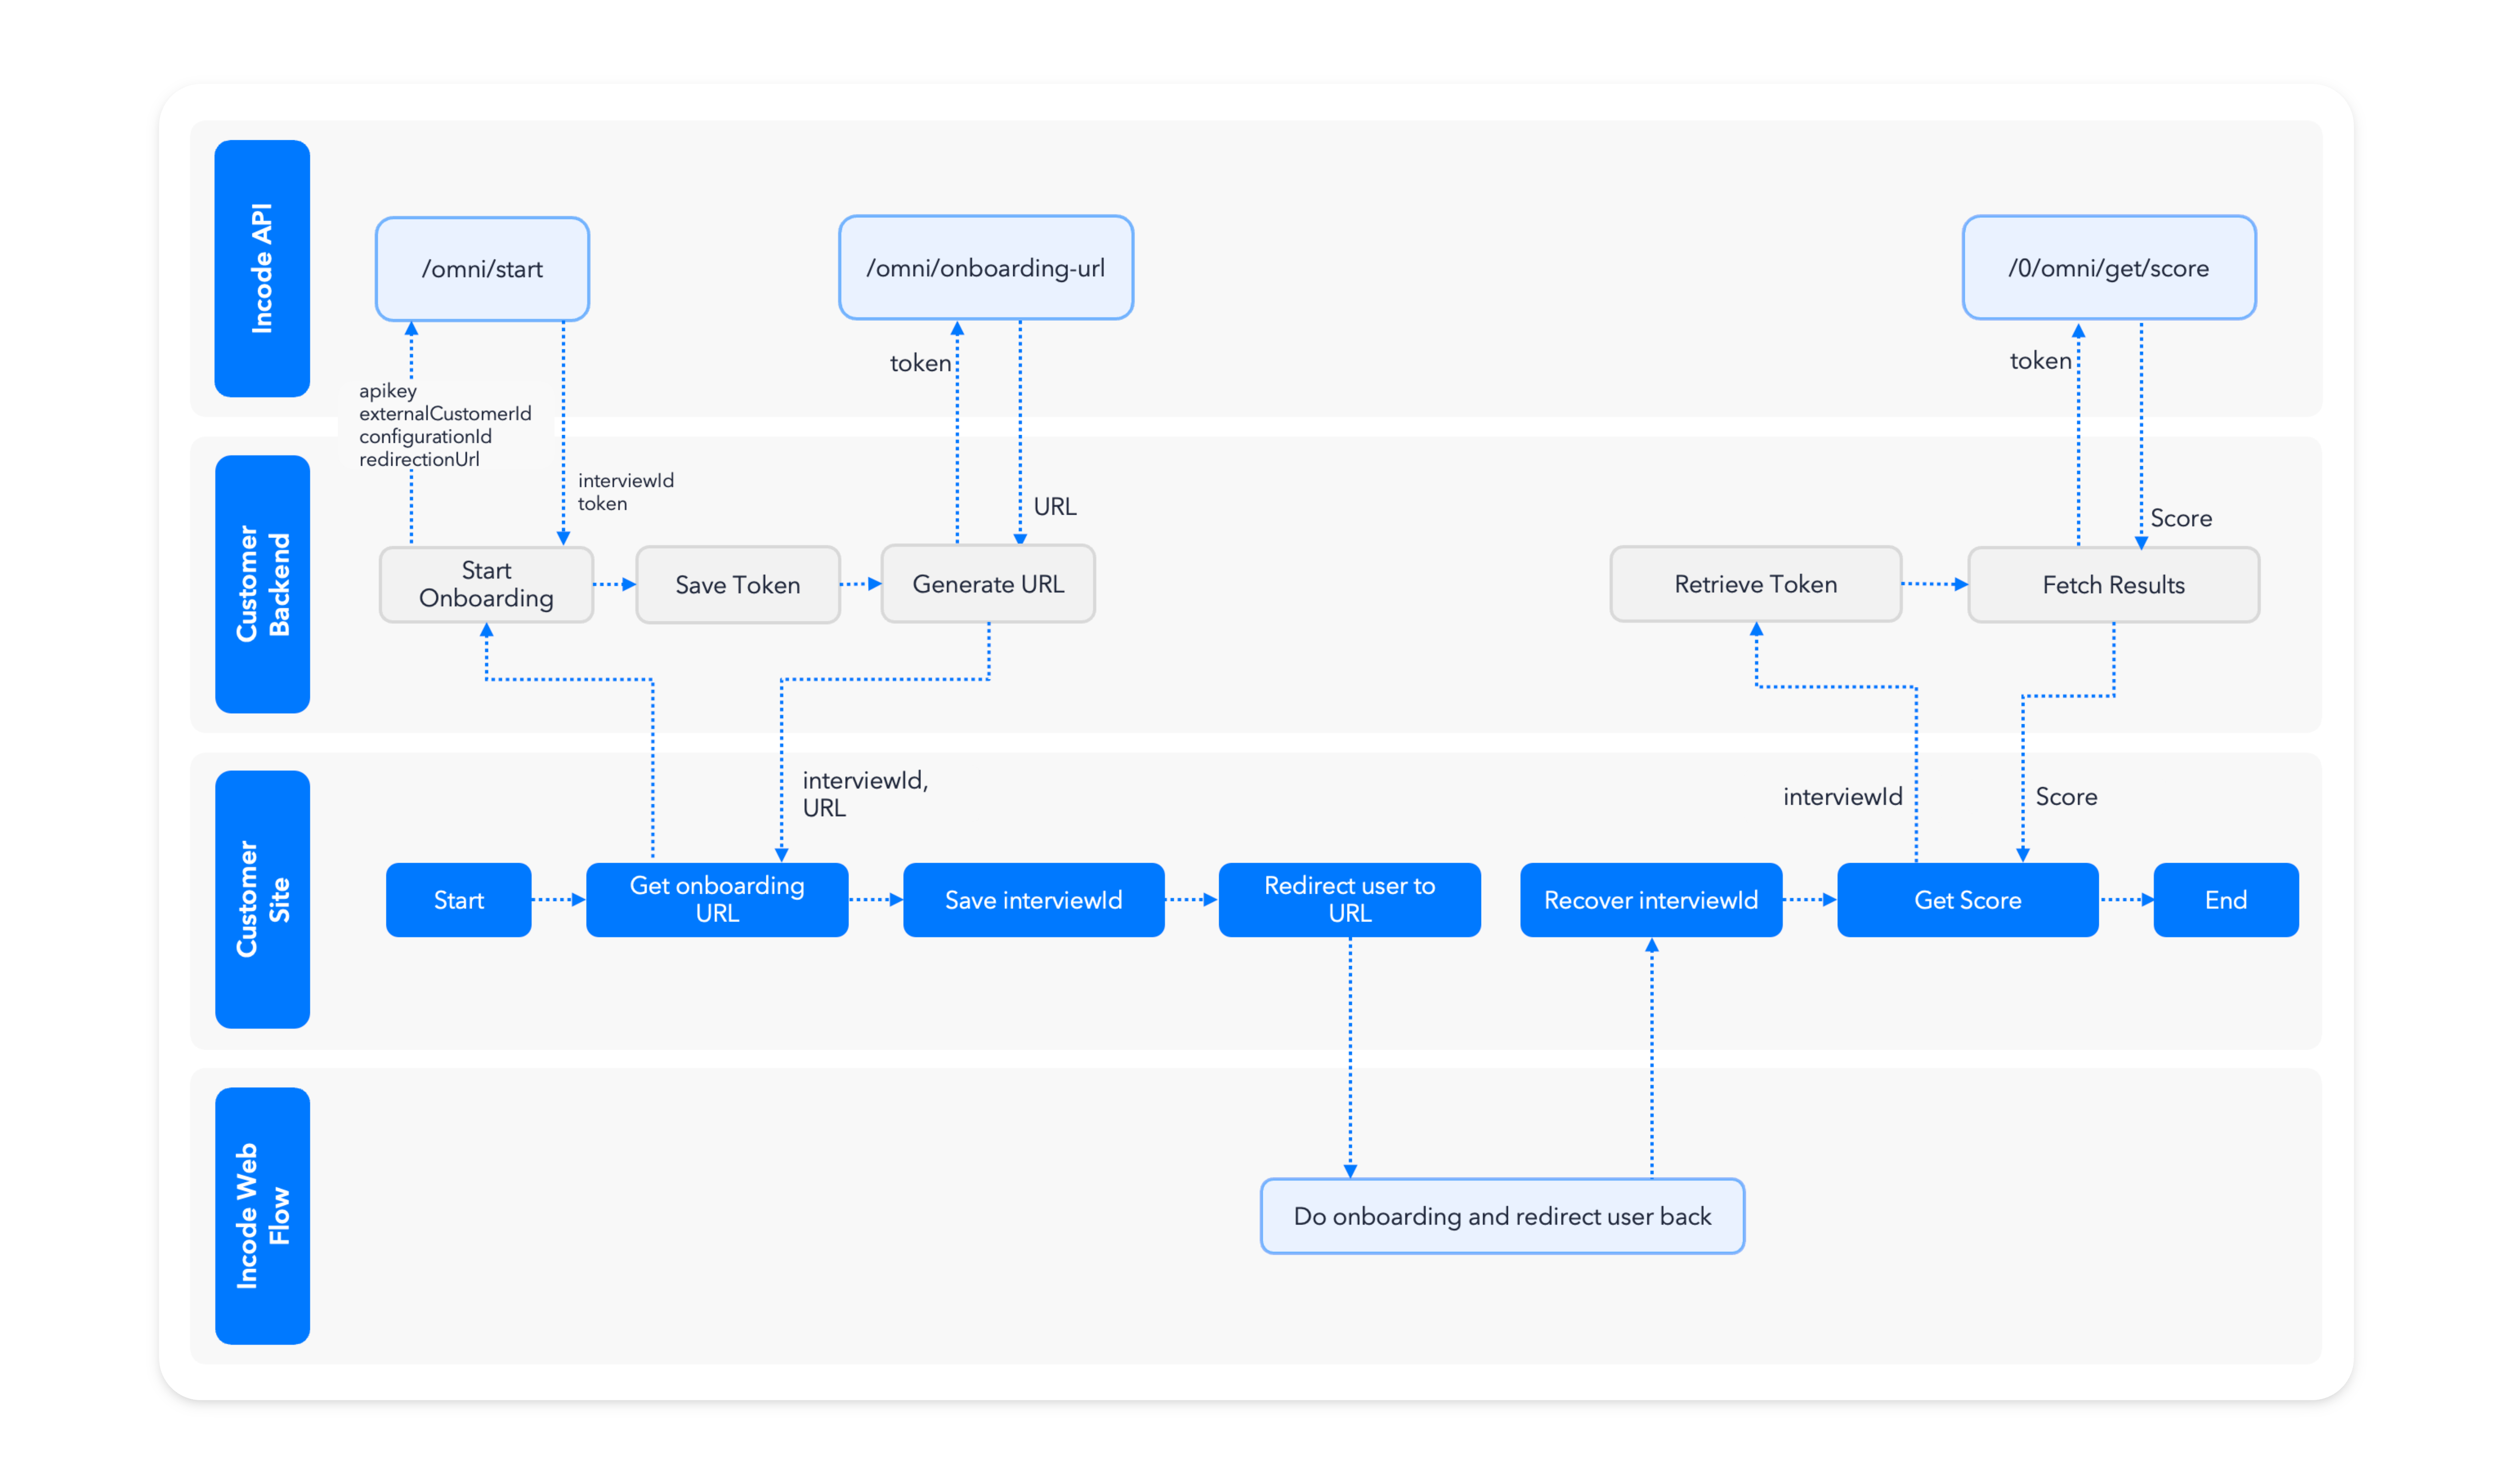
The following flow diagram describes all the steps needed to complete this integration.
Step 1: Create a new endpoint in your Backend
This endpoint is meant to Create a Session and Generate the onboarding URL, make it available to your Frontend app.
Using Static URLYou might decide to skip creating the session and generating the url in backend if you don't plan to associate any information about your user during
/omni/start, in that case take a look at how to Copy Onboarding URL from the Dashboard and completely skip step 1.
Step 1.1: Create the Session
You can see all the details about creating a session using the api in Create Session, but the gist is that you need to call /omni/start, to retrieve interviewIdand token.
During this step you need to setup theredirectionURL to where you want to redirect the user back.
const params = {
  configurationId: <<flowId>,
  countryCode: "ALL",
  language: "en-US",
  //externalCustomerId: "someuser0001", //The Id if the user in your system
  redirectionUrl: "https://example.com/", //The url where the user will be redirected at the end of the onboarding
};

const headers = {
  accept: 'application/json',
  'Content-Type': 'application/json',
  'x-api-key': 'APIKEY',
  'api-version': '1.0'
};

const options = {
  method: 'POST',
  headers: headers,
  body: JSON.stringify(params)
};

const response = await fetch('USER.DEMO_URLomni/start', options);

const {token, interviewId} = response.json();

/**
/* Save the token and the interviewId to your database,
/* you will need it later to retrieve the results.
**/
saveToken({token, interviewId});
curl --location 'USER.DEMO_URLomni/start' \
--header 'Accept: application/json' \
--header 'Content-Type: application/json' \
--header 'api-version: 1.0' \
--header 'x-api-key: APIKEY' \
--data '{
"countryCode": "ALL",
"configurationId": "65283accd410a1dd7e965479",
"externalCustomerId": "someuser0001",
"redirectionUrl": "http://example.com/"
}'Step 1.2: Save the token and interviewId
Save the session tokenand the interviewIdto your database associated to your user, you will need this information later to review the session in the dashboard and to retrieve the scores, OCR data and images via API.
Step 1.3: Generate Onboarding URL
You can see all the details about generating an onboarding URL using the api in Generate Onboarding URL, but the gist is that you need to call /omni/onboarding-url with the session token, to retrieve theurl.
const headers = {
  accept: 'application/json',
  'Content-Type': 'application/json',
  'api-version': '1.0',
  'X-Incode-Hardware-Id': 'TOKEN'
};

const options = {
  method: 'GET',
  headers: headers,
};

const response = await fetch('USER.DEMO_URL0/omni/onboarding-url', options);

const {url} = response.json();

/**
/* Return url and interviewId
**/
curl --location 'USER.DEMO_URL0/omni/onboarding-url' \
--header 'Content-Type: application/json' \
--header 'api-version: 1.0' \
--header 'X-Incode-Hardware-Id: TOKEN' \
Zero configuration endpointsYou will notice that the url in this step has a
/0, this endpoints only need the Session Token to work, all endpoints that refer to an specificinterviewIdsupport the/0and are able to get all information needed to work out of the Session Token.You will use more of this endpoints later to retrieve the scores, OCR data and images via API.
Step 1.4: Return the values
Now just return the url and the interviewId to the frontend.
Step 2: Set some references about the session in the frontend
Now on your frontend call the endpoint you created before, it should return the url and the interviewId.
When the user is redirected back to your site, the URL will not have any information about what the onboarding was, so you need some kind of reference to know which onboarding this was, for this example we will use interviewId and we will save it into localStorage.
const response = await fetch(`https://you.backend.app/create-session-and-onboarding-url`, {});
const { interviewId, url } = await response.json();

localStorage.setItem("interviewId", interviewId);
3. Redirect the user to the URL
window.location.replace(url);4. Receive the user back
For the user to come back you need to set up the redirectURL in Get Onboarding URL, independently of the method you choose, you need to create the page to where the user is coming back.
Create an HTML file named finished.html with its corresponding javascript file.
5. Retrieve the session reference and ask your backend for the results
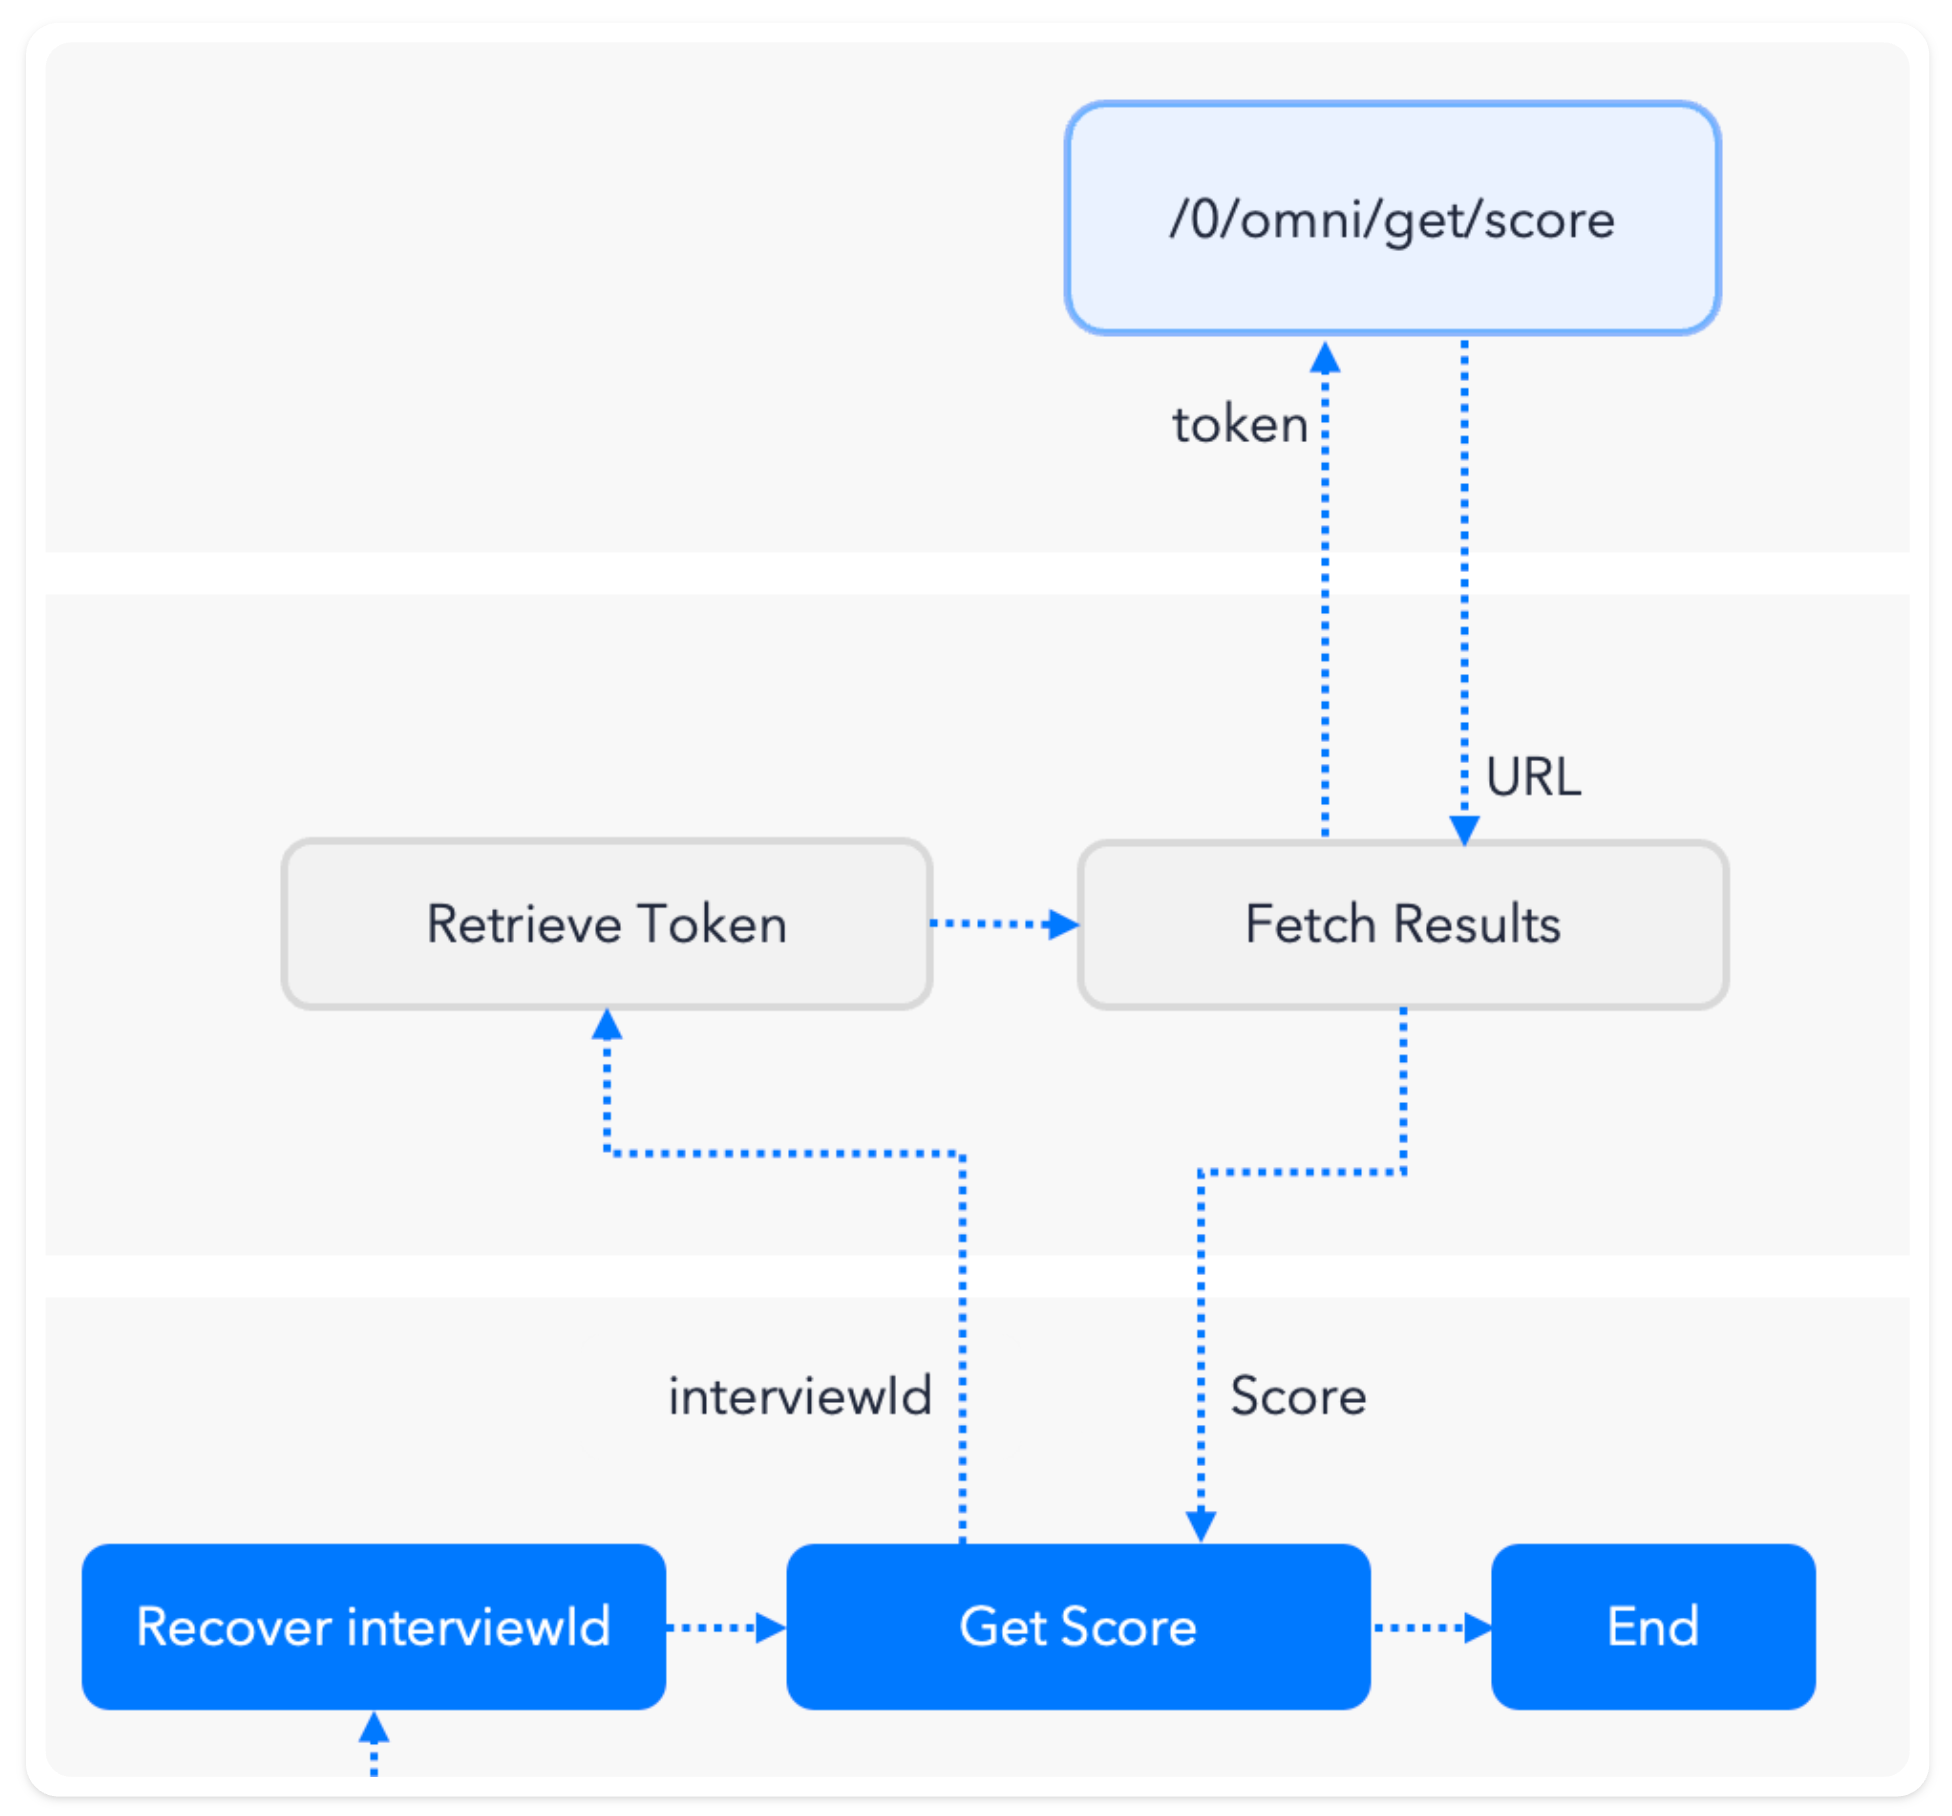
If you followed these steps, you can then retrieve the session reference (in this case interviewId) from localStorage.
Fetching the scores happens in the backend, so let's close this step by asking the data from it, you can see exactly what the scores mean and what other things you can fetch in the next step.
// Retrieve the session reference
const interviewId = localStorage.getItem('interviewId')

// Fetch score
const response = await fetch(
	`https://you.backend.app/fetch-score=?interviewId=${interviewId}`
);
/** you control this endpoint, so you could return anything you want **/
const {status} = await response.json();

if(status==='OK'){
    console.log('You sucessfully onboarded');
} else {
    console.log('You didn\'t passed');
}
6. Fetch the scores in the Backend
In your backend you should receive the interviewId, use it to retrieve the token from the database, and then Fetch Results and Data .
Updated 3 months ago