
Extended Onboarding React Integration
Learn how to integrate Incode Web SDK in your web applications with Typescript and all the recommended modules.
This guide will teach you how to create an app using the Incode Standard Flow with React 18 . You can call this approach a "linear flow" where all Incode modules are executed one after another step-by-step.
This approach is the most convenient for scenarios where you want your users to go through the Incode modules before they go further on your application.
Before starting, ensure you have read the following guides:
Source Code Available:For your convenience a repository with exactly the source code create during this guide/tutorial is available in Onboarding Extended React you can copy and paste from there or use it as a base to start your own project.
Step 1: Setup your TS project
For this react guide we are going to start our project using vite and typescript, please have your development environment ready with NodeJs version 18 or more and then run:
npm create vite@latest my-react-app -- --template react-ts
cd my-react-app
npm install
You will have a brand new vite project where to start integrating the webSDK.
Setting Up HTTPS on the frontend local server
For this example to work, you will have to be able to open this App using HTTPS in you mobile phone, even when you can open the page in desktop, the quality of the webcams wouldn't let you go much far in the process, so opening the URL in your mobile phone is a must.
To enable HTTPS in vite install vite-plugin-mkcert that will help you to create SSL certificates locally and automatically.
npm install vite-plugin-mkcertThen Modify your vite.config.ts file to serve your project in https.
import { defineConfig } from 'vite'
import react from '@vitejs/plugin-react'
import mkcert from 'vite-plugin-mkcert'

// https://vitejs.dev/config/
export default defineConfig({
  plugins: [react(),mkcert() ],
  server: { https: true, host: true },
})
Finally go into package.json and modify the dev script to allow opening your server from anywhere in your local network by adding the --host option.
"dev": "vite --host",Now, when you run your script again with npm run dev, you will see something like this:
  VITE v5.0.7  ready in 114 ms

  ➜  Local:   http://localhost:5173/
  ➜  Network: https://192.168.68.103:5173/
  ➜  press h + enter to show help
Take notice of the Network value and add it to your .env file, this is the URL you will be accessing on your mobile phone to do the testing.
VITE_LOCAL_SERVER_URL=https://192.168.68.103:5173/Try this URL, you should be able to visit it after allowing the SSL exception on your browse.
Step 2: Initialize Incode's Web SDK

First install @incodetech/welcome in your project and then create an incode.ts file in /src to hold the initializing code.
npm install @incodetech/welcomeThe create method creates the incode object, this object loads all the relevant Machine Learning models, implements several security measures and initialize the analytics need for the correct functionality of our platform.
import { create } from "@incodetech/welcome";
const apiURL = import.meta.env.VITE_INCODE_API_URL as string;

type SessionType ={
  token: string,
  uniqueId?: string
};

const incode = create({
  apiURL: apiURL
});

export {incode, type SessionType};
We also export the SessionType that match the response of the Backend Sample Server.
In this example we need to add some environment variables and import them using the import.meta.env object, please add the following variable to the .env file.
VITE_INCODE_API_URL=DEMO_URL_0The minimal parameters for the create method id apiUrl, but you can configure several stuff if needed
lang: Defaults to autodetect the language of the browser, but can be manually setup to"en"or"es".darkMode: Used to change the theme of the tutorials, defaults tofalse.translations: Object with all the translations needed, you can find a example in this recipe:
If you need to further customize the experience of the user checkout our Styling and CSS Customization
Step 3: Get Incode's Session Object

A session object includes an access token which is used to authenticate requests to your Incode environment. As a best practice, Web SDK clients should fetch a session from a server. This server should be maintained by your organization.
To complete Step 3, please setup and run a sample server. Each sample server includes setup instructions and has code to fetch an access token. Once the sample server is running you can fetch your access token using the sample server's /startendpoint and create a session object.
Setup a quick start sample server (15-20 minutes): Quick Start Sample Servers
If your local server is in your same computer, you can serve it as a reverse proxy, just extend your vite.config.ts to have a proxy configuration:
  server: {
    https: true,
    proxy: {
      '/api': {
        target: 'http://localhost:3000',
        changeOrigin: true,
        secure: false,
        ws: true,
        rewrite: (path) => path.replace(/^\/api/, ''),
      }
    }
  },
Next update your .env file to include the HTTPS URL to your sample server.
VITE_INCODE_API_URL=DEMO_URL_0
VITE_INCODE_CLIENT_ID=<your-client-id>
VITE_TOKEN_SERVER_URL=/api
Update your App.tsx file to retrieve the token, use this moment to cleanup all unneeded styles and markup from the default app.
- We'll use the
useEffect()hook that is run after the initial load of your component. - To store the session token we use a simple state at component level.
- During development react will mount the component twice to make easier to detect errors, we don't want to trigger the fetching of the session twice, so we use a reference to signal we already loaded the data.
import { useState, useEffect, useRef} from 'react'

async function startOnboardingSession() {
  const tokenServerURL = import.meta.env.VITE_TOKEN_SERVER_URL as string;

  const urlParams = new URLSearchParams(window.location.search);
  const uniqueId = urlParams.get('uniqueId');

  let sessionStartUrl = `${tokenServerURL}/start`
  if (uniqueId) sessionStartUrl +=`?uniqueId=${uniqueId}`;

  const response = await fetch(sessionStartUrl);
  if (!response.ok) {
    const sessionData = await response.json();
    throw new Error(sessionData.error);
  }

  return await response.json() as SessionType;
}

function App() {
  const [session, setSession] = useState(null); // Stores the Session
  const isLoaded = useRef(false); // Variable that will not trigger re-renders

  // Run this after the initial loading
  useEffect(() => {
    // Only fetch the data if we havent fetched it yet
    if (isLoaded.current) return;

    //Fetch the session and save it on the session variable
    startOnboardingSession().then(async (session) => {
      setSession(session);
    }).catch(
      (e)=>console.log(e)
    );
    // We already sent the async call, don't call it again
    isLoaded.current = true;
  }, []);

  if (!session) return (<p>Loading Session...</p>);
  return (<pre>{JSON.stringify(session,null,2)}</pre>)
}

export default App
The response should look something like this:
{
  "token": "eyJhbGciOiJIUzI1NiJ9.eyJleHR88lcm5hbFVzZXJJZCI6IjY1NzM4ODY2ZjcwOGMwZTdkMDlmNjFjMSIsInJvbGUiOiJBQ0NFU1MiLCJrZXlSZWYiOiI2MmZlNjQ3ZTJjODJlOTVhZDNhZTRjMzkiLCJleHAiOjE3MDk5MzI3NzQsImlhdCI6MTcwMjA3MDM3NH0.GOA3SaGEv9kh5B9qnfTq11JzxFt6kxhJjNqd7j1tZec28",
  "uniqueId": "8d3d45ac-ee2d-48f9-a88a-860373382a9e"
}
This token will be used during all the process to call incode's API securely from the frontend, you can use the interviewId to link this onboarding to you own backend if needed, and the uniqueId will allow us to use renderRedirectToMobile effectively.
uniqueIdNotice how we look for uniqueId in the query params ->
https://your-ip:port/?uniqueId=some-unique-id-value, this is to serve the/startendpoint with theuniqueIdif provided, and thus be able to continue sessions in mobile, that where started in desktop. It will make more sense once explained in therenderRedirectToMobilesection.
Step 4: Add the Render Step Utility
To simplify how to handle the different steps in the onboarding the react way, you can use a steps utility component.
To keep everything organized let's start by creating a new folder to keep all our components /src/components, now create a Steps.tsx file inside and add the following code:
import { Children, cloneElement } from "react";

function Steps({ children, currentStep }: StepsPropTypes) {
  return (
    <>
      {Children.map(
        children,
        (child, index) => currentStep === index && cloneElement(child)
      )}
    </>
  );
}
type StepsPropTypes= {
  children: React.ReactElement[];
  currentStep: number;
}
export default Steps;
This utility component can have several childs inside it and present the current one depending on it's currentStep prop.
Take this minimal implementation of the step Utility, It will show only Step 1. when clicked it will show Step 2, and so on, until it shows Last Step.
import Steps from "./Steps";
function App() {
  const [step, setStep] = useState(0); // Store the current step

  //Advance to the next Step
  function goNext() {
    setStep(step + 1);
  }

  //Advance to the last step
  function goLast() {
    setStep(3); // whatever is the number of steps minus 1
  }

  return (
    <Steps currentStep={step}>
      <h1 onClick={()=> goNext()}>Step 1</h1>
      <h1 onClick={()=> goNext()}>Step 2</h1>
      <h1 onClick={()=> goNext()}>Step 3</h1>
      <h1 onClick={()=> goNext()}>Step 4</h1>
      <h1>Last Step</h1>
    </Steps>
  )
Integrated into our App.tsx it will look like this:
import { useState, useEffect, useRef} from 'react'
import Steps from "./components/Steps";

//Function to fetch the onboarding session
async function startOnboardingSession() {
  const tokenServerURL = import.meta.env.VITE_TOKEN_SERVER_URL as string;
  const response = await fetch(`${tokenServerURL}/start`);
  const session = await response.json();
  return session;
}

function App() {
  const [session, setSession] = useState(null); // Stores the Session
  const [step, setStep] = useState(0); // Store the current step
  // Store data that will not trigger re-renders unless specifically told so
  const isLoaded = useRef(false);

  //Advance to the next Step
  function goNext() {
    setStep(step + 1);
  }

   //Advance to the last step
  function goLast() {
    setStep(3); // whatever is the number of steps minus 1
  }

  // Run this after the initial loading
  useEffect(() => {
    // Only fetch the data if we haven't fetched it yet
    if (isLoaded.current) return;

    //Fetch the session and save it on the session variable
    startOnboardingSession().then(async (session) => {
      setSession(session);
    }).catch(
      (e)=>console.log(e)
    );
    // We already sent the async call, don't call it again
    isLoaded.current = true;
  }, []);

  if (!session) return (<p>Loading Session...</p>);
  return (
    <Steps currentStep={step}>
      <div onClick={()=> goNext()}>
        <h1>Step 1</h1>
        <pre>{JSON.stringify(session,null,2)}</pre>
      </div>
      <h1 onClick={()=> goNext()}>Step 2</h1>
      <h1 onClick={()=> goNext()}>Step 3</h1>
      <h1 onClick={()=> goNext()}>Step 4</h1>
      <h1>Finish</h1>
    </Steps>
  )
}

export default App
Step 5: Redirect To Mobile

Our recommended approach for a successful capture is to do it on mobile, where capture quality is much more higher and we can retrieve information about the location of the device among other signals that increase the certainty of the identification of the customer. For this we will use the VITE_LOCAL_SERVER_URL value we already stored in the .env file from a previous section and the uniqueId we got from the session start.
Sending the uniqueId in the url of this component is important because then when you open this same url, but on mobile, you will be able to continue the session you started here and this component will be able to follow along the progress of the mobile side, jumping to the last step as as it detects that the mobile side finished
Create the RedirectToMobile.tsx file inside src/components.
import {useEffect, useRef} from "react"
import {incode, type SessionType} from "../incode"

const RedirectToMobile = function({
  session,
  onSkip,
  onFinish,
}: RedirectToMobileTypes) {
  const containerRef= useRef<HTMLDivElement>(null)
  const isMounted = useRef(false)

  useEffect(() => {
    if (isMounted.current) {
      return
    }

    const localServerUrl = import.meta.env.VITE_LOCAL_SERVER_URL as string;

    if ( incode.isDesktop() ) {
      incode.renderRedirectToMobile(containerRef.current, {
        session: session,
        onSuccess: onFinish,
        skipDesktopRedirect: (): void => {onSkip()},
        allowSkipRedirect: true,
        url:`${localServerUrl}?uniqueId=${session.uniqueId}`,
      });
    } else {
      onSkip();
    }

    isMounted.current = true
  }, [session, onSkip, onFinish])

  return <div ref={containerRef}></div>
}

type RedirectToMobileTypes = {
  session: SessionType;
  onSkip: () => void;
  onFinish: () => void;
}

export {RedirectToMobile}
Here you start to see the patterns we are going to use for all our components, we return an empty div that during the useEffect() hook will be filled up with the actual component. We will always pass a session, and move to the next step at the end of the process.
Add your redirectToMobile component into the Steps utility component
Now the component has everything it needs to work it's time to import the new component and add it into the steps.
First import the component at the top of App.tsx
import { RedirectToMobile } from './components/RedirectToMobile';And then add it into the Steps:
  if (!session) return (<p>Loading Session...</p>);
  return (
    <Steps currentStep={step}>
      <RedirectToMobile session={session} onSkip={goNext}/>
      <h1>Finish</h1>
    </Steps>
  )
The component will load as the first step, if incode.isDesktop() is true, we will render the redirectToDesktop screen, if not, we will call the onSkip callback. You have the option to allow skipping in the WebSDK(not recommended), in such case we will present a skip button and call the onSkip callback if clicked.
At this moment your App.tsx should look like this:
import { useState, useEffect, useRef} from 'react'
import Steps from "./components/Steps";
import { RedirectToMobile } from './components/RedirectToMobile';


//Function to fetch the onboarding session
async function startOnboardingSession() {
  const tokenServerURL = import.meta.env.VITE_TOKEN_SERVER_URL as string;
  const response = await fetch(`${tokenServerURL}/start`);
  const session = await response.json();
  return session;
}

function App() {
  const [session, setSession] = useState(null); // Stores the Session
  const [step, setStep] = useState(0); // Store the current step
  // Store data that will not trigger re-renders unless specifically told so
  const isLoaded = useRef(false);

  //Advance to the next Step
  function goNext() {
    setStep(step + 1);
  }

  // Run this after the initial loading
  useEffect(() => {
    // Only fetch the data if we haven't fetched it yet
    if (isLoaded.current) return;

    //Fetch the session and save it on the session variable
    startOnboardingSession().then(async (session) => {
      setSession(session);
    }).catch(
      (e)=>console.log(e)
    );
    // We already sent the async call, don't call it again
    isLoaded.current = true;
  }, []);

  if (!session) return (<p>Loading Session...</p>);
  return (
    <Steps currentStep={step}>
      <RedirectToMobile session={session} onSkip={goNext}/>
      <FrontId session={session} onError={handleErrorEvent} onSuccess={goNext}/>
      <h1>Finish</h1>
    </Steps>
  )
}

export default App
Step 6: User Consent

To keep everything ordered add a new component with a file named UserConsent.tsx into the src/components/folder.
renderUserConsent() get its contents from the User Consent configuration in the flow or workflow associated with this component.
import {useEffect, useRef} from "react"
import {incode, type SessionType} from "../incode"

function UserConsent({ session, onSuccess}:UserConsentPropTypes) {
    const containerRef = useRef<HTMLDivElement>(null);
    const isMounted = useRef(false);


    useEffect(() => {
        function captureAndContinue() {
            // Now that the user consented, we can ask for this data

            // Optional but valuable for fraud prevention, hurts conversion
            // incode.sendFingerprint(session);
            // incode.sendGeolocation(session);

            onSuccess();
        }

        if (isMounted.current) {
            return;
        }
        incode.renderUserConsent(containerRef.current, {
            onSuccess: () =>{ captureAndContinue() },
            session: session,

        });
        isMounted.current = true;
    }, [session, onSuccess]);

    return <div ref={containerRef}></div>;
}
type UserConsentPropTypes = {
    session: SessionType;
    onSuccess: () => void;
}
export USERCONSENT;
Capture Device Info

Users vary greatly; some may use your web application under optimal conditions on a high-end device with powerful cameras, while others might not. Therefore, Incode recommends that all onboarding sessions record device and geolocation information.
Incode only uses this data for specific purposes: statistics, troubleshooting, and improving the Web SDK and the Incode Platform.
On the other hand, you can use this information to establish business rules. For example, you might only accept requests from a limited list of regions, or your country's regulations may require user geolocation.
During the captureAndSkip() function we take the chance to send the device and geolocation info, this will be invaluable to validate if the user is a malicious actor.
function captureAndContinue() {
  // Now that the user consented, we can ask for this data

  // Optional but valuable for fraud prevention, hurts conversion
  // incode.sendFingerprint(session);
  // incode.sendGeolocation(session);
  onSuccess();
}
Include it in the flow
Now let's include it into App.tsx, first include the new component:
import { UserConsent } from './components/UserConsent';Add the new component in the render section
  return (
    <Steps currentStep={step}>
      <RedirectToMobile session={session} onSkip={goNext}/>
      <UserConsent session={session}  onSuccess={goNext}/>
      <h1>Finish</h1>
    </Steps>
  )
Step 7: Capture ID
Now let's start capturing documents, for that we will use the RenderCamera WebSDK method, this method will behave different depending on the first parameter, the possible values are 'front', 'back', 'selfie', 'document', 'passport', 'secondId', 'thirdId', and 'insuranceCard', in this guide we will only capture the front and back of a single Id and the selfie, which constitutes the core of the Incode's experience.

We recommend creating a component for each capture to make easier for you to calibrate you user journey.
Capture the Front
To keep everything ordered add a new component with a file named FrontId.tsx into the src/components/folder.
import {useEffect, useRef } from "react"
import {incode, type SessionType} from "../incode"

const FrontId = function({
  session,
  onSuccess,
  onError
}: FrontIdPropTypes) {
  const containerRef= useRef<HTMLDivElement>(null);
  const isMounted = useRef(false);

  useEffect(() => {
    if (isMounted.current) {
      return;
    }

    incode.renderCamera("front", containerRef.current, {
      onSuccess,
      onError: ()=> onError({type: "Couldn't Capture FrontId"}),
      token: session,
      numberOfTries: 3,
      showTutorial: true,
      showCustomCameraPermissionScreen: true,
      showDoublePermissionsRequest: true,
    });

    isMounted.current = true;
  }, [session, onSuccess, onError]);

  return <div ref={containerRef}></div>;
}
type FrontIdPropTypes = {
  session: SessionType;
  onSuccess: () => void;
  onError: (e: {type: string}) => void;
}

export {FrontId}
Now let's include it into App.tsx, first include the new component:
import { FrontId } from './components/FrontId';We didn't had a function and state to handle errors, add it now.
  // Error Handling
  const [error, setError] = useState("");
  //Handling Error
  function handleError(e: { type: string; }) {
    setError(e.type);
  }
Add the error handling and the new component in the render section
  if (!session) return (<p>Loading Session...</p>);
  if (error) return (<p>Error: {error}!</p>);
  return (
    <Steps currentStep={step}>
      <RedirectToMobile session={session} onSkip={goNext}/>
      <UserConsent session={session}  onSuccess={goNext}/>
      <FrontId session={session} onError={handleError} onSuccess={goNext}/>
      <h1>Finish</h1>
    </Steps>
  )
We hope now the pattern is really clear now:
- Create new component inside
src/components/. - Import it.
- Include it inside the
Stepscomponent in the render phase with the relevant callbacks.
Requesting the use of the camera:The Web SDK takes care of requesting the use of the camera to the user. The camera cannot be activated without the user explicitly allowing its use.
If the user denies the use of the camera, the
renderCamera()method will trigger theonErrorcallback with the error messageDOMException: Permission deniedwhich means the ID capture and validation cannot be performed.
Capturing Passports too?The webSDK has the method renderDocumentSelector that present a document selection screen and then capture the type of document selected:
- For Identification Card it automatically captures Front and Back.
Equivalent of callingrenderCamera("front")and thenrenderCamera("back")- For Passport it only ask for the front of it .
Equivalent of callingrenderCamera("passport")It is a direct replacement of
renderCameraso it uses all the same parameters except for type.
Capture the Back
Add a new component with a file named BackId.tsx into the src/components/folder.
import {useEffect, useRef } from "react"
import {incode, type SessionType} from "../incode"

const BackId = function({
  session,
  onSuccess,
  onError
}: BackIdPropTypes) {
  const containerRef= useRef<HTMLDivElement>(null);
  const isMounted = useRef(false);

  useEffect(() => {
    if (isMounted.current) {
      return;
    }

    incode.renderCamera("back", containerRef.current, {
      onSuccess,
      onError: ()=> onError({type: "Couldn't Capture Back Id"}),
      token: session,
      numberOfTries: 3,
      showTutorial: true,
      showCustomCameraPermissionScreen: true,
      showDoublePermissionsRequest: true,
    });

    isMounted.current = true;
  }, [session, onSuccess, onError]);

  return <div ref={containerRef}></div>;
}

type BackIdPropTypes = {
  session: SessionType;
  onSuccess: () => void;
  onError: (e: {type: string}) => void;
}

export {BackId}
Now let's include it into App.tsx, first include the new component:
import { BackId } from './components/BackId';Add the new component in the render section
  return (
    <Steps currentStep={step}>
      <RedirectToMobile session={session} onSkip={goNext}/>
      <UserConsent session={session}  onSuccess={goNext}/>
      <FrontId session={session} onError={handleError} onSuccess={goNext}/>
      <BackId session={session} onError={handleError} onSuccess={goNext}/>
      <h1>Finish</h1>
    </Steps>
  )
Step 8: Validate the ID Document
Now it's time to send the pictures we took for processing, after this call is done, no other picture/document can be send to this session, so if you wish to capture more things, make sure to make it before this.
Create a new component ProcessId.tsx
import {useEffect} from "react"
import {incode, type SessionType} from "../incode"


function ProcessId({
  session,
  onSuccess,
  onError
}:ProccessIdPropTypes) {
  useEffect(() => {
    void incode.processId(
      {token: session.token}
    ).then(() => {
      onSuccess();
    }).catch((error) => {
      onError({type: error});
    });
  }, [session, onSuccess, onError]);

  return <p>Processing...</p>;
}

type ProccessIdPropTypes = {
  session: SessionType;
  onSuccess: () => void;
  onError: (e: {type: string}) => void;
}

export {ProcessId}
This component will draw "Processing..." in the Steps while an async call to process the data is made, and will go to the next step as soon as a response is received.
Now just import it add it to the steps, at this moment your App.tsx should look like this.
import { useState, useEffect, useRef } from 'react'
import Steps from "./components/Steps";
import { RedirectToMobile } from './components/RedirectToMobile';
import { FrontId } from './components/FrontId';
import { BackId } from './components/BackId';
import { ProcessId } from './components/ProcessId';

//Function to fetch the onboarding session
async function startOnboardingSession() {
  const tokenServerURL = import.meta.env.VITE_TOKEN_SERVER_URL as string;
  const response = await fetch(`${tokenServerURL}/start`);
  const session = await response.json();
  return session;
}

function App() {
  const [session, setSession] = useState(null); // Stores the Session

  const [step, setStep] = useState(0); // Store the current step
  //Advance to the next Step
  function goNext() {
    setStep(step + 1);
  }

  // Error Handling
  const [error, setError] = useState("");
  //Handling Error
  function handleError(e: { type: string; }) {
    setError(e.type);
  }

  // Store data that will not trigger re-renders unless specifically told so
  const isLoaded = useRef(false);

  // Run this after the initial loading
  useEffect(() => {
    // Only fetch the data if we havent fetched it yet
    if (isLoaded.current) return;

    //Fetch the session and save it on the session variable
    startOnboardingSession().then(async (session) => {
      setSession(session);
    }).catch(
      (e)=>console.log(e)
    );
    // We already sent the async call, don't call it again
    isLoaded.current = true;
  }, []);

  if (!session) return (<p>Loading Session...</p>);
  if (error) return (<p>Error: {error}!</p>);
  return (
    <Steps currentStep={step}>
      <RedirectToMobile session={session} onSkip={goNext}/>
      <UserConsent session={session}  onSuccess={goNext}/>
      <FrontId session={session} onError={handleError} onSuccess={goNext}/>
      <BackId session={session} onError={handleError} onSuccess={goNext}/>
      <ProcessId  session={session} onError={handleError} onSuccess={goNext} />
      <h1>Finish</h1>
    </Steps>
  )
}

export default App
processId()does not return the result of the validation:The
processId()method does not return the score of the ID validation. Validation scores must be requested in your application backend.
Step 9: Capture Face

Now let's ask the user to take a live picture of himself to match it with his Id, create a new component named Selfie.tsx
import {useEffect, useRef} from "react"
import {incode, type SessionType} from "../incode"

function Selfie({ session, onSuccess, onError }:SelfiePropTypes) {
  const containerRef = useRef<HTMLDivElement>(null);
  const isMounted = useRef(false);

  useEffect(() => {
    if (isMounted.current) {
      return;
    }
    incode.renderCamera("selfie", containerRef.current, {
      onSuccess,
      onError: ()=> onError({type: "Couldn't Capture Selfie"}),
      token: session,
      numberOfTries: 3,
      showTutorial: true,
      showCustomCameraPermissionScreen: true,
      showDoublePermissionsRequest: true,
    });
    isMounted.current = true;
  }, [session, onSuccess, onError]);

  return <div ref={containerRef}></div>;
}
type SelfiePropTypes = {
  session: SessionType;
  onSuccess: () => void;
  onError: (e: {type: string}) => void;
}
export {Selfie};
Keep it LightYou will notice that this screen doesn't fill the whole screen with the camera feed as the document capture do, the reason is that the light of the screen greatly helps to improve selfie quality, please don't customize to make it dark.
And add the new step as before:
<Steps currentStep={step}>
  <RedirectToMobile session={session} onSkip={goNext}/>
  <UserConsent session={session}  onSuccess={goNext}/>
  <FrontId session={session} onError={handleError} onSuccess={goNext}/>
  <BackId session={session} onError={handleError} onSuccess={goNext}/>
  <ProcessId  session={session} onError={handleError} onSuccess={goNext} />
  <Selfie session={session} onError={handleError} onSuccess={goNext}/>
  <h1>Finish</h1>
</Steps>
Step 10: Match the Face with the Id
Updated GuideIn the past a post process was needed for the face, nowadays the Selfie step does the processing two, making this step unneeded.
Step 11: Mark the Onboarding as Complete

The last step is to mark the session as finished, this will trigger business rules in the backend as well as the feed analytics. This has to be done in the backend so we will need to add a endpoint to it and call it from the frontend.
Create a new function in App.tsx along with startOnboardingSession to finish the session.
async function finishOnboardingSession(token:string) {
  // Connect with your backend service to finish the session
  const response = await fetch(`${tokenServerURL}/finish`, {
      method: "POST",
      body: JSON.stringify({token})
  });

  if (!response.ok) {
      const data = await response.json();
      throw new Error(data.error);
  }

  return await response.json();
}
Inside App.tsx add a new function along with the step and goLast functions
  async function finishOnboarding() {
    if(session) finishOnboardingSession(session.token);
    goLast();
  }
Then modify Selfie to call that function instead of the next Step:
<Steps currentStep={step}>
  <RedirectToMobile session={session} onSkip={goNext}/>
  <UserConsent session={session}  onSuccess={goNext}/>
  <FrontId session={session} onError={handleError} onSuccess={goNext}/>
  <BackId session={session} onError={handleError} onSuccess={goNext}/>
  <ProcessId  session={session} onError={handleError} onSuccess={goNext} />
  <Selfie session={session} onError={handleError} onSuccess={finishOnboarding}/>
  <h1>Finish</h1>
</Steps>
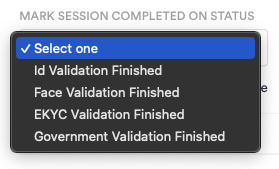
You can let the flow to automatically finish on several situations:To do that go to Flows > Edit > View Details > Self Configurations, to set it to any of this options:
getFinishStatus()does not return the result of the validation:The
getFinishStatus()method does not return the score of the onboarding session. Validation scores must be requested in your application backend.
Step 12: Launch the App
You run the app by executing the dev script in the shell
npm run devIt will output something like this:
  VITE v5.0.7  ready in 244 ms

  ➜  Local:   https://localhost:5173/
  ➜  Network: https://192.168.68.103:5173/
  ➜  press h + enter to show help
Take notice of the Network value, that is the URL that you will be able to visit on your local network to use your app. We strongly recommend to use your mobile phone, but test a couple of times in your desktop to make sure your RedirectToMobile works.
Testing and production environments:Please make sure you use the Incode testing environment during your development process. Using the Incode production environment may result in service charges in your account. Please contact us to know more about the service fees.
HTTPS
Handling both your local sample server and your frontend server with https might be cumbersome, but as the final testing happens in a mobile phone everything must be valid https, otherwise it will cause mixed content warnings and CORS errors.
Visualizing it all Together
There is a Full Sequence Diagram in the Repository that goes with this tutorial: https://github.com/Incode-Technologies-Example-Repos/onboarding-extended-react
References
- This guide is based on the Diagram for the Incode Web SDK - Standard Integration Approach.
- Also you can always visit the Incode WebSDK referenceto learn more about the methods and configuration options used in this guide.
- Finally, compare your code or use it as a starting point.
Updated 3 months ago