
Embedded Iframe
Explains how to set up onboarding with Incode using an Iframe in your application front end.
Overview
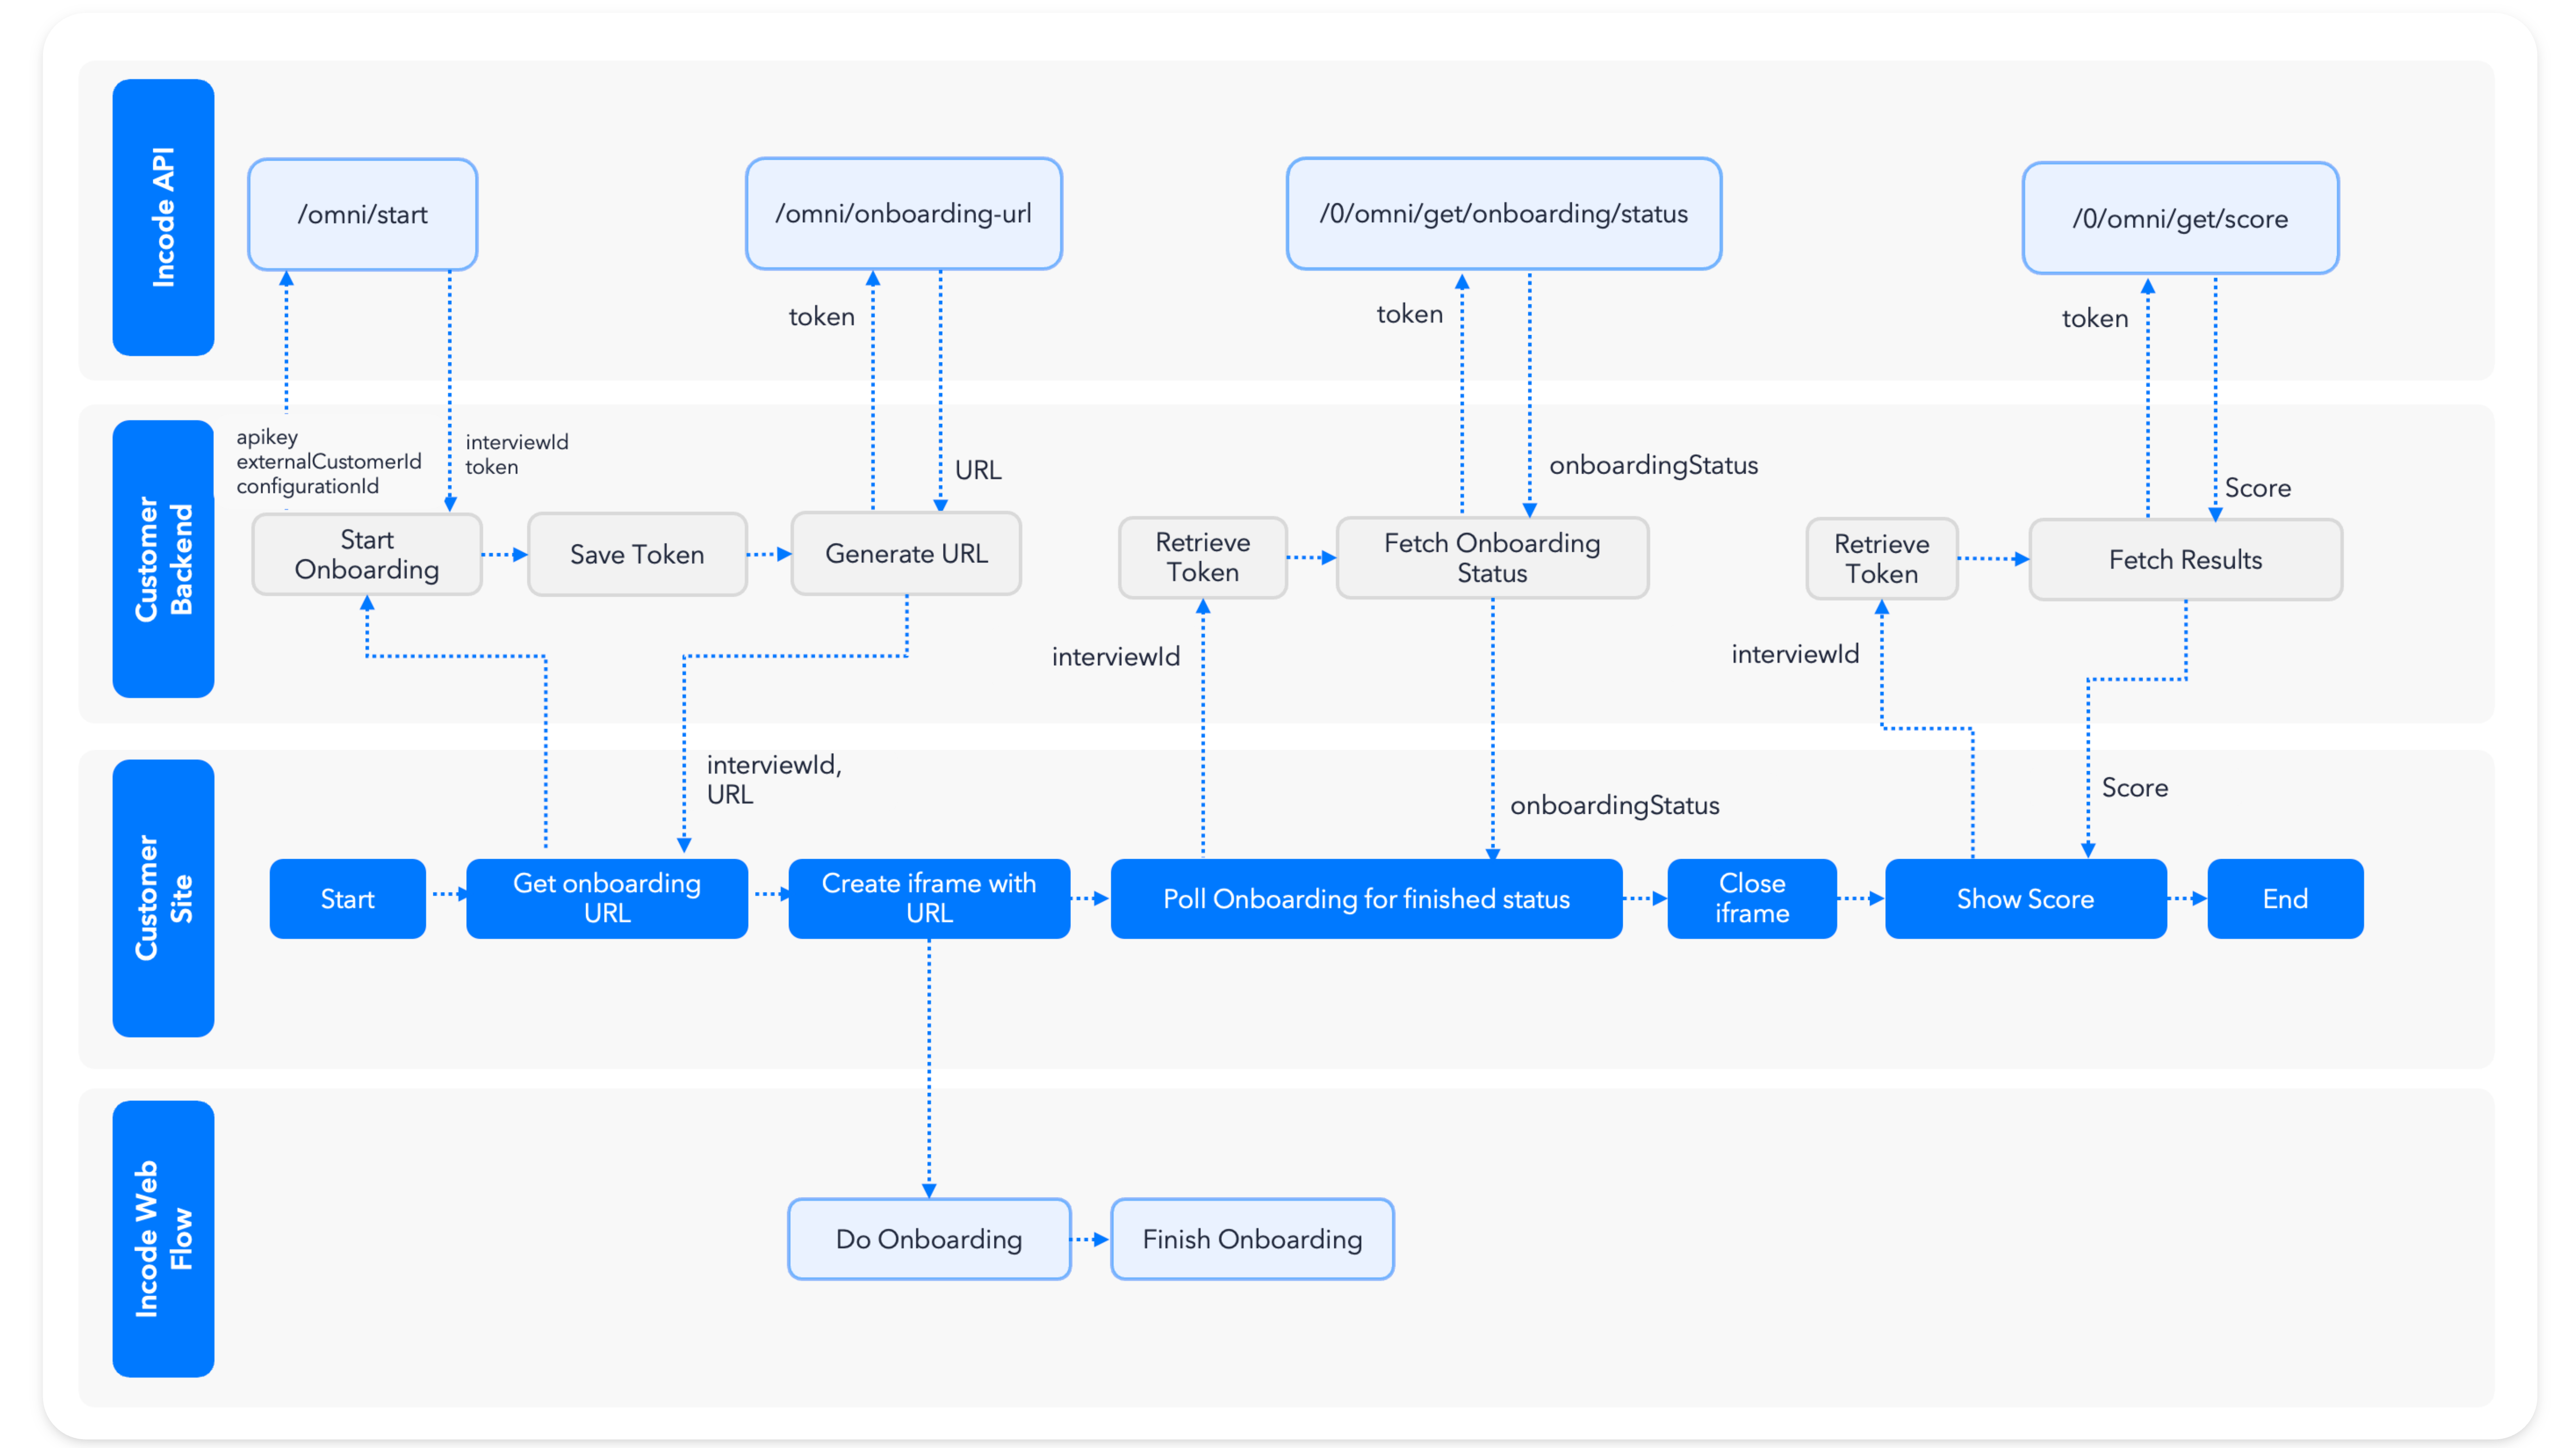
This low-code integration allows you to keep the end user from ever leaving your application. Instead, onboarding with Incode is completed within an IFrame that displays in your application front end. This diagram provides a visual of all the steps needed to complete this integration.
Step One: Create a new endpoint in your back end
This endpoint is meant to create an Onboarding Session and generate the onboarding URL, then make the session available to your app front end.
Option: Using a static URLIf you don't plan to associate any information about your user during the
/omni/startAPI call, you could skip Step One. Instead, you would need to Copy the Onboarding URL from the Dashboard before moving to Step Two.
Step 1.1: Create session
This image provides the code needed to create an Onboarding Session for your integration. It provides the information you need if you are already familiar with coding for the Omni API. If not, we strongly recommend you refer to the Create an Onboarding Session page to make sure you understand the step completely.
const params = {
  configurationId: <<flowId>,
  countryCode: "ALL",
  language: "en-US",
  //externalCustomerId: "someuser0001", //The Id if the user in your system
  //redirectionUrl: "https://example.com/", //The url where the user will be redirected at the end of the onboarding
};

const headers = {
  accept: 'application/json',
  'Content-Type': 'application/json',
  'x-api-key': 'APIKEY',
  'api-version': '1.0'
};

const options = {
  method: 'POST',
  headers: headers,
  body: JSON.stringify(params)
};

const response = await fetch('USER.DEMO_URLomni/start', options);

const {token, interviewId} = response.json();

/**
/* Save the token and the interviewId to your database,
/* you will need it later to retrieve the results and poll for status.
**/
saveToken({token, interviewId});
curl --location 'USER.DEMO_URLomni/start' \
--header 'Accept: application/json' \
--header 'Content-Type: application/json' \
--header 'api-version: 1.0' \
--header 'x-api-key: APIKEY' \
--data '{
"countryCode": "ALL",
"configurationId": "65283accd410a1dd7e965479",
"externalCustomerId": "someuser0001",
"redirectionUrl": "http://example.com/"
}'Step 1.2: Save the token and interviewId
Save the session tokenand the interviewId for this user and session to your database associated. You will need this information later to review the session in the dashboard and to retrieve the scores, OCR data, and images via API.
Step 1.3: Generate onboarding URL
This image provides the code needed to generate an onboarding URL for this session. It provides the information you need if you are already familiar with coding for the Omni API. If not, we strongly recommend you refer to the Generate Onboarding URL page to make sure you understand the step completely.
const headers = {
  accept: 'application/json',
  'Content-Type': 'application/json',
  'api-version': '1.0',
  'X-Incode-Hardware-Id': 'TOKEN'
};

const options = {
  method: 'GET',
  headers: headers,
};

const response = await fetch('USER.DEMO_URL0/omni/onboarding-url', options);

const {url} = response.json();

/**
/* Return url and interviewId
**/
curl --location 'USER.DEMO_URL0/omni/onboarding-url' \
--header 'Content-Type: application/json' \
--header 'api-version: 1.0' \
--header 'X-Incode-Hardware-Id: TOKEN' \
Zero configuration endpointsNotice that the URL in this step has a
/0. That is because this endpoint only needs the Session Token to work. All endpoints that refer to a specificinterviewIdsupport the/0and can access all information needed to work fromt the Session Token.You will see this type of endpoint again later to retrieve the scores, OCR data, and images via API.
Step 1.4: Return the values
Call the endpoint your created to return the url and the interviewId to your application front end.
Step Two: Create an Iframe with the URL in the front end
The Iframe you create must:
- Be set to 100%
- Allow the usage of geolocation, microphone, and camera
- Include a gyroscope and accelerometer for features with motion, orientation, and gesture-based interactions
Refer to this sample code to set the IFrame URL. The end user can then complete the Onboarding Session from Step One in the IFrame.
const createIframe = (url) => {
  /* Get the container where we are going to insert the iframe */
  const app = document.getElementById('app'); //reference to a element on index.html page

  /* Create the iframe */
  const frame = document.createElement('iframe');
  /* Set the URL */
  frame.src = url;
  frame.id = 'app-iframe'
  frame.width = '100%';
  frame.height = '100%';
  /* Allow the iframe to use the camera and other media */
  frame.allowUserMedia = true;
  frame.setAttribute('frameborder', '0');
  /* Allow specific permissions. Notice the wildcard character (*) */
  frame.setAttribute('allow', 'geolocation *; microphone *; camera *; accelerometer *; gyroscope *;');
  /* Insert iframe into container */
  app.appendChild(frame);
}

const response = await fetch(`https://you.backend.app/create-session-and-onboarding-url`, {});
const { interviewId, url } = await response.json();

createIframe(url);
Step Three: Retrieve the onboarding status
There is no way to directly monitor the Onboarding Session progress when using an IFrame. You must do so using your application back end.
Step 3.1: Create an endpoint
Use this sample code to create an endpoint in your application back end. This endpoint will retrieve the status for the Onboarding Session.
/** Retrieve the token from your database, implementation details are up to you **/
const token = getToken(interviewId);

const headers = {
  accept: 'application/json',
  'Content-Type': 'application/json',
  'api-version': '1.0',
  'X-Incode-Hardware-Id': 'TOKEN'
};

const options = {
  method: 'GET',
  headers: headers,
};

const response = await fetch('USER.DEMO_URL0/omni/get/onboarding/status', options);

const {onboardingStatus} = response.json();

/**
/* Return onboardingStatus
**/
Step 3.2: Poll for the onboarding status
Use this code to poll the API for the status of the Onboarding Session. You can find a full list of possible Onboarding Statuses on this page. Once the status is ONBOARDING_FINISHED you can retrieve the session results and data.
async function fetchOnboardingStatus(interviewId) {
  const response = await fetch(
    `https://you.backend.app/onboarding-status?interviewId=${interviewId}`,
  );
  const {onboardingStatus} = await response.json();
  return {onboardingStatus}
}

const interval = setInterval(async () => {
   const onboarding = await fetchOnboardingStatus(interviewId);

   if (onboarding.onboardingStatus==='ONBOARDING_FINISHED'){
     clearInterval(interval);

	 	 // Remove iframe from the parent node
     //const frame = document.getElementById('app-iframe');
     //frame.parentNode.removeChild(frame);

			// Here You are ready to fetch scores
   }
}, 1000);
Step Four: Close Iframe
Closing an Iframe can sometimes be tricky. This code shows how to fully stop the IFrame by referencing its parent node.
// Remove iframe from the parent node
const frame = document.getElementById('app-iframe');
frame.parentNode.removeChild(frame);
Step Five: Retrieve and display the scores
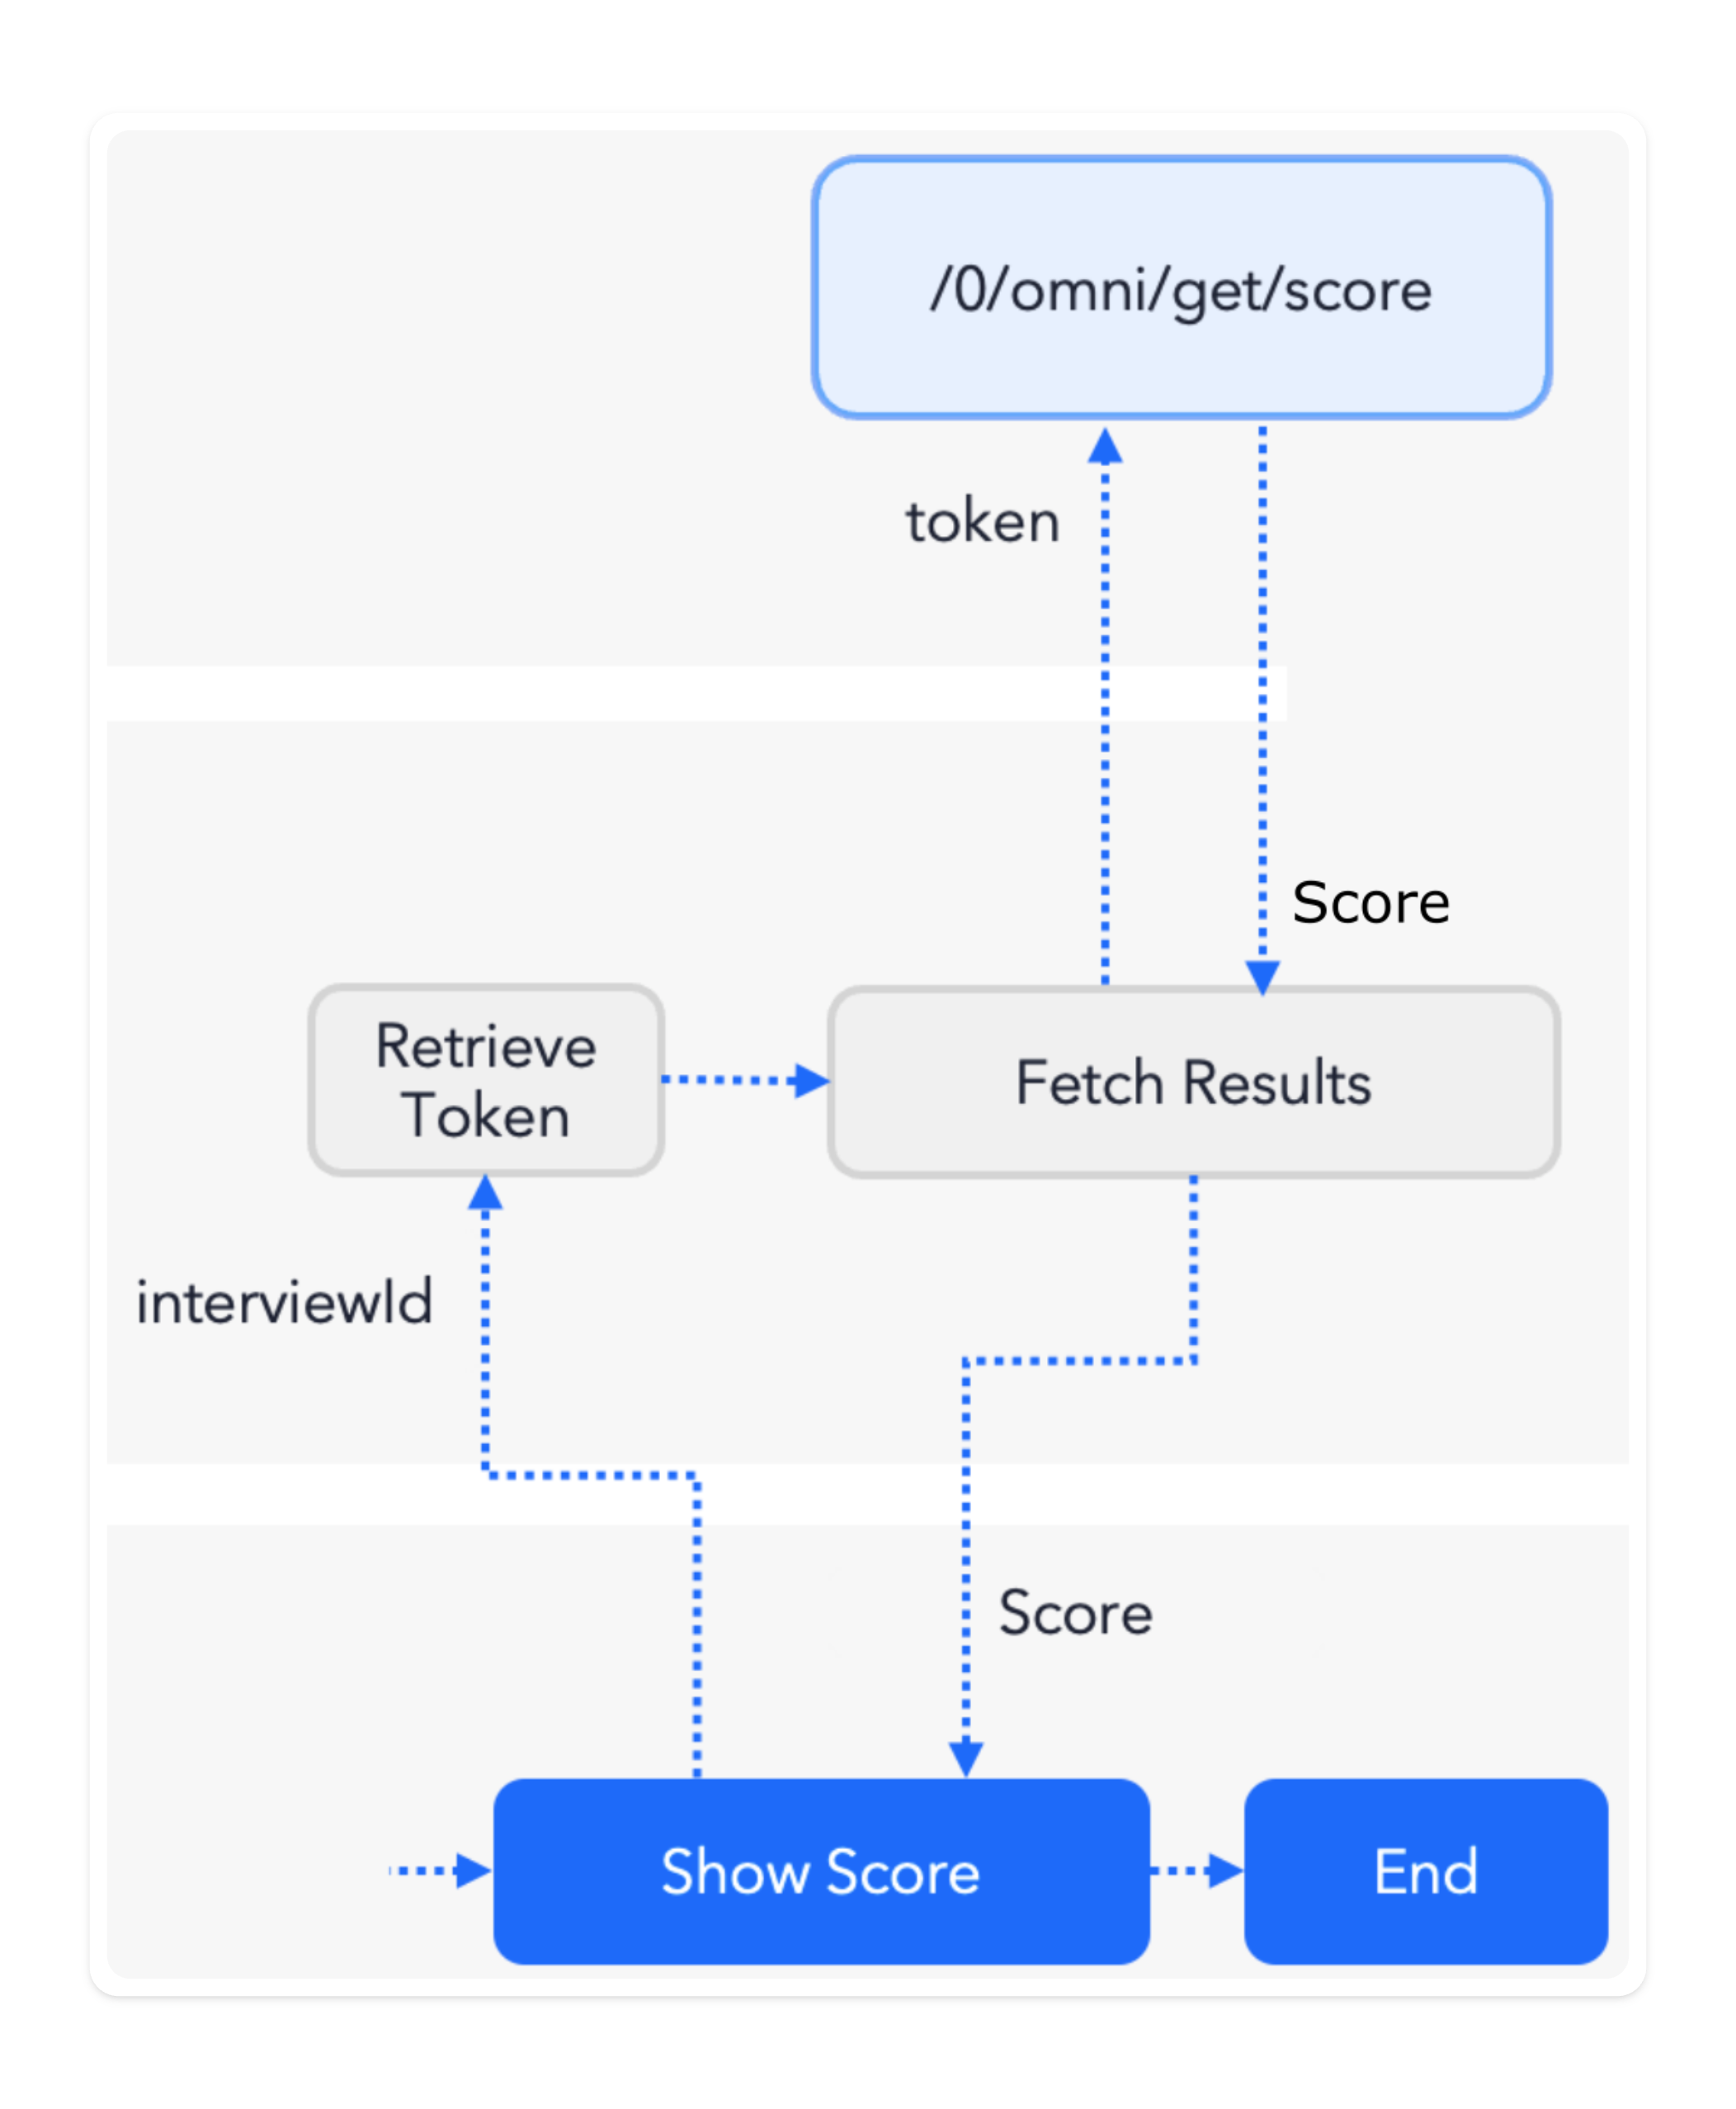
This image provides the code needed to retrieve and display the Onboarding Session results. It provides the information you need if you are already familiar with coding for the Omni API. If not, we strongly recommend you refer to the Fetch Score Data page to make sure you understand the step completely.
// Fetch score
const response = await fetch(
	`https://you.backend.app/fetch-score=?interviewId=${interviewId}`
);
/** you control this endpoint, so you could return anything you want **/
const {status} = await response.json();

if(status==='OK'){
    console.log('You sucessfully onboarded');
} else {
    console.log('You didn\'t passed');
}
Step Six: Fetch the scores
Use the interviewId you retrieved in the previous step to fully Fetch Results and Data for further analysis and review.
Updated 3 months ago