
Create a Standard Flow
Flows simplify the development process and are governed by a flow configuration. A flow configuration is a set of Incode modules that define how a user must verify themselves according to your organization's business needs and risk preferences. Modules control the behavior of your application and the UI/UX that the user is presented with. In this example, we'll demonstrate how to create a standard flow, the most common type of flow configuration with a set of essential modules for getting started. Flows are created in the Dashboard.
Using the Flow Tab
Step 1: Create a flow
- Open the Dashboard -> Flows Tab -> New Flow
Step 2: Give your flow a name
- Enter the name Standard Flow in the input box.
Step 3: Configure global settings
For this standard flow, we're going to choose the presets that are optimal for the majority of use cases.
- NAME: The name of the flow. This is the name that will appear in the session logs so that you can identify which flow a session was processed with.\
- REDIRECT URL: The redirect URL determines where there user will be redirected to after they complete the flow. If it is left blank, the user will not be redirected and the process will end on the final completion screen.\
- MARK SESSION COMPLETED ON STATUS: It is not necessary to use this configuration, if your purpose is to use this flow in a "No Code" Web Flow Application. It is also not necessary to use this configuration if you call the finish method in a custom application. In fact it is encouraged not to use this setting for both of these cases. For all other use cases, this configuration will determine the point at which a session will be marked as complete. For this example we only want the session to be marked as complete when all modules have been completed. Since Facial Recognition and Face Match are part of this flow (which occurs after all other validations), we want to mark the session as complete after the
Face Validation Finishedstatus is returned. This is important for analytics and for tracking which sessions a user has completed in the dashboard. The validations of a session occur in the following order:-
- Id Validation Finished
- Government Validation Finished
- eKYC Validation Finished
- Face Validation Finished\
-
- Redirect Desktop Attempts to Mobile: If this configuration is active and a user begins the onboarding on a desktop device, Incode will detect the device and begin the flow by displaying a screen with a QR code and a phone number input. The user can either scan the QR code with their mobile device to complete the flow or they can enter their phone number to have an onboarding link sent to their mobile device via SMS. Due to the quality difference between desktop cameras and mobile devices, we always recommend activating this configuration to obtain the best results. If you do not select this a user will simply advance through the flow using their desktop camera. If you need to offer both options, you can also activate the
Add Continue to Desktopconfiguration, which will add a button to the UI so that they have the option to continue on their desktop.\ - Display Result on Desktop: When this is active, after the user completes the flow on their mobile device, the desktop device that was displaying the QR code and phone number input will display the final screen of the session on the desktop device where the session began. To customize your final screen, see our section on UI customization.\
- SESSION SCORE PASS: A session can be either approved, denied, or sent to manual review. Configuring the SESSION SCORE PASS logic tells the flow how you would like to approve Identities into your database when you have a session with a score status of
Pass,Warn, orFail. In this example, we set the session toApprovewhen the score is aPass, send the session toManual Reviewwhen the session score is aWarn(i.e. the session score is slightly below a passing score), andDenycreating an identity when the session score is aFail. Then click green button to continue to the module selection page.
- SESSION SCORE PASS: A session can be either approved, denied, or sent to manual review. Configuring the SESSION SCORE PASS logic tells the flow how you would like to approve Identities into your database when you have a session with a score status of
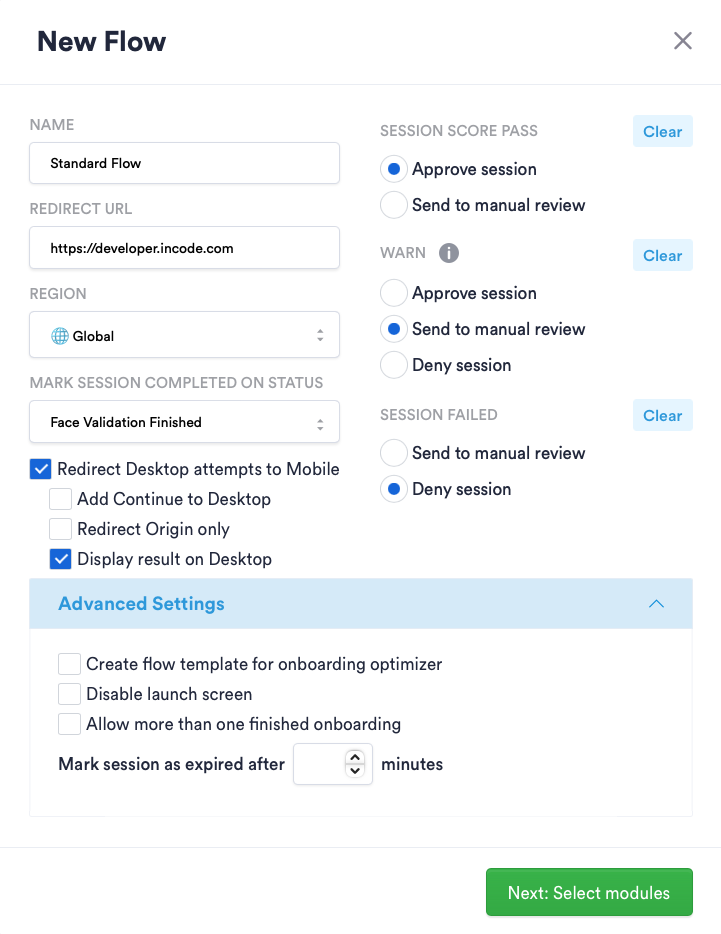
Global flow setting with Redirect Desktop Attempts to Mobile enabled and behaviors defined for approving a session.
Step 4: Enable modules to include
-
Choosing flow modules is easy. Click the checkbox to make selections. To create the Standard Flow enable the following modules.
- Privacy consent
- Machine learning consent
- ID capture
- ID validation
- Face capture
- Face match
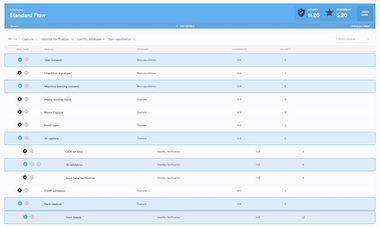
Edit flow module screen depicting standard modules
Step 5: Activate and save your flow
- Activate and save your flow. On the top banner on the right side, click the label "Activate Flow" and then click the "Save Flow". Once saving the flow a screen will display showing all of your organizations flows.
Updated about 1 year ago