
Standard Identity Verification Workflow
An efficient ID verification workflow is crucial for businesses to ensure user authenticity and compliance with regulatory standards. This page outlines the Identity Verification template in the Incode Omni Dashboard.
An Incode standard identity verification workflow verifies users by capturing their identification document (ID) and face data. This confirms that the person on the ID is the same person performing the identity verification. It also checks the validity of an ID in terms of tampering, altering, expiration date, and so on.
You can create this workflow from a template in the Incode Omni Dashboard. This template includes all the essential modules detailed on this page, pre-configured for a standard identity verification process. Using the template saves you time and ensures your process follows best practices.
To get started, go to Dashboard > Workflows, click New+, and then click the Identity Verification template.
Workflow Diagram and Explanations
This diagram shows the modules and processes in the workflow template. Modules require an action by the end user during the verification. Processes are in the background for the end user and do not require action on their part. You can configure both modules and processes.
The diagram also shows an optional condition node. You can decide whether conditions are needed based on your business rules. They allow for a dynamic end user path through the verification process.
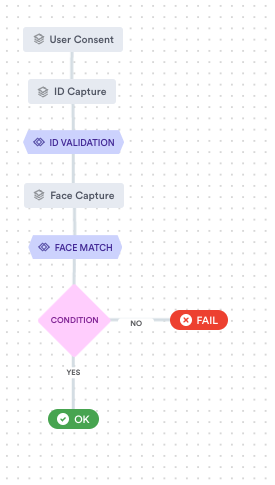
Steps in the standard Identity Verification workflow
| Step Name | Step Type | Description |
|---|---|---|
| User Consent | Module | Ensures that users are informed and agree to the processing of their personal and biometric data before proceeding with the verification process. It is a critical module for legal compliance and trust-building. You can use Incode default consent language or specify your own. Learn more how to setup your own consent language. |
| ID Capture | Module | Captures user identity documents. You can configure the module to accept specific document types. This lets you support verification requirements of different regions and allow for variations between documents like passports and driver's licenses. You can also set a limit for the number of capture attempts. This enhances security and the user experience. A reasonable limit ensures users are careful when capturing their ID. It also reduces errors and potential fraud. |
| ID Validation | Process | Ensures the captured document's validity. It conducts checks for expiration and authenticity. For example, it can detect screen or printed document replicas. The step also includes various fraud checks that safeguard the integrity of the verification process. |
| Face Capture | Module | Captures a live image of the user's face. The module can include liveness detection to prevent spoofing and ensure the presence of a real person during the capture. Quality checks are also available to ensure the captured image meets the criteria necessary for accurate verification. |
| Face Match | Process | Ensures the face captured in the selfie matches the face captured from the ID. Configuration options include sensitivity settings for how close the match should be. Incode recommends skipping face match animation in production environments. The animation may inadvertently provide feedback to potential fraudsters. |
| Condition Node | Node | Allows the end user to follow more than one path. For example, a straightforward application of condition nodes is to determine the session outcome based on the overall results of ID validation, face recognition, and liveness checks. Additional conditions can be tailored to specific requirements where needed. This adds flexibility to the verification process. |
Final Session Results
Based on the outcomes evaluated by the condition node(s), you can set up the final session results to reflect the verification status:
- OK: Verification successful.
- FAIL: Verification failed.
- MANUAL: Requires manual review.
Updated 3 months ago
Learn more about customization of your Workflow and how to user Conditionals to craft unique user journeys