
[Legacy] Web SDK Face Authentication
Understand and set up this process for end users who have already been onboarded by your organization and have an Incode Identity.
WarningThis method of Face Authentication is being deprecated in favor of an updated method that uses a Face Authentication module within Workflows and Flows. This change allows for a higher level of security and configurability when authenticating users.
Key dates:
- End of Support (EoS): October 1, 2026
- End of Life (EoL) / Retirement: April 1, 2027
We recommend completing your migration by January 1, 2027 to avoid any last-minute issues or service disruptions.
Documentation for the new method of Face Authentication can be found here:
Overview
Incode face authentication is a process in which a previously onboarded end user's face is captured using the Incode Web SDK. Incode then compares this selfie to the user's Incode Identity. Face authentication can be used to:
- Identify a user and grant access or permissions in your application.
- Get an access token to interact with a particular onboarding session.
This diagram shows how face authentication works at a high level.
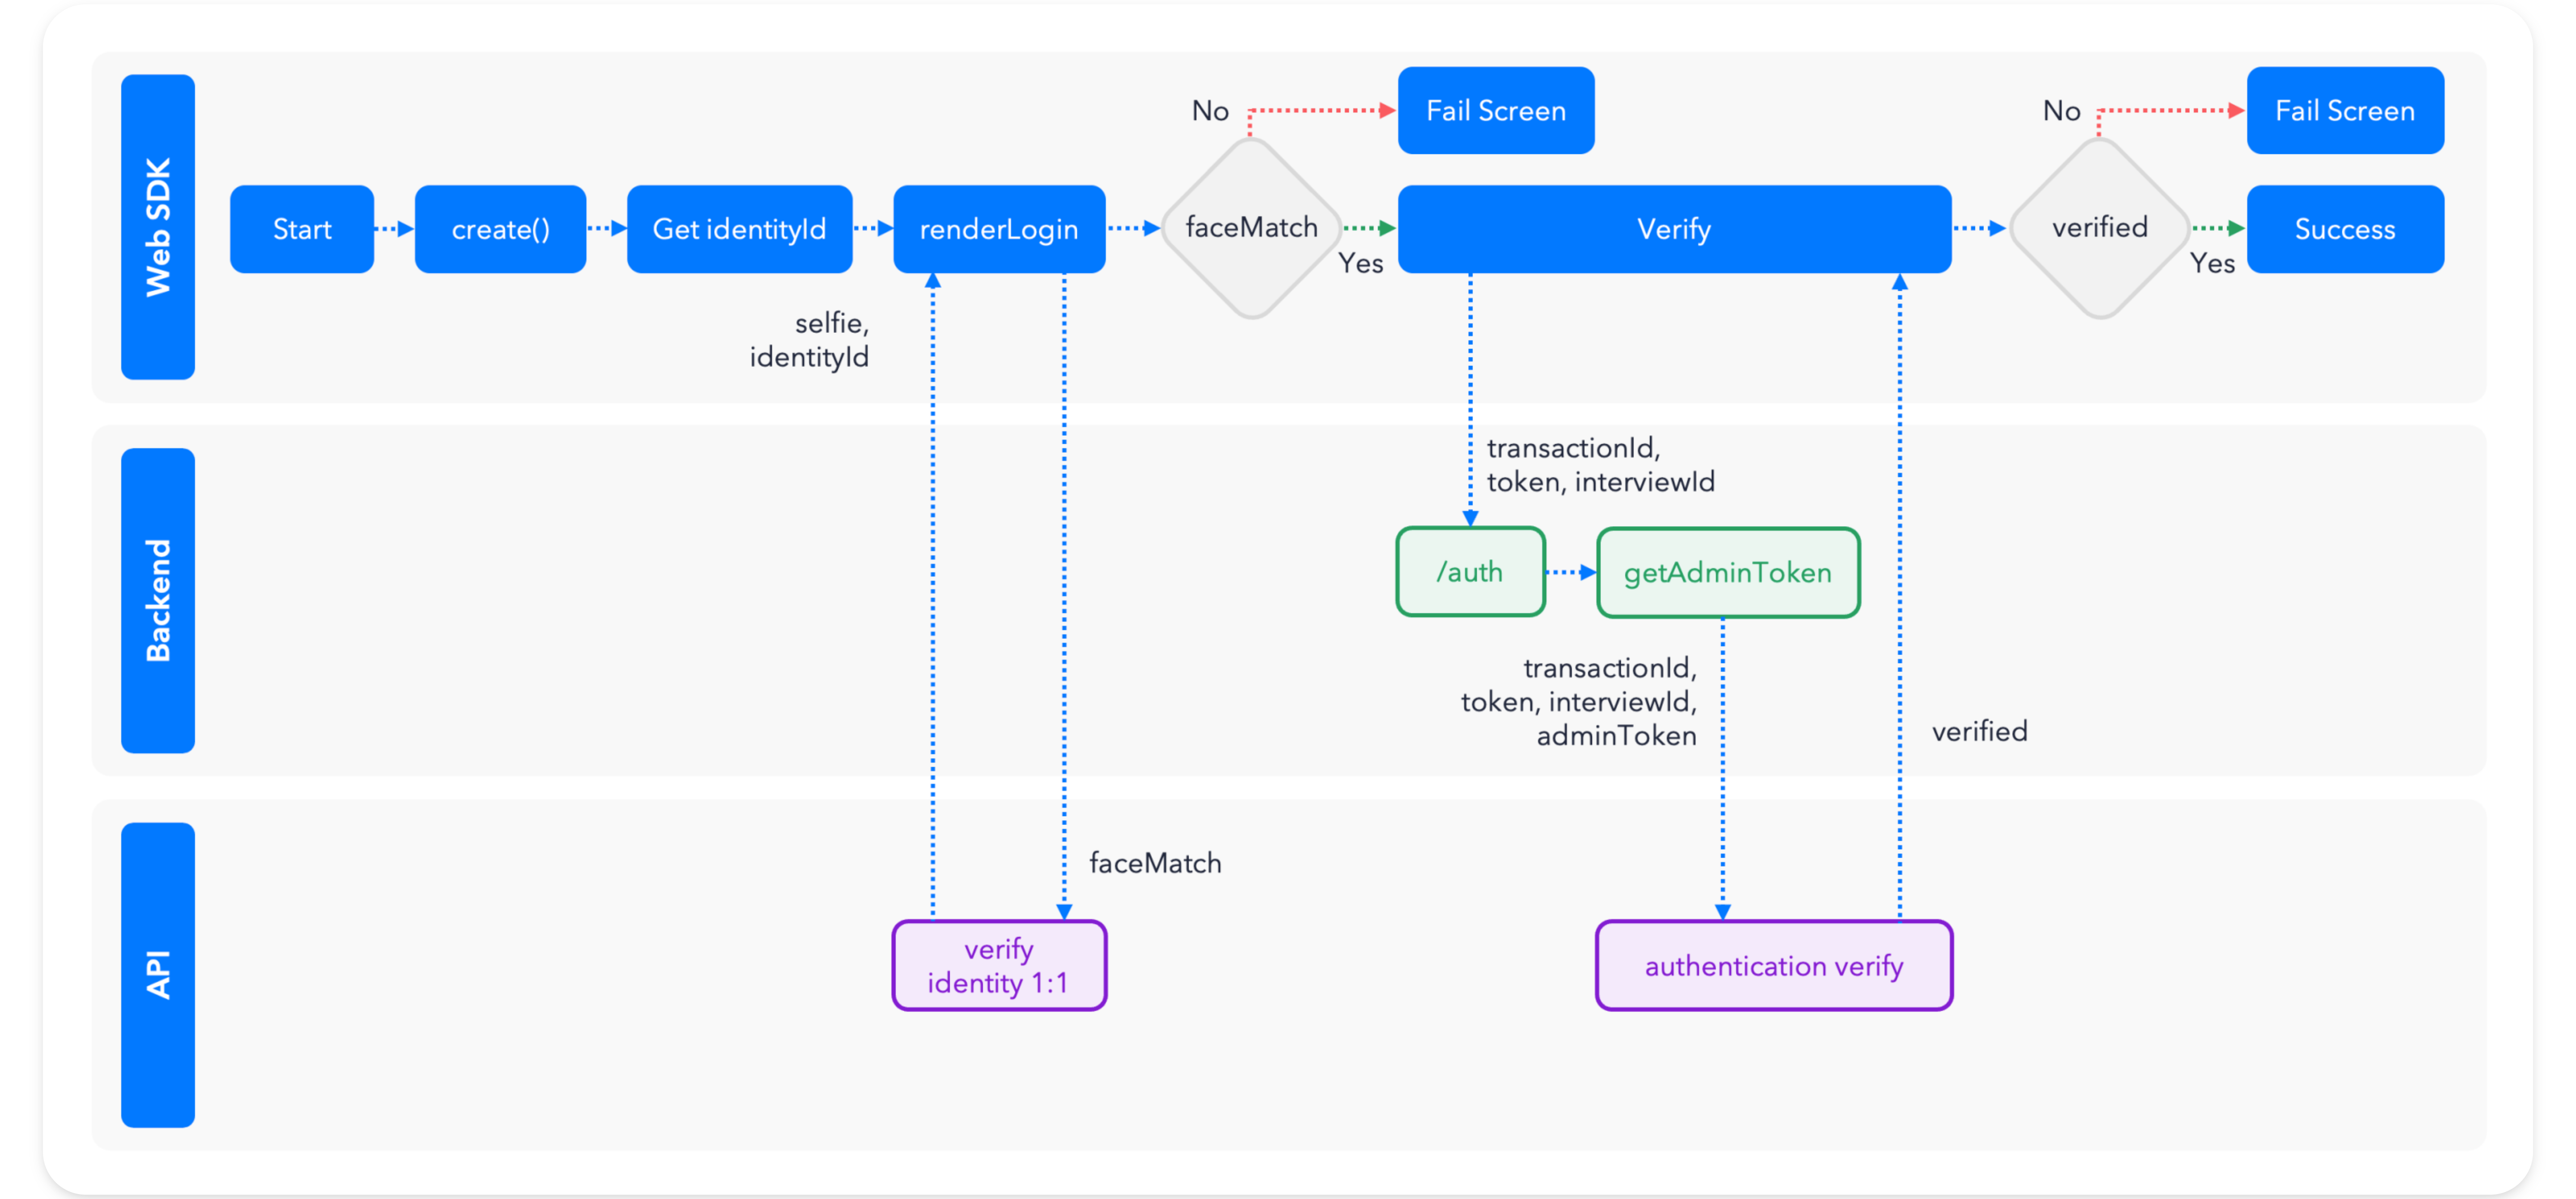
- Your application uses the
renderLoginmethod from the Web SDK, which captures a selfie for a user with an existing Incode Identity. - Using
faceMatch, Incode verifies that the user's new selfie matches the Incode Identity. - Your application back end validates whether Incode registered the authentication attempt and was successful using the
/authentication/verifyendpoint of the Omni API.
Pre-requisites
Before any coding, please make sure you are familiar with the following pre-requisites:
- Incode Identities
- Web SDK Standard Integration
Set up face authentication
Step One: Identify your user with renderLogin()
renderLogin()The renderLogin() method of the Incode Web SDK renders a face recognition screen and checks to see if the user has an Incode Identity.

ImportantIncode validates the existence of a user based on the biometric template generated when the Incode Identity was created. If you have questions about the confidence thresholds, ask your Customer Success Manager.
Use this HTML code to run the Incode Web SDK.
<!DOCTYPE html>

<html lang="en">
<head>
    <meta charset="UTF-8">
    <meta http-equiv="X-UA-Compatible" content="IE=edge">
    <meta name="viewport" content="width=device-width, initial-scale=1.0">
    <title>Incode Web SDK Demo 2024</title>
    <script src="https://sdk.incode.com/sdk/onBoarding-1.86.0.js" defer></script>
    <script src="app.js" defer></script>
</head>
<body>
    <main>
        <section id="incode-container"></section>
    </main>
</body>
</html>
The code includes the app.js file shown here. Notice that the apiURL on line 8 ends in /0. This is needed so the endpoint doesn't start the Incode SDK using the apiKey.
let incode;

const container = document.querySelector("#incode-container");

Initialize the Web SDK.
function initializeIncodeSDK() {
    const incode = window.OnBoarding.create({
        apiURL: "https://demo-api.incodesmile.com/0",
     });
    return incode;
}

Call the `renderLogin()` method to capture the user's face.
function identifyUser(){
    incode.renderLogin(container,{
        onSuccess: (response) => {
          Check for a face match to know if the user has a registered identity.
          if (response.faceMatch){
            // If  yes, validate the authentication (`/omni/authentication/verify`)
            // You will learn how later in this guide
          }
        },
        isOneToOne: true,
        oneToOneProps: {
          identityId: "The user's identity ID (UUID)"
         }
    });
}

async function app() {
    incode = initializeIncodeSDK();
    identifyUser();
}

document.addEventListener("DOMContentLoaded", app);
Step Two: Check whether the user's selfie and the Incode Identity match
This image shows an example of the renderLogin() method response.
{
    "customerId": "635f3a596a3dfd258aca0af3",
    "token": "IDENTITY TOKEN",
    "interviewId": "6350faae5d5aa3c7fa905cb9",
    "interviewToken": "ONBOARDING SESSION TOKEN",
    "transactionId": "64102af47b8072faffad19da",
    "faceMatch": true,
    "spoofAttempt": false,
    "secondFactor": false,
    "children": [],
    "spoofConfidence": 0.00383246,
    "recognitionConfidence": {
        "confidence": 0.904334,
        "candidates": []
    },
    "blurriness": 273.622,
    "isBright": true,
    "overallScore": 0.904334,
    "overallStatus": "PASS",
    "base64Image": ""
}
For a face authentication process, these properties from the response are crucial:
faceMatch: user was successfully identified (true) or not (false).customerId: ID of the existing Incode Identity determined to belong to the user.token: authentication token.interviewToken: session token for the user's original onboarding. You can use this value in your application back end to access original data from the user's onboarding session (for example, to get OCR data like name or address via the Omni API).transactionId: identifier for this authentication attempt identifier.
Step Three: Validate the authentication attempt
Your application back end must use the /omni/authentication/verify endpoint to validate the authentication attempt, because the Omni API requires an admin token. Use the cURL request shown here to do so.
curl --location '[YOUR INCODE API URL]/omni/authentication/verify' \
--header 'Accept: application/json' \
--header 'Content-Type: application/json' \
--header 'api-version: 1.0' \
--header 'x-api-key: INCODE API KEY' \
--header 'X-Incode-Hardware-Id: ADMIN TOKEN' \
--data '{
  "transactionId": "AUTHENTICATION ATTEMPT IDENTIFIER FROM THE renderLogin() METHOD RESPONSE",
  "token": "AUTHENTICATION TOKEN FROM THE renderLogin() METHOD RESPONSE",
  "interviewToken": "The session token FROM THE renderLogin() METHOD RESPONSE"
}'
The /omni/authentication/verify request body requires these values from the renderLogin() response explained in the previous step:
transactionIdtokeninterviewToken
The following image shows the /omni/authentication/verify response.
{
  "verified":true
}
{
"verified":true
"reason": 0
}This verified (boolean) key is the only value returned indicating the authentication is legitimate. As shown in the high-level diagram, you must validate this value to decide whether the user continues with your application flow.
Updated 3 months ago
What’s Next
- You can download the code sample for this guide.
- Get a webhook notification every time an authentication is registered.