
Get Onboarding URL [old]
How to get the URL to start the onboarding process
You can get two types of Onboarding URLs:
- Dynamic URL(recommended): Generated by calling the Omni API after a session start.
- Static URL: Created automatically by the Workflow, is the same for all users.
Dynamic URL
In the backend, you will need to implement an endpoint that creates a session and then generates the onboarding URL.
- Create an onboarding session following this guide Create a Session.
- Get an Onboarding URL following this guide Generate Onboarding URL.
Dynamic onboarding URLs are flexible, and you can add metadata to the onboarding session, such as externalCustomerId, custom-fields, and redirectionURL.
A sample of such a combined endpoint is presented below for your convenience.
// Combined endpoint that calls incodes `omni/start` and then with the token calls `0/omni/onboarding-url`
// to retrieve the unique onboarding URL for the newly created session.
app.get('/onboarding-url', async (req, res) => {
  // Start Session
  const startHeader = {
    'Content-Type': "application/json",
    'x-api-key': API_KEY,
    'api-version': '1.0',
  };
  const startParams = {
    configurationId: CONFIGURATION_ID,
    countryCode: "ALL",
    language: "en-US",
    // redirectionUrl: "https://example.com?custom_parameter=some+value",
    // externalCustomerId: "some value to identify the user in your system",
  };
  const responseStart = await fetch(
    "USER.DEMO_URLomni/start",
    {
      method: 'POST',
      body: JSON.stringify(startParams),
      headers: startHeader
    }
  );
  const startData = await responseStart.json();

  // Generate URL
  const onboardingHeader = {
    'Content-Type': "application/json",
    'x-api-key': API_KEY,
    'api-version': '1.0',
    'X-Incode-Hardware-Id':startData.token
  };

  const responseOnboardingUrl = await fetch("USER.DEMO_URL0/omni/onboarding-url", {method: 'GET', headers:onboardingHeader});
  const onboardingUrlData = responseOnboardingUrl.json();
  res.json({url: onboardingUrlData.url, interviewId: startData.interviewId, token: startData.token});
});
Return just what is neededWe are returning more things thats just the
url, depending on the implementation you might need thetokento securely ask for the user scores, or maybe use theinterviewIdto use as a reference to your own systems.This data is added here we can show you how to get it, but always try to return the minimum of information in your end product.
Static URL
You can get the static Onboarding URL by clicking the link icon from the Workflows list shown on Omni Dashboard.
 ##
##
Not RecommendedUsing an static URL is simple and easy, but you still need to start the session in the backend and read the results in a webhook for anything slightly useful. Therefore 99% of integrations end up implementing a backend and enjoying the added benefits of relating the
interviewIdwith anexternalCustomerId.At this point generating the url in the backend is just the better logical steps.
Setup Redirect URL and CorrelationId (required for Redirect and Back)
When you are doing a Redirect and Back integration, once the Onboarding process is finished, the end user will be redirected back to an specific url on the Web Application to continue the process. You will also need a value stored in a cookie or local storage to identify the user coming back.
You will need to:
- Create this URL entry point to be able to receive the end users back (e.g.
https://your.app.com/finished.html). - Setup this URL in the Workflow configuration or during the
/startcall. - Choose a unique identifier for this session and save it in a way
https://your.app.com/finished.htmlcan retrieve it back.
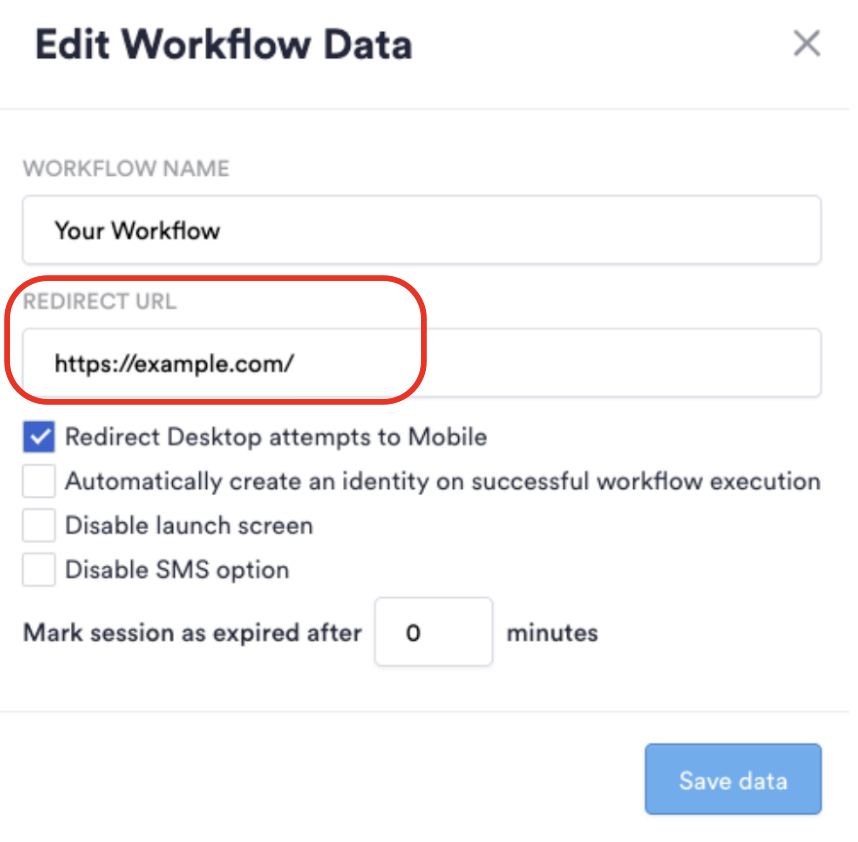
Setup Redirect URL in Workflow
Go to Workflows > Open workflow designer > Edit, Click on the pencil next to the workflow name and fill the Redirect URL field in the popup. Set this up so it goes to a page specifically made to receive user back from the Incode's Web Flow (e.g. https://your.app.com/finished.html)
Setup redirectionUrl during session creation
Use this option to set and specific URL every time, probably even sending some custom parameters unique for that session.
  const startParams = {
    configurationId: CONFIGURATION_ID,
    countryCode: "ALL",
    language: "en-US",
    redirectionUrl: "https://your.app.com/finished.html?custom_parameter=some+value",
    //externalCustomerId: "some value to identify the user in your system",
  };
OptionalYou can also take advantage of the
externalCustomerIdparameter to link this session to the user unique identifier for you to use later.It will be visible in the dashboard, returned in the webhook when the onboarding finishes and can be used to do searches in the dashboard.
Setup a CorrelationId
When the user is back from the Incode's flow, there will be no data point in the URL to let you know which user is coming back, so you will need to setup a correlationId to continue the process.
This correlationId could be anything, the user id or an interview id are the most common ones, but for security in this step it would be a good idea to generate a unique identifier to work as a correlation to the original session to avoid exposing user or interview ids to the frontend, and Instead store this delicate information in your backend.
The details on how to increase the security of your information is up to you. but for our simplest case, you can use interviewId as correlation and return it along with the token, then store this 2 values Client Side (Browser Local Storage, Browser Cookies, etc.), make sure you can retrieve this data later when the user is sent to redirectionUrl.
Updated 3 months ago