
Workflow Implementation Options
This page describes on how to do a workflow Incode Mobile Onboarding implementation.
Integrating the identity verification via workflows into your application or website is a crucial step in utilizing the full capabilities of the Incode Omni platform. The platform offers a versatile set of integration options to cater to different needs, including direct onboarding URLs, iFrame integration, and SDKs for iOS, Android, and React Native platforms. Each method provides a seamless way to incorporate the identity verification process into your user flow, enhancing user experience and security.
Web - Onboarding URL
The onboarding URL is a straightforward method to start the identity verification process. By directing users to this URL, they can begin their onboarding session without the need for integrating specific SDKs or custom UI elements into your application. This approach is ideal for quick deployments and can be easily shared via email or text message. For more details on how to generate and use the onboarding URL, refer to the section on Low Code integration in our detailed guide.
Mobile Platforms - iOS, Android, React Native
For native mobile applications, the Incode Omni platform provides SDKs for both iOS and Android. These SDKs allow for deep integration into your mobile app, offering a native experience for users and access to additional functionalities that enhance the verification process.
React Native developers can take advantage of the dedicated React Native SDK to integrate the onboarding session into cross-platform applications. This SDK combines the ease of development in React Native with the robust features of the Incode Omni platform, ensuring a native-like experience across both iOS and Android devices.
Before you start, setup the environment and install the SDK into the project following the details outlined in the environment setup guides.
The minimum supported Android version is 21, which supports 99.6% of devices.
The minimum supported iOS version is iOS 13, which supports 99.6% of devices.
Step 1: Initialize the Incode SDK
Before the Incode SDK can be utilized, it must be initialized. Check the following code on how to initialize the Incode SDK on each platform.
fun incodeSDKInitialize(app: Application) {
    try {
        IncodeWelcome.Builder(app, Constants.API_URL, Constants.API_KEY)
            .setLoggingEnabled(true)
            .build()

        incodeSDKInitialized = true
    } catch (exception: Exception) {
        incodeSDKInitialized = false
    }
}

private fun setIncodeCommonConfig() {
    val commonConfig: CommonConfig = Builder()
        .setShowExitConfirmation(true)
        .setShowCloseButton(true)
        .build()

    IncodeWelcome.getInstance().setCommonConfig(commonConfig)
}
public static void incodeSDKInitialize(Application app) {
try {
new IncodeWelcome.Builder(app, Constants.API_URL, Constants.API_KEY)
.setLoggingEnabled(true)
.build();
incodeSDKInitialized = true;
} catch (Exception exception) {
incodeSDKInitialized = false;
}
}
private void setIncodeCommonConfig() {
CommonConfig commonConfig = new CommonConfig.Builder()
.setShowExitConfirmation(true)
.setShowCloseButton(true)
.build();
IncodeWelcome.getInstance().setCommonConfig(commonConfig);
}func incodeSDKInitialize(api_url: String, api_key: String) {
IncdOnboardingManager.shared.initIncdOnboarding(url: api_url,
apiKey: api_key,
loggingEnabled: true,
testMode: testMode) { (success, error) in
print("IncdOnboarding SDK initialization, success: \(success == true), error: \(error?.description ?? "nil")")
self.dispatchGroup.leave()
}
}
func setIncodeCommonConfig() {
IncdOnboardingManager.shared.allowUserToCancel = true
IncdOnboardingManager.shared.idBackShownAsFrontCheck = true
IncdOnboardingManager.shared.idFrontShownAsBackCheck = true
}const IncodeSDKInitialize = (API_URL, API_KEY) => {
IncodeSdk.initialize({
testMode: false,
apiConfig: {
url: API_URL,
key: API_KEY,
},
waitForTutorials: true,
})
.then((_) => {
startWorkflow();
})
.catch((e) => {
console.error('Incode SDK failed init', e);
});
};Step 2: Create the session
Next, a session needs to be created in order for the data to be captured. This requires a Configuration ID, which is also known as a flow ID. To configure a flow, check out the getting started guide.
private fun getSimpleWorkflowSession(): SessionConfig {
    val sessionConfig: SessionConfig = Builder()
        .setConfigurationId(Constants.WORKFLOW_ID)
        .build()

    return sessionConfig
}
private SessionConfig getSimpleWorkflowSession() {
SessionConfig sessionConfig = new SessionConfig.Builder()
.setConfigurationId(Constants.WORKFLOW_ID)
.build();
return sessionConfig;
}func createWorkflowSessionConfiguration() -> IncdOnboardingSessionConfiguration {
return IncdOnboardingSessionConfiguration(configurationId: "PASTE_HERE_WORKFLOW_ID")
}function getSimpleWorkflowSession() {
let sessionConfig: {
region: 'ALL',
configurationId: WORKFLOW_ID,
};
return sessionConfig;
}Step 3: Execute the Onboarding
Once the SDK is initialized, flow is configured, session is created, and callbacks are implemented, then it is ready for the user to start the flow by calling the startOnboarding function.
private fun startWorkflow() {
    setIncodeCommonConfig()
    IncodeWelcome.getInstance().startWorkflow(
        activity,
        getSimpleWorkflowSession(),
        getSimpleWorkflowOnboardingListener()
    )
}
private void startWorkflow() {
setIncodeCommonConfig();
IncodeWelcome.getInstance().startWorkflow(
activity,
getSimpleWorkflowSession(),
getSimpleWorkflowOnboardingListener()
);
}func startStraightforwardOnboarding() {
setIncodeCommonConfig()
let sessionConfig = createWorkflowSessionConfiguration()
IncdOnboardingManager.shared.presentingViewController = self
IncdOnboardingManager.shared.startWorkflow(sessionConfig: sessionConfig, delegate: self)
}function startWorkflow(){
let sessionConfig = getSimpleWorkflowSession();
IncodeSdk.startWorkflow({
sessionConfig: sessionConfig,
})
.then((result) => {
fetchUserScores();
})
.catch((e) => {
// TODO - Manage Onboarding error
});
}Step 4: Process Results
private fun fetchUserScores(interviewId: String) {
    IncodeWelcome.getInstance().getUserScore(FAST, interviewId, object : GetUserScoreListener {
        override fun onUserScoreFetched(result: UserScoreResult) {
            Timber.d("onUserScoreFetched: %s", result)

            validateResultWithBusinessLogic(result)
        }

        override fun onUserCancelled() {
            Timber.d("getUserScore onUserCancelled")
        }

        override fun onError(error: Throwable) {
            Timber.d("getUserScore onError: %s", error)
        }
    })
}

private fun validateResultWithBusinessLogic(result: UserScoreResult) {
    // TODO - Apply business rules to check the scores of the session
}
private void fetchUserScores(String interviewId) {
IncodeWelcome.getInstance().getUserScore(FAST, interviewId, new GetUserScoreListener() {
@Override
public void onUserScoreFetched(UserScoreResult result) {
Timber.d("onUserScoreFetched: %s", result);
validateResultWithBusinessLogic(result);
}
@Override
public void onUserCancelled() {
Timber.d("getUserScore onUserCancelled");
}
@Override
public void onError(Throwable error) {
Timber.d("getUserScore onError: %s", error);
}
});
}
private void validateResultWithBusinessLogic(UserScoreResult result) {
// TODO - Apply business rules to check the scores of the session
}func fetchUserScore() {
IncdOnboardingManager.shared.getUserScore(userScoreFetchMode: UserScoreFetchMode.fast, interviewId: interviewId ,completion: {
userScore in
if(userScore.error != nil) {
validateResultWithBusinessLogic()
}
else {
// TODO - Manage fetch user score error
}
})
}
func validateResultWithBusinessLogic(userScore:UserScore) {
// TODO - Apply business rules to check the scores of the session
}function fetchUserScores(interviewId) {
IncodeSdk.getUserScore({ mode: 'fast' })
.then((result) => {
validateResultWithBusinessLogic(result);
})
.catch((e) => {
// TODO - Manage getting User Score error
});
}
function validateResultWithBusinessLogic(result){
// TODO - Apply business rules to check the scores of the session
}Agent initiated
Without any integration, onboarding link can be shared with users via SMS directly from Omni dashboard. This is a use case for call centres or customers who must verify their users identity, but not necessary integrate that into their own platform. In the Session list, with option New Manual Session, link for an onboarding can be sent to the user via SMS.
- Add user phone number
- Choose a workflow
- Send SMS
- Review session result
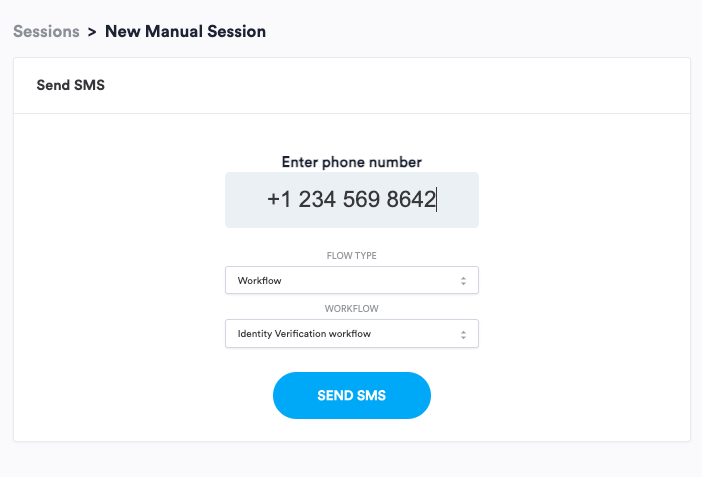
Send the onboarding URL via SMS
Updated 4 months ago