
User Experience V2 Migration Guide
Instructions for upgrading your Incode Web SDK integration to use the new capture UI/UX introduced in v1.83.0.
Step One: Upgrade the Incode Web SDK
The full UXv2 experience is available starting on WebSDK version 1.83.0. Depending on your integration type (CDN or Package manager), you should update to the latest Web SDK version.
 <!-- Include Incode Web SDK inside the head tag -->
  <script src="https://sdk.incode.com/sdk/onBoarding-USER.WEB_SDK_VERSION.js" defer></script>
"dependencies": {
//...
"@incodetech/welcome": "^USER.WEB_SDK_VERSION"
}Step Two: Replace ID capture-related methods
The new renderCaptureId() is a streamlined method. It incorporates the previously separate steps into a centralized ID capture process, as shown in the image.
For example, instead of using renderDocumentSelector() ➔ renderCamera("front") ➔renderCamera("back"), and/or renderCamera("passport"), you now use only renderCaptureId(). All logic is handled internally. The following code shows the changes you must make for the new ID capture experience.
// Remove all the logic and chaining of methods for:
// renderDocumentSelector()
// if id ➔ renderCamera('front') ➔ renderCamera('back')
// if passport ➔ renderCamera('passport')

// Use the single method renderCaptureId()
incode.renderCaptureId(cameraContainer, {
  session: incodeSession,
  onSuccess: processId, // Method to call incode.processId();
  onError: showError,
  //forceIdV2: true, // Optional: To force UXv2 during development, leave it blank for production.
  //uiConfig: UiConfig, // Optional: custom theming.
});
2.1. Where are all my options?
options?Previously, many parameters had to be passed with the
optionsobject. Now, most parameters are automatically retrieved by the ID Capture module in your Flow or Workflow configuration.
| Previous option name | New option/module configuration | Description |
|---|---|---|
onSuccess | No change | Callback function to be executed after a successful capture. |
onError | No change | Callback function to be executed after a capture error. |
token | session | Incode Session token. |
numberOfTries | ID Capture ➔ "Number of image capture attempts" | Number of opportunities the user has to perform a successful capture. |
timeout | ID Capture ➔ "Autocapture Timeout" and "ID detection timeout" | Timeouts in seconds before enabling the manual capture mode. |
showTutorial | ID Capture ➔ "ID capture tutorial" | Toggle on/off Incode capture tutorials. |
isRecordingEnabled | ID Capture ➔ "Enable ID recording" | Records a brief video of the moment of capture. |
2.2. What happened to the renderDocumentSelector() method?
renderDocumentSelector() method?You can toggle the Document Selector screen by selecting the option ID Capture ➔ "Show document chooser screen". You'll find this in your Flow or Workflow configuration, as shown here.
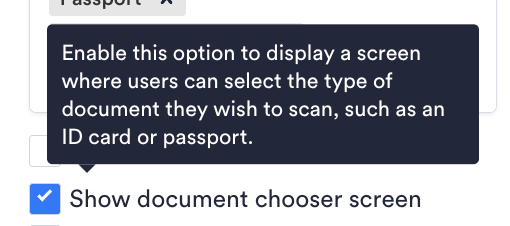
The document selector screen is optional. The new capture experience recognizes the document type and adjusts automatically. However, the screen provides a custom UI that can assist the user in capturing the passport more effectively.
The
processId()method is still required after capturing the ID document.
Step Three: Replace the renderCamera('selfie') method
renderCamera('selfie') methodThe new renderCaptureFace() method is a direct replacement of renderCamera('selfie') The following code shows the changes you must make for the new face capture experience.
// Remove renderCamera('selfie')

// Use the method renderCaptureFace()
incode.renderCaptureFace(cameraContainer, {
  session: incodeSession,
  onSuccess: processFace, // Method to call incode.processFace();
  onError: showError,
  //forceV2: true, // Optional: To force UXv2 during development, leave it blank for production.
  //uiConfig: UiConfig, // Optional: custom theming.
});
3.1. Where are all myoptions?
options?Previously, many parameters had to be passed with the
optionsobject. Now, most parameters are automatically retrieved by the Face Capture module in your Flow or Workflow configuration.
| Previous option name | New option/module configuration | Description |
|---|---|---|
onSuccess | No change | Callback function to be executed after a successful capture. |
onError | No change | Callback function to be executed after a capture error. |
token | session | Incode Session token. |
numberOfTries | Face Capture ➔ "Number of image capture attempts" | Number of opportunities the user has to make a successful capture. |
timeout | Face Capture ➔ "Autocapture Timeout" | Timeout in seconds before enabling the manual capture mode. |
showTutorial | Face Capture ➔ "Face capture tutorial" | Toggle on/off Incode capture tutorials. |
isRecordingEnabled | Moved to: Face Capture ➔ "Enable face recording" | Records a brief video of the moment of capture. |
assistedOnboarding | Module Configuration: Face Capture ➔ "Assisted Onboarding" | Allows the rear camera to be used for face capture instead of the front camera, enabling a second person to assist the user. |
hatCheckEnabled | Face capture ➔ "Hat Validation" | Enables the hat detection check. |
lensesCheckEnabled | Face capture ➔ "Lenses Validation" | Enables the glasses detection check. |
maskCheckEnabled | Face capture ➔ "Mask Validation" | Enables the face mask detection check. |
eyesClosedCheckEnabled | Face capture ➔ "Closed eyes validation" | Enables the closed eyes detection check. |
Step Four: Call processFace() after
processFace() afterIn order to complete the face capture process with the new UI/UX experience, you must call the processFace() method after the face capture. The following code shows the changes you must make.
async function processFace() {
  try {
    const results = await incode.processFace(incodeSession); // {token: 'sdfsfs....sdfsdf'}
    console.log("processFace results", results);
    nextStep();
  } catch (error) {
    showError(error);
  }
}
Step Five: Customization
Previously, customers who wanted to customize the capture experience used CSS classes. The new UX v2 uses Design Tokens as shown here.
uiConfig
export type UiConfig = {
  branding?: {
    logo?: { src?: string; height?: string };
    hideFooterBranding?: boolean;
  };
  closeButton?: {
    show?: boolean;
    position?: 'left' | 'right';
    offset?: number | string;
  };
  theming?: {
    designTokens?: DesignTokens
    shirtColor?: string;
  };
  notifications?: {
    minimal?: boolean;
  };
};
You can now customize the UI by passing an object with the value to overwrite, as shown in the following code. This allows for more direct customization while still maintaining a coherent UI.
const UiConfig = {
  theming: {
    designTokens: {
      button: {
        primary: {
          surface: { default: '#fda9cc', hover: '#fa91bd' },
          text: { default: '#ffffff' },
        }
      },
    }
  },
};

incode.renderCaptureId(cameraContainer, {
  session: incodeSession,
  onSuccess: processId, // Method to call incode.processId();
  onError: showError,
  uiConfig: UiConfig, // Optional: custom theming.
}
For more information, review the Theming page.
Step Six: Turn on the UXv2 experience
Once you've completed these changes, just turn on the new experience. To do so, set forceIdV2 in renderIdCapture and forceV2in renderFaceCapture to true.
Updated 4 months ago