
Open ID Connect (OIDC)
Overview
Open ID Connect (OIDC) is an identity layer built upon the OAuth 2.0 framework and can be used by Incode customers to standardize the integrations between their applications and Incode.
For more details on how OpenID Connect works, see here.
Use Cases Supported
Incode currently support the following use-cases using OIDC:
Onboarding of a new user

During onboarding, the user will be prompted to take a photo of their face (selfie) and capture their government-issuedID, which will be used for verification purposes. The selfie photo is then compared to a government-issued ID, such as a driver's license, to verify the user's identity. If the user's identity is successfully verified, a user identity can be created in Incode's system with the face stored as a one-way vector / face template representation, and they can proceed to use the face recognition authentication method.
Onboarding flows/workflows can be additionally configured to include additional steps using Incode's legacy flows or Workflows.
Face Authentication via one-to-one (1:1) Face Match, using either an Incode Identity UUID or email as identifier

When a user attempts to authenticate using their face, the Incode authorization server compares the user's face (in the form of a vector / face template) to the vector / face template created during onboarding.
Using the one-to-one method, an identifier for the user must be provided in a login_hint with either a UUID of the Identity created during onboarding (stored on the customer side and passed in to Incode) or an email address of the user in the user's identity profile.
Face Authentication via one-to-many (1:N) Face Match

When a user attempts to authenticate using their face, the Incode authorization server compares the user's face to the face template created during onboarding.
Using the one-to-many method, the user's biometric vector / face template is compared against the identities within Incode's system, and no login_hint needs to be provided.
When a user attempts to authenticate using their face, the Incode authorization server compares the user's face to the face template created during onboarding. If the user's face is recognized and they are authenticated Incode will return results via an authorization code exchange for access and ID tokens.
OIDC Protocol Support
Authentication Code Flow (with PKCE)
The Authorization code flow is the only flow supported by Incode with OpenID Connect (OIDC). This flow involves several steps, including authentication, authorization, and the exchange of tokens.
The typical use cases for the authorization code flow include web applications, native applications and single-page applications that require secure authentication and access to protected resources. This mechanism provides the benefit of not exposing any tokens to the browser or end-user.
In the first step of the authorization code flow, the client application initiates the flow by making a request to the authorization server. The user is then redirected to the authorization server's login page, where they enter their credentials and consent to the permissions requested by the client.
Once the user is authenticated and has granted permission, the authorization server returns an authorization code to the client. The client then exchanges the authorization code for access and ID tokens that can be used to access protected resources.
It's worth noting that the original authorization code flow is designed for client applications that can securely store a client secret. Native applications and other clients that can't securely store a client secret may need to use the authorization code flow with PKCE instead. Incode supports Authorization code flow with PKCE as well.
Authentication Methods
- Basic Authentication: This authentication method is used when the client can securely store a client secret. It involves including the client's ID and secret in the request header in the form of a base64 encoded string.
- JSON Web Tokens (JWTs): This method is similar to basic authentication, but instead of including the client's ID and secret, it includes a digitally signed JWT in the header. The JWT contains information about the client and is used to verify the client's identity.
- Client Secrets: This authentication method is also used when the client can securely store a client secret. It involves including the client's ID and secret in the request body in the form of a multipart/form-data message.
Scopes
-
openid (mandatory): This scope indicates that an application intends to use the OIDC protocol to verify a user's identity.
-
profile (Claims: name, family_name, given_name, middle_name, gender, birthdate, locale, and updated_at): This scope provides basic profile information about the user.
{ "name": "John Doe", "email": "[email protected]" "family_name": "Doe", "given_name": "John", "middle_name": "Peter", "gender": "male", "birthdate": "1990-01-01", //yyyy-MM-dd "locale": "en_US", "updated_at": 1650675090 } -
email (Claim: email): This scope provides the user's email address.
{ "email": "[email protected]" } -
address (Claim: address): This scope provides the user's address.
{ "address": "123 Main St, Anytown USA" } -
phone (Claim: phone_number): This scope provides the user's phone number.
{ "phone_number": "+13015551212" // international E164 format } -
selfie (Claim: selfie): This scope provides the user's selfie.
{ "selfie": "https://reddacted-url.com/env/f35844c8bcbf45be1a64fd6e8d622cc93b0fcfaa/selfie/0140d9eb-3246-452a-aad0-f7574c49ad50.jpg?X-Amz-Security-Token=FGoEb3JpZ2luX2VjEKT%2F%2F%2F%2F%2F%2F%2F%2F%2F%2FwEaCXVzLWVhc3QtMSJHMEUCIQCCFCkEjS5sK6RNPnMDAOjy7QYJ%2FLI0OAq4SuJmYK4vWgIgLjy3DWJ8fc8lGuMU5Py2Jkplps7sgGXMLVen%2BrGhbmEq%2FwMIHRABGgw5OTI3MDQyMjE4MTgiDB1sP8pvG%2BjJbcrc9ircA39rsXoCRrhUzNaEnVkLkPTCymNmaqHD94OfEnvdnMIvC4102v0mfTnM8j%2FWRE6E9%2BDPxlTIoyhG7nxCThm7ejy8SzK1R5dktUrt8ocV0DJtbp82iROhsScm9poxDe6dYv5HO0lRCEyuiGzkae3MhGFbyCRlH0%2BB8Ld5l0HPY%2Fu6gHXQOGNcQgweX%2BZHKcum2gbIWWKIrROHR25rw4PE2%2BJkRv7RYRLHF5bJ2x6CChcKsVzK%2Fw8e%2B6eFFPBcHGKL3lSpmnBGu%2FAb5M%2FbAum9W3PUUS81UCygrvU73DNw7EQgcEUIzLYpb7nL%2FsQjDBA%2F1O9kf%2BdQJ0UeWpUWUFvPom5MpsXoQxoSHhZujOUtb3Usc7RfW6mB9R0OT04vAde2%2Bf3qdTCHRc38jz6KMngDVCmkUdIDD0m1MsCWzPSehDp%2F8%2BkQYTliGZKXRgHR4Wv%2B9bj3LZpk4GkeFQ9JA%2BPZX9S0b%2B%2BhK%2FDZOnxxY38CFsdkcDlnBeWkcDXj5e8WQWcuLIHmSSypQ%2FgzCmL0nMKfZfbD5dbLNz1flXRa8cDSBswVgUA912bSB49orlhCyKKlAnnGZA3nQ2oXuC2YMmJD%2FAq5S%2FCH8ni4vMbP7s6Wm%2BfYSKWYI52N5btCVW%2FkMO7L3asGOqUBfKjM4RSF3EnPdr4PtAFWQc925Pb3eQlgEfVB0EGqr2uPOKZs5Dax7C%2FDgGT0vHSwExb2oaHJkULIykruhO6vTplvn%2FeyFUPI8klzWbuj5E7blFZA8C%2FuoKw2bjs%2FGxD9SHqQextmpXzhR45oOj8gkh9xc1IQ8MXTsnUm64fPI%2FAZ840941bHMLcz%2BaaWKjmRIyzoZmOTpMmsZo3pJkIgajIQcCpI&X-Amz-Algorithm=AWS4-HMAC-SHA256&X-Amz-Date=20231211T203443Z&X-Amz-SignedHeaders=host&X-Amz-Expires=3600&X-Amz-Credential=ASIA6OIOIKJ5FRKWKD7R%2F20231211%2Fus-east-1%2Fs3%2Faws4_request&X-Amz-Signature=d3aae984eedbf86320d101923531e60480a4769c3a7dfb02d885ca15738ef6e1" //Pre-signed url for selfie } -
selfie_attestation (Claims: liveness_score_value, liveness_score_status): This scope provides an attestation of the user's selfie, including liveness score value and status. This scope can be used when client needs to verify that the end user is a real person. This can be used in addition to other authentication method. The end user still needs to successfully pass onboarding initially.
{ "liveness_score_value": 0.9, "liveness_score_status": "OK" } -
id_attestation (Claims: id_photo_security_and_quality_tests, id_specific_tests, id_overall_score, id_overall_status): This scope provides an attestation of the user's face recognition, including security and quality tests, specific tests, overall score, and overall status. Given that the client receives detailed Identity verification scores, they decide to allow access to different resources to the users with higher or lower identity scores.
{ "id_photo_security_and_quality_tests": "tamperCheck, screenIdLiveness", "id_specific_tests": "issueDateValidity, documentClassification", "id_overall_score": 0.75, "id_overall_status": "OK" } -
fr_attestation (Claims: fr_overall_status, fr_overall_score, fr_tests (lenses, face_mask, brightness)): This scope provides an attestation of the user's face match. In case of onboarding authentication type, fr_attestation reflects Selfie versus ID Photo. In case of face authentication this reflects face authentication attempt results for Selfie versus Enrolled Photo/Database.
{
    "fr_tests": {
        "lenses": "no",
        "face_mask": "no",
				"brightness": "OK"
    },
    "fr_overall_status": "PASS",
    "fr_overall_score": 0.8533697
}
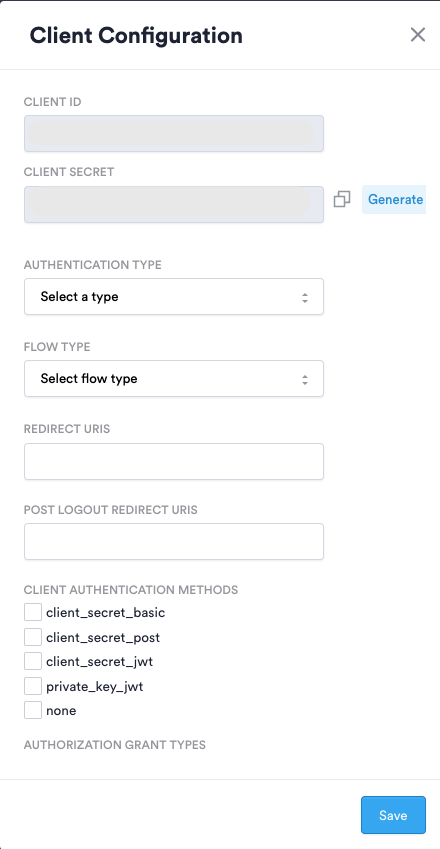
Setting up OIDC Configuration in Incode's Dashboard
- Navigate to Dashboard -> Configuration -> Incode OIDC Authorization Server - Client Configuration
- Click
Generate Newto create a new OIDC Configuration (bottom right corner) - Configure your client configuration as follows:
- Client ID - (Will be auto-generated) - Unique public identifier of client app
- Client Secret - (Will be auto-generated, but could be re-generated as necessary) - Secret known only to the client app and Incode Authorization server
- Authentication Type -
- Onboarding - Select for the new onboarding use-case
- Face authentication - Select for biometric face authentication use-case
- Flow Type -
- Flow - Incode's legacy configurator
- Workflow - Incode's customizable drag-and-drop no-code editor configurator (Recommended)
- Redirect URIs - Relying Party (RP) redirect URI upon completion
- Post Logout Redirect URI - (Optional)
- Client Authentication Methods - The authentication method used when authenticating the client when using the Token Endpoint
- client_secret_basic , client_secret_post , client_secret_jwt - Used when client can securely store a client secret
- client_secret_basic - Authentication using the HTTP Basic authentication scheme
- client_secret_post - Authentication by including the Client Credentials in the request body
- client_secret_jwt - Clients create a JWT using an HMAC SHA algorithm, signed by client secret and sends it in parameter client_assertion when invoking token endpoint
- private_key_jwt - Client creates and signs a JWT using its own private key and sends it in parameter named client_assertion when invoking token endpoint
- none - For clients that can’t securely store client secret (Native apps for example) and use PKCE flow.
- client_secret_basic , client_secret_post , client_secret_jwt - Used when client can securely store a client secret
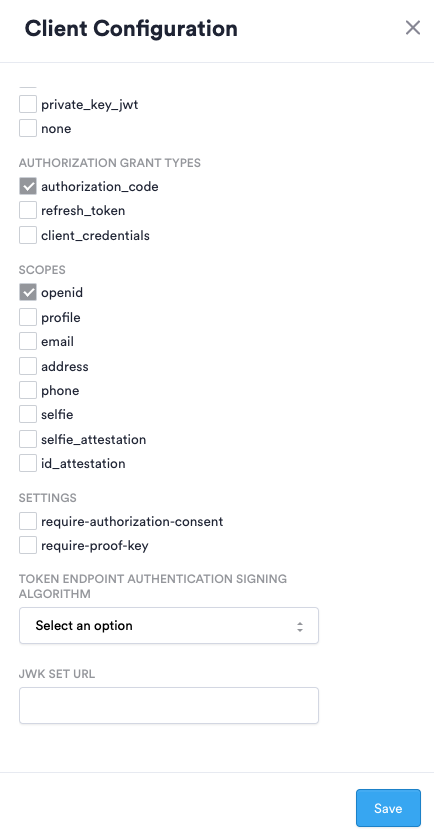
- Authorization Grant Types - Refers to the way client can get an access token
- authorization_code - This tells the token endpoint that the application is using the Authorization Code grant type (default grant for auth code flow)
- client-credentials - used when applications request an access token to access their own resources, not on behalf of a user
- refresh-token - used by clients to exchange a refresh token for an access token when the access token has expired.
- Scopes - See Scopes section above
- Settings - Additional settings for authentication process
- require-authorization-consent - indicates that user consent is required to authorize access to user's information
- require-proof-key - indicates that PKCE flow should be used
Creating an OIDC Authorization Request in a Client App
To create an authorize OIDC request, the following parameters must be set:
- Authorize URI: The URL of the authorize endpoint. For Incode Omni, the value should be
[INCODE_PROVIDED_URL]/oidc-url/oauth2/authorize. - Redirect URI: The URL where the user will be redirected after successful authentication.
- Client ID: The unique client identifier provided by Incode.
- Scope: The list of required scopes. The
openidscope is mandatory. Any other registered scope can be passed in, separated by spaces. - Custom State field: An optional value that is carried through the entire flow and returned to the client. It is common to use state to store an anti-forgery token that can be verified after the login flow is complete. Another common use is storing the location the user should be redirected to after logging in.
- Custom Nonce field: A random value that is used to prevent replay attacks.
- Response Type: Set to
code. This is the only response type supported by Incode Omni. - Use PKCE option (if necessary): Indicates that PKCE should be used.
After configuring the request parameters, the request can be sent, and the user can follow the steps in the authorization code flow to authenticate and obtain tokens from the Incode authorization server. The response will contain a code value that will be used in the next step.
Exchanging authorization code for access and ID tokens
In the Authorization Code Flow, the client exchanges the authorization code for access and ID tokens by sending a POST request to the token endpoint at [INCODE_PROVIDED_URL]/oidc-url/oauth2/token. The request body is sent in x-www-form-urlencoded format and must include the following parameters:
grant_type: Set toauthorization_code.client_id: The unique client identifier provided by Incode.client_secret: The secret known only to the client and Incode.redirect_uri: The URL where the client will receive the response.code: The authorization code retrieved in the first step of the flow.
Note that the data supplied in the body needs to be compliant with the configuration on the dashboard, and the example above is for the client_secret_post authentication method.
Testing & Troubleshooting
We recommend using the OIDC Debugger for testing & troubleshooting: https://oidcdebugger.com/
Get User Information
To retrieve user information from the authorization server, you can make a GET request to the /userinfo endpoint at [INCODE_PROVIDED_URL]/oidc-url/userinfo. This endpoint requires an access token to be included in the request header using the Bearer scheme.
Example Request:
GET /oidc-url/userinfo HTTP/1.1
Host: [INCODE_PROVIDED_URL]
Authorization: Bearer [ACCESS_TOKEN]
Example Response:
{
    "sub": "1234567890",
    "email": "[email protected]"
}
Well-known Endpoints
To retrieve all the well-known endpoints, please use [INCODE_PROVIDED_URL]/.well-known/openid-configuration