
Salesforce
This guide walks you through everything you need to do after installing the Incode Identity Verification for Salesforce package. By the end, your team will be able to trigger identity and/or business verification directly from any Contact, Lead, or Account record and see results update in real time.
You do not need to be a developer to complete this guide. Each step is numbered and takes about 20–30 minutes total.
What is Incode Verification for Salesforce?
Incode Verification for Salesforce is a managed package that brings Incode's identity verification (IDV) and business verification (KYB) directly into the Salesforce records your teams already work in: Contact, Lead, and Account. Sales, RevOps, and Compliance users can request a verification, watch its status update in real time, and review the result without ever leaving the CRM.
One click sends the customer a secure verification link by email. As Incode processes the session, webhook callbacks push the outcome back into Salesforce through a Platform Event, so the requesting user sees the status flip from Pending, Approved, or Declined inline, with no page refresh required.
The package ships with:
- A Lightning record-page component for Contact, Lead, and Account, configurable per layout as either an IDV or KYB card via Lightning App Builder.
- IDV flows for individuals, government ID capture, selfie, liveness, and face match, and any other module you might need from our solution.
- KYB flows for businesses, allowing the verification of business name and TIN lookup, registration status, entity type, address, and UBO/Director matching.
- Branded verification emails containing links the customer can follow to complete verification on their own device.
- Real-time push-based status updates via Platform Events.
- Verification history on every record, with a drill-down Session Details modal you can drill into:
- IDV: sub-scores (ID Verification, Face Recognition, Liveness, GovMatch, Video Selfie) and the captured selfie, front-ID, and back-ID images
- KYB: the full eKYB response (business name, TIN, address, registration status, entity type) and UBO/Director matches
- Optional storage of score JSON and captured ID images in Salesforce Files for compliance review.
Why does this integration matter?
Most teams that need identity or business verification today live in two systems: their CRM, where the customer relationship is tracked, and their verification dashboard, where the actual check happens. That split has a real cost:
- Slower onboarding. Reps copy data between tools, chase customers through email threads, and lose context as deals move forward.
- Weaker audit posture. Verification outcomes live in one system and the commercial record in another, making it hard to prove who was verified, when, and against what flow.
- Inconsistent fraud protection. Without verification embedded in the workflow, it often gets skipped on lower-priority accounts until a problem surfaces.
This integration closes that gap. Verification becomes a one-click step inside the same record where the deal, the contact, and the case history already live. For legitimate customers, onboarding gets faster. For compliance and AML teams, the audit trail gets tighter. For the business, fraud protection extends to every account, not just the high-value ones.
Who is it for?
- B2C and financial services teams running KYC at Contact or Lead creation
- B2B sales and onboarding teams running KYB before opening a new business account
- Compliance, AML, and Risk teams that need a defensible audit trail tying each verification to a Salesforce record
- Teams handling regulated or high-value transactions that benefit from step-up verification at contract or payment milestones
📦 Latest Package Installation Link
Use the link below to install or upgrade to the latest version of the package:
Latest version: v0.10.0-1:
- Production: https://login.salesforce.com/packaging/installPackage.apexp?p0=04tJx0000005PsDIAU
- Sandbox: https://test.salesforce.com/packaging/installPackage.apexp?p0=04tJx0000005PsDIAU
NoteThe links above always point to the current latest version. This page is updated with every new release, and previous versions are documented in Version History below.
Tip — install/upgrade into a specific orgThe link above defaults to
login.salesforce.com, which routes you through the standard Salesforce login picker. To go straight to the install/upgrade wizard inside a specific target org (e.g. a sandbox you're already logged into), swap the host with the target org's My Domain URL.For example, if the target org is
https://acme--sandbox.sandbox.lightning.force.com/lightning/page/home, change the path so the URL becomes:https://acme--sandbox.sandbox.lightning.force.com/packaging/installPackage.apexp?p0=04tJx0000005PsDIAUOpening that URL while logged into
acme--sandboxtakes you directly to the install/upgrade wizard for that org. The same pattern works for any sandbox, scratch org, or production org — keep the/packaging/installPackage.apexp?p0=…suffix and only swap the host.
Version History
| Version | Released | Highlights |
|---|---|---|
| v0.10.0-1 | 2026-05-31 | Combined IDV + KYB managed package · Real-time updates via Platform Events · Manual Review status writable · Webhook Secret + X-Incode-Secret header · Use Production API toggle · Store Score And Images toggle · Branded verification emails (auto-routed IDV vs KYB) · Session Details modal · Three permission sets (Admin / User / Webhook Guest) · Salesforce Site + Apex REST endpoint · Post-install setup script + idempotent Run Setup button |
Installation
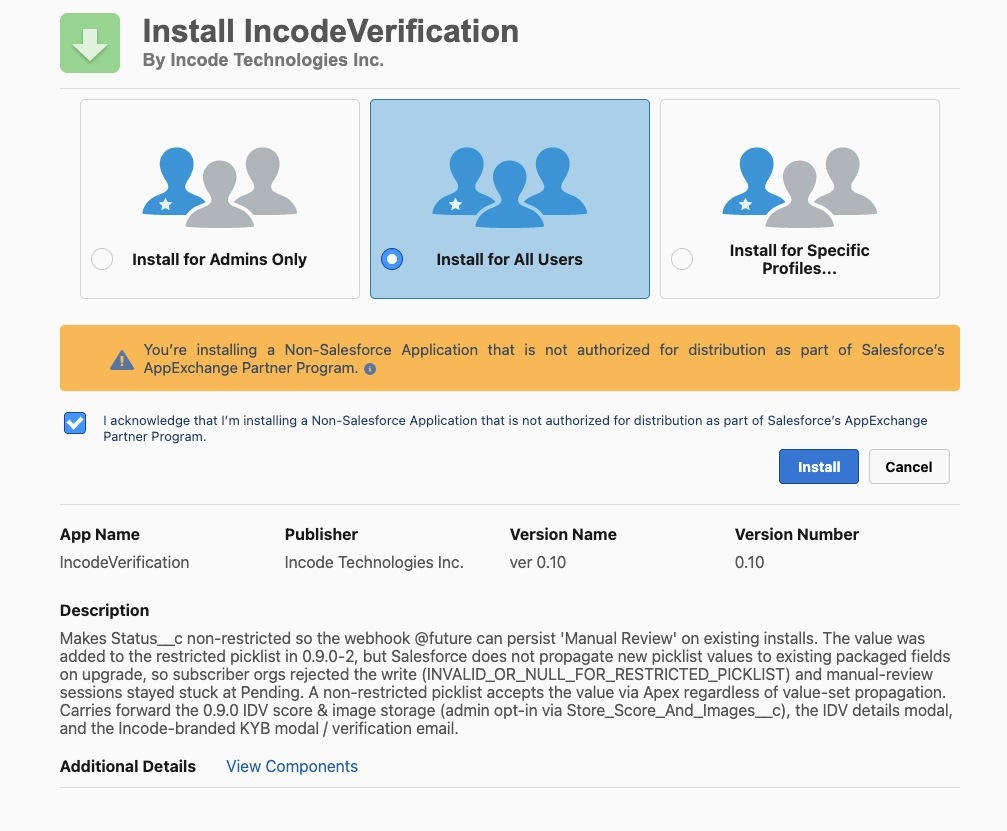
The installation links above take you to the following screens:
- Select Install for All Users.
NoteRemember to set proper settings regarding user access.
- Click Install.
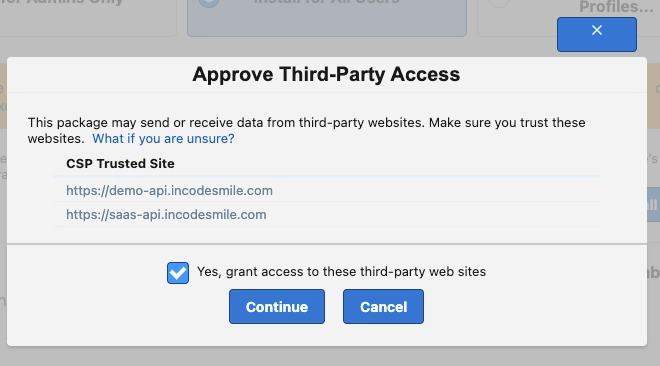
- In the pop-up requesting third-party access, check Yes, grant access to these third-party web sites. You must accept it because the managed package needs to communicate with the Incode solution through APIs. Click Continue.
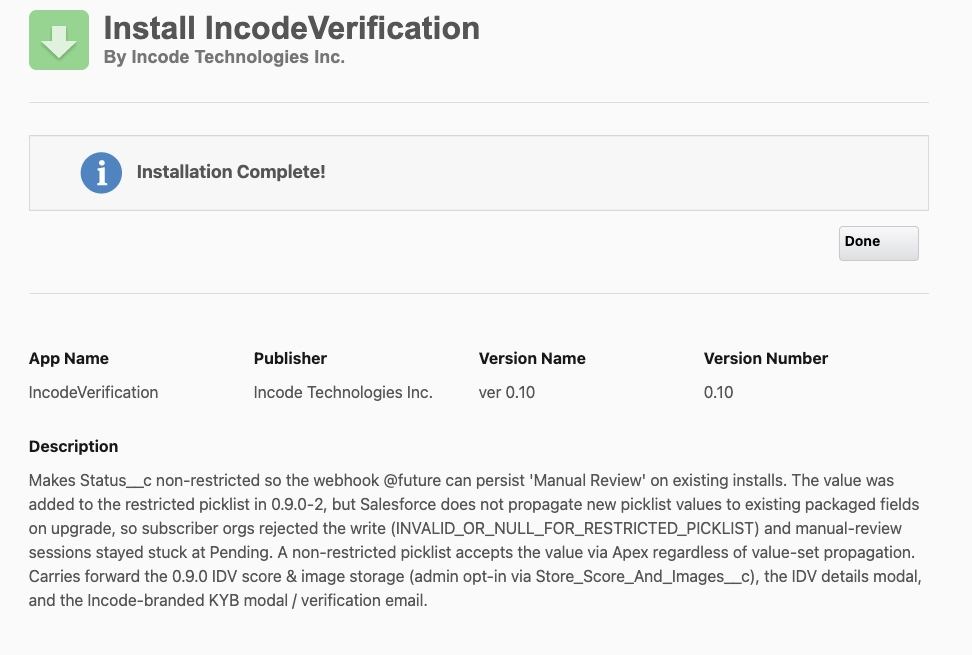
- A successful installation shows the following page with the "Installation Complete!" message. Click Done.
What the package automates for you
When you install or upgrade the package, a post-install script runs automatically and handles the following:
- Creates the default Incode Config record. You only need to fill in your API Key and Configuration ID (Flow ID).
- Verifies both Named Credentials are present and warns you if either is missing.
- Auto-creates two email templates into the
Incode Templatesfolder with automatic routing by verification type:- Incode Verification Request (IDV)
- Incode KYB Verification Request (KYB)
You create the folder once (Step 3), thenRun Setupin Step 4 to create both templates inside it.
- Assigns the
Incode_Webhook_Guestpermission set to the Site Guest User once the Salesforce Site exists. You create the Site (Step 2), thenRun Setupin Step 4 to pick it up and assign the permset automatically.
After install, you can re-run automated setup any time from the App Launcher → Incode Setup → Run Setup button. It is idempotent and safe to click after every package upgrade or whenever you make a manual config change. Anyone running this needs the Incode Admin permission set assigned (and the Customize Application permission, which System Administrators have by default).
Before You Begin
What you will need from Incode
Before starting, make sure you have received the following from your Incode account team:
| Item | Where to find it |
|---|---|
| API Key | Incode Dashboard → Configuration → API Keys |
| Demo or Prod environment | You would need access to a sandbox or production environment of Dashboard to properly perform this integration. |
| Onboarding Flow | You must have an active onboarding flow configured in Dashboard. If you do not have one yet, create one under Flow Builder before proceeding. |
| Configuration ID | The ID of your onboarding flow. Incode Dashboard → Flow Builder → Flows → copy the Flow URL. |
| Webhook URL slot | Incode Dashboard → Configuration Webhooks (you will paste a URL here in Step 2) |
| Environment | Confirm whether you are connecting to the Demo environment (demo-api.incodesmile.com) or the Production environment (saas-api.incodesmile.com) |
TipIf you do not yet have an Incode account or API credentials, contact your Incode representative before proceeding. Nothing in this guide will work without a valid API Key, an onboarding flow, and its Flow ID.
Salesforce prerequisites
- You must be a Salesforce System Administrator (or have the "Customize Application" and "Modify All Data" permissions).
- The package must already be installed. If you have not installed it yet, use the link at the top of this page before continuing.
- Your org must have My Domain enabled (Setup → My Domain). Lightning Experience components require My Domain to be active.
- Your org must have the sending email domain verified and email deliverability set to "All Email". See Step 0 below.
Step 0 — Verify Email Domain and Deliverability
Salesforce requires that your organization's email domain is verified before any emails can be sent — even if your individual user email address shows as verified. Without this, the package will fail with: "We can't send your email because your email address domain isn't verified."
Option A — Verify your email domain (recommended for Production)
This is the recommended approach for production orgs. It verifies your domain via DNS so all users with that email domain can send emails.
- In Setup, type
Email Domain Verificationin Quick Find and click the result (under Email). - If your domain (e.g.,
yourcompany.com) is not listed, click Add Domain. - Enter your email domain — this is the part after the
@in your Salesforce user email addresses. - Salesforce will generate DNS TXT records that must be added to your domain's DNS configuration.
- Work with your IT/DNS administrator to add the provided TXT records to your domain's DNS.
- Return to the page and click Verify. DNS propagation can take up to 72 hours.
NoteThis is a one-time org-level setup. Once the domain is verified, all users in the org whose email address uses that domain can send emails.
Option B — Use a substitute email address (quick fix for Sandbox / Scratch Orgs)
If you are working in a sandbox, scratch org, or developer edition and do not have access to DNS settings, you can enable a substitute sender address instead of verifying the domain.
-
In Setup, type
Deliverabilityin Quick Find and click Deliverability. -
Under Email Security Compliance, check Use a substitute email address for unverified domains.
-
Click Save.
Salesforce will replace the unverified "From" address with a generic Salesforce no-reply address. The recipient still receives the email, but the sender name will not show your domain.
ImportantThis is a workaround for testing and development. For production orgs, use Option A so emails are sent from your real domain and are less likely to be flagged as spam.
Substitute address is not a complete bypass.Even with this enabled, Salesforce still requires the sending user's email address itself to be verified (see "Verify the sending user's email" below). Substitute-address handles the domain check, not the user check. If you skip the next step, verification requests will appear to succeed in Salesforce (a "Pending" row shows up) but no email will ever reach the recipient.
Verify the sending user's email (required for Sandbox / Scratch Orgs)
Salesforce will refuse to send any outbound email if the user triggering the send has an unverified email address on their User record. This is separate from domain verification (Option A) and is not bypassed by substitute address (Option B).
In production orgs, this is rarely an issue, as admins log in with their already-verified work email. In scratch orgs and freshly cloned sandboxes, the auto-generated user often has a synthetic email address (e.g., [email protected]) that you can't actually receive mail at, which means the verification link Salesforce sends is unreachable. You need to point the user at a real inbox you control before requesting verifications.
- In Setup, type
Usersin Quick Find and click Users. - Click your user's name (the one you're logged in as).
- Click Edit.
- Change the Email field to a real address you can receive mail at. For testing, a personal Gmail address works fine (e.g.,
[email protected]). - Click Save.
- Salesforce sends a verification email to that address. Open your inbox, find the message from Salesforce, and click the verification link.
- Return to Salesforce — the email is now verified for use as the From address.

Why this mattersScratch org users default to a synthetic @example.com email that no one can read. Without changing it to a real address and verifying it, every outbound email from that user, verification requests included, will silently fail.
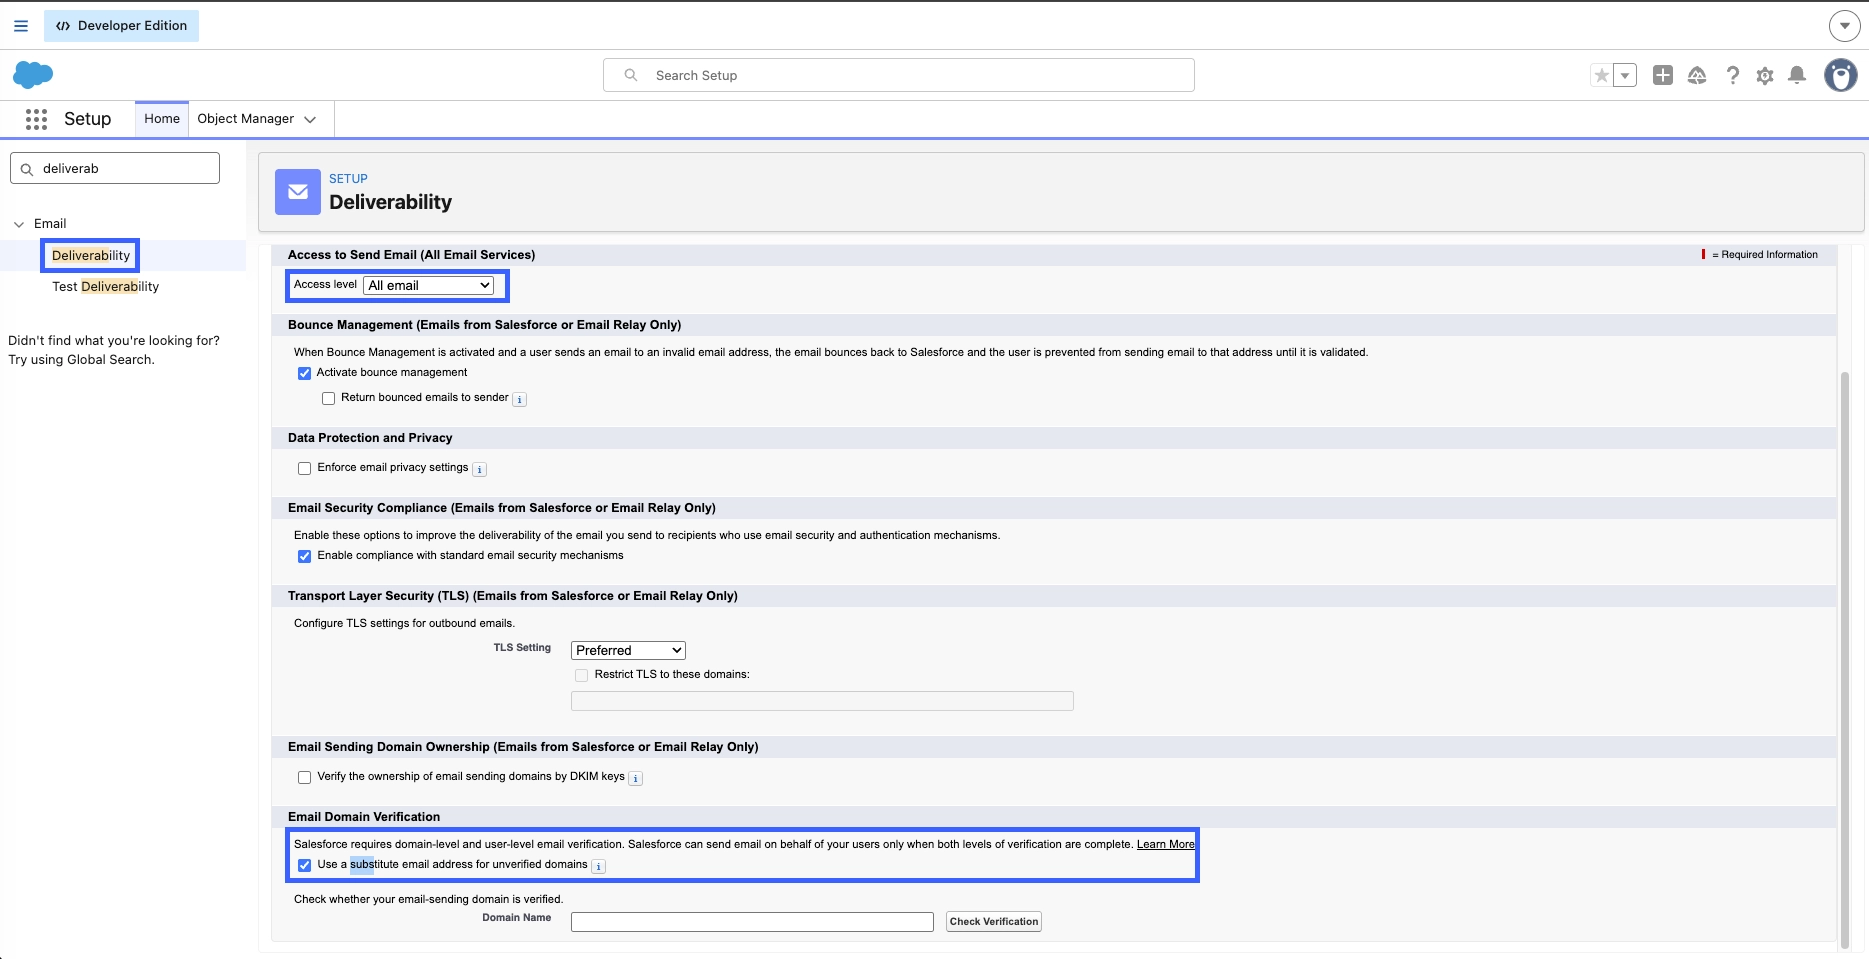
Confirm email deliverability
- In Setup, type
Deliverabilityin Quick Find and click Deliverability. - Ensure Access to Send Email is set to All Email. New sandbox and scratch orgs default to "System Email Only", which blocks all outbound emails except password resets.
- Click Save.
Test the email setup before continuing
Before moving on to Step 1, confirm Salesforce can actually send mail from this org:
- In Setup, type
Test Deliverabilityin Quick Find and click Test Deliverability. - Enter your own email address and click Send.
- Salesforce sends test emails. They should arrive within 1–2 minutes (check spam if they don't).
If you see "The FROM address has not been verified": the sending user's email is unverified. Go back to "Verify the sending user's email" above.
If the test succeeds but no emails arrive: check spam, then check Setup → Email Log Files to see what Salesforce reports for each attempt.
If the test succeeds and emails arrive: email setup is complete. Proceed to Step 1.
Step 1 — Configure Custom Settings
The default Incode Config record is auto-created at install time. You only need to populate the values.
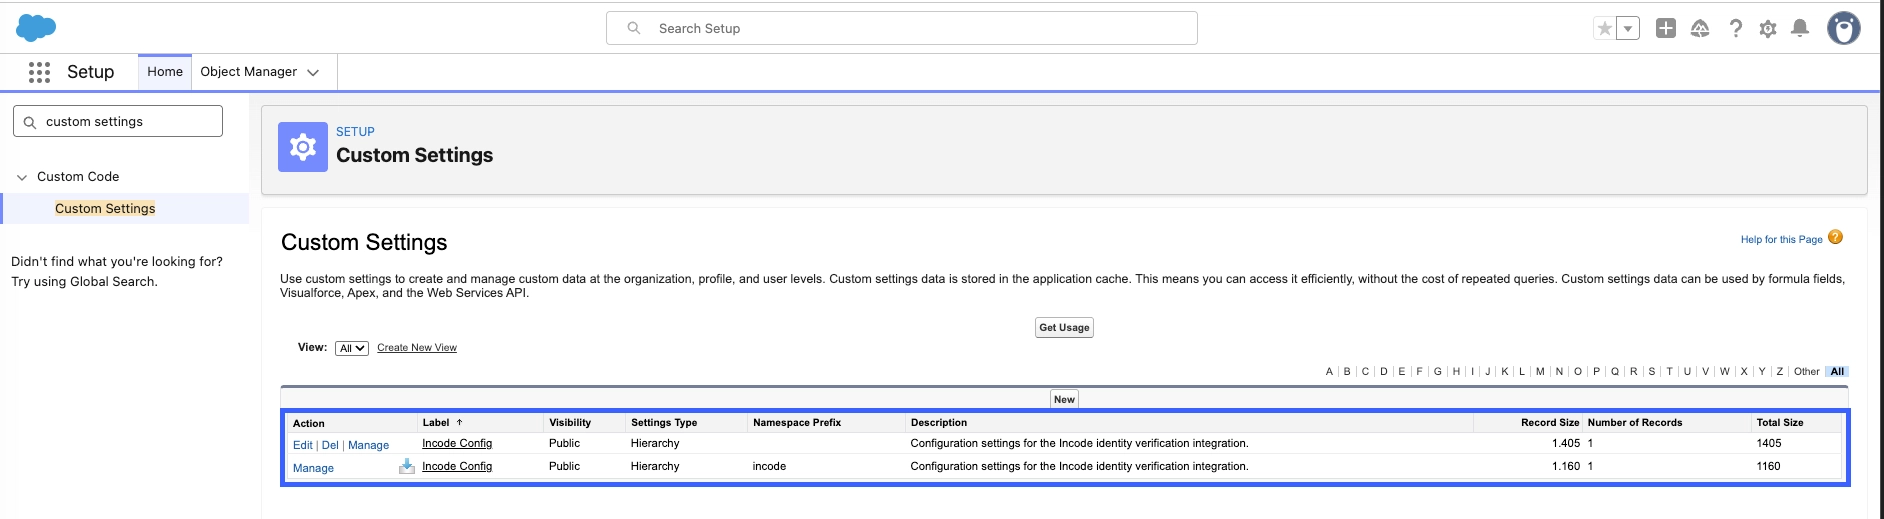
- In Setup, type
Custom Settingsin Quick Find and click the result. - Find Incode Config in the list and click Manage next to it.
- Click Edit on the org-default row (auto-created).
- Fill in the fields:
| Field | What to enter |
|---|---|
| API Key | Your Incode API Key (e.g. eyJhbG...) |
| Configuration ID | Your onboarding Flow ID for the IDV flow from Dashboard (e.g. 6421abc123def456) |
| KYB Configuration ID | Your onboarding Flow ID for the business verification flow from Dashboard (e.g. 6421abc123def487) |
| Webhook Secret | Optional. Leave blank for now — add it later if Incode provides one. |
| Use Production API | Leave unchecked for Demo. Check this box only when you are ready to go live after testing end-to-end and confirming verifications are working. |
| Store Score And Images | Optional checkbox, off by default. When enabled, completed IDV sessions store the full score result plus the selfie, front-ID, and back-ID images into Salesforce Files attached to the verification record, and enable the per-row details modal (see Step 7). Enabling Store Score And Images persists copies of government-ID images in Salesforce Files. Confirm this is consistent with your org's data-retention and privacy policies before turning it on. KYB/IDV status, score, and history all work without it. |
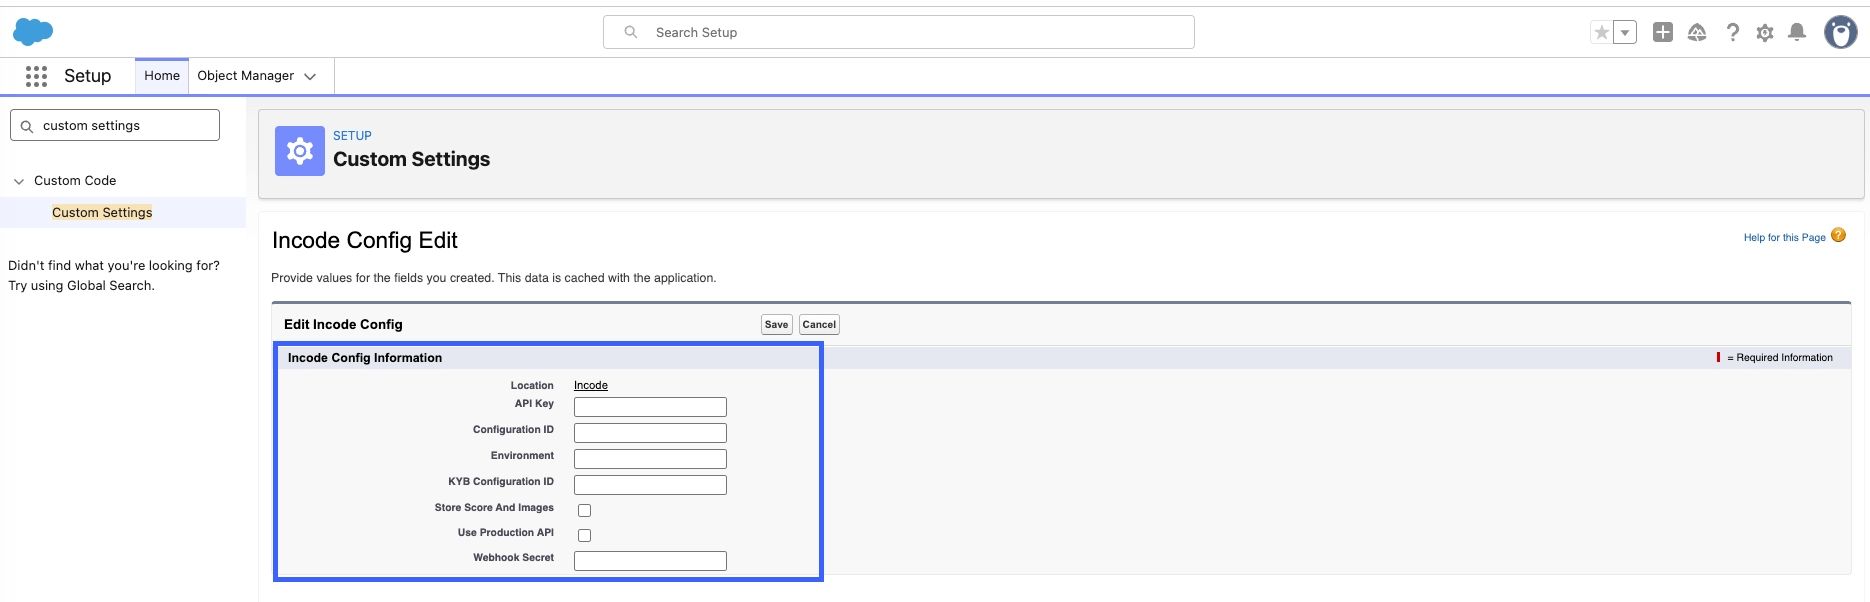
- Click Save.
Step 2 — Create the Webhook Endpoint (Salesforce Site + Incode Dashboard)
The Incode platform needs a public HTTPS URL to send verification results back to Salesforce. This is a two-part step: first you create a public Salesforce Site that exposes the webhook endpoint, then you register that endpoint URL with Incode Dashboard so it knows where to POST results.
Why manual?Salesforce does not allow Sites (CustomSite metadata) to be included in second-generation managed packages. This is a one-time setup step.
Part A — Create and Activate the Salesforce Site
The package includes the Visualforce pages the Site needs, you just need to wire them up.
- In Setup, type
Sitesin Quick Find and click Sites. - If this is your first Site, Salesforce will ask you to register a Sites domain. Accept the suggested domain (e.g.
yourcompany.my.salesforce-sites.com) and click Register My Salesforce Site Domain. Wait for registration to complete. - Click New to create a new Site.
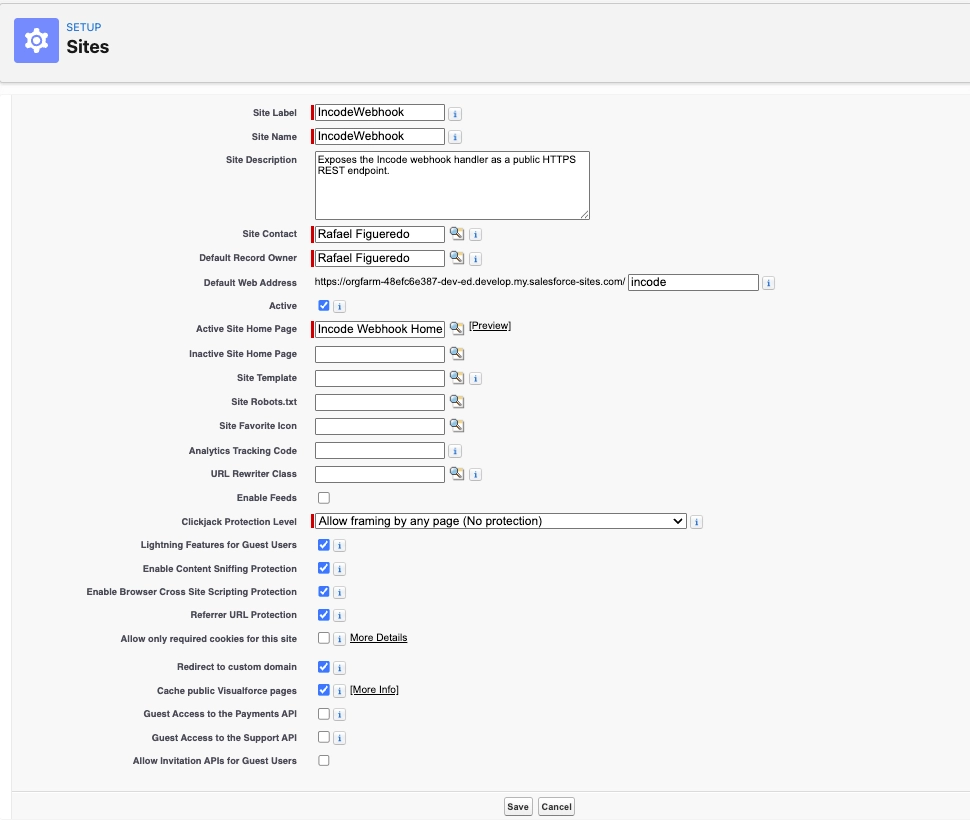
- Fill in the Site details:
| Field | Value |
|---|---|
| Site Label | Any label works. We suggest a name containing the word Incode (e.g. IncodeWebhook, IncodeIdentity). Run Setup in Step 4 finds the Site's Guest User by matching "Incode" in the auto-generated profile name. If you choose a label without "Incode", you'll need to assign the Webhook Guest permset manually (see Step 5). |
| Site Name | Auto-populates from the label |
| Active | Checked |
| Active Site Home Page | Select incode__Incode_Webhook_Home (provided by the package) |
-
Click Save.
-
Once saved, copy the Site URL shown on the Site detail page. Salesforce computes this for you — by default it is just your registered Sites domain with no path component, e.g.:
https://yourcompany.my.salesforce-sites.comIf your org's Site has a custom Default Web Address set on the Site record, the URL will include that path segment. Always use whatever Salesforce displays as the Site URL, not the Site Name.
-
Your full webhook endpoint URL is the Site URL +
/services/apexrest/incode/webhook. For the typical case above:https://yourcompany.my.salesforce-sites.com/services/apexrest/incode/webhook
Keep this URL handy — you'll paste it into the Incode Dashboard in Part B.
Tip
incodein the URL path (before/webhook) is the managed package namespace, automatically prepended by Salesforce.webhookis the REST endpoint mapping. Neither depends on the Site label you chose.
Part B — Register the Webhook URL in the Incode Dashboard
You are registering an Onboarding status webhook url, this is the hook Incode fires when a verification session ends (whether the user finished, failed, or was sent to manual review). Without it, the status in Salesforce will stay Pending indefinitely.
- Log in to the Incode Dashboard (your Incode account manager can provide the URL).
- In the left menu, click Configuration.
- Switch to the Webhooks tab.
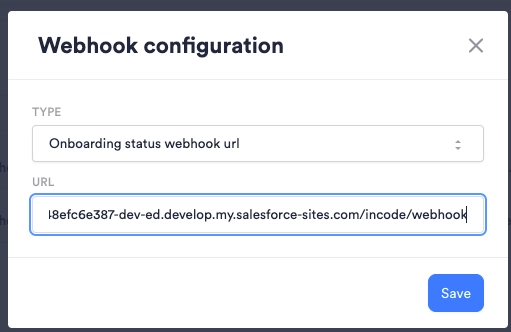
- Scroll down and click Generate new.
- Use the Type drop-down to select Onboarding status webhook url. The package listens for the
ONBOARDING_FINISHEDevent, which is delivered exclusively through this webhook. - In the URL field, enter the full webhook URL from Part A (e.g.
https://yourcompany.my.salesforce-sites.com/services/apexrest/incode/webhook). Use whatever Salesforce shows as the Site URL, do not insert the Site Name as a path segment unless your Site has a custom Default Web Address - Click Save.
If you entered a Webhook Secret in Step 1:
- Scroll up to the General section of the Configuration > Webhooks.
- Click the + under Webhook custom headers.
- For Custom Header Key, enter X-Incode-Secret
- For Custom Header Value, enter the exact string you entered in the Webhook Secret field in Step 1.
- Click Update settings.
Incode will include this header in every POST it sends to Salesforce. The package checks the X-Incode-Secret request header on every inbound webhook call and rejects any request where it is missing or does not match — returning HTTP 401 so Incode knows to alert on the failure.
Step 3 — (Optional) Create the Email Template Folder
The package includes a built-in fallback email (plain HTML, no template required), so verification emails will be delivered even if you skip this step. Creating a named template lets you customize the branding and wording.
Why is this manual?The 2GP managed-package builder cannot bundle
EmailFoldermetadata — a known Salesforce platform limitation. The post-install script auto-creates the email template only if the folder exists, which means the folder must be created manually first. Step 4 (Run Setup) auto-creates the template into it.
Quickest path
- In Setup, type
Email Template Foldersin Quick Find and create a new folder:- Folder Label:
Incode Templates - Folder Unique Name:
Incode_Templates(must match exactly) - Folder Access: Read/Write
- Folder Label:
Step 4 will detect the folder and auto-create both templates inside it: Incode Verification Request (IDV) and Incode KYB Verification Request (KYB). The package automatically routes the email by verification type.
To customize the template (after Step 4 has created it)
- In Setup, type
Classic Email Templatesin Quick Find. - In the folder dropdown, select Incode Templates → click the template you want to customize (Incode Verification Request for IDV or Incode KYB Verification Request for KYB) → Edit HTML Version.
- Edit the HTML. Keep these two placeholder strings intact — the package replaces them at send time:
{{VERIFICATION_URL}}— the unique verification link{{FIRST_NAME}}— the contact/lead's first name (falls back to "there" if blank)
- Click Save.
NoteThese are plain string placeholders, not Salesforce merge fields like
{!Contact.FirstName}. The package only replaces the{{...}}tokens.
Step 4 — Run Incode Setup
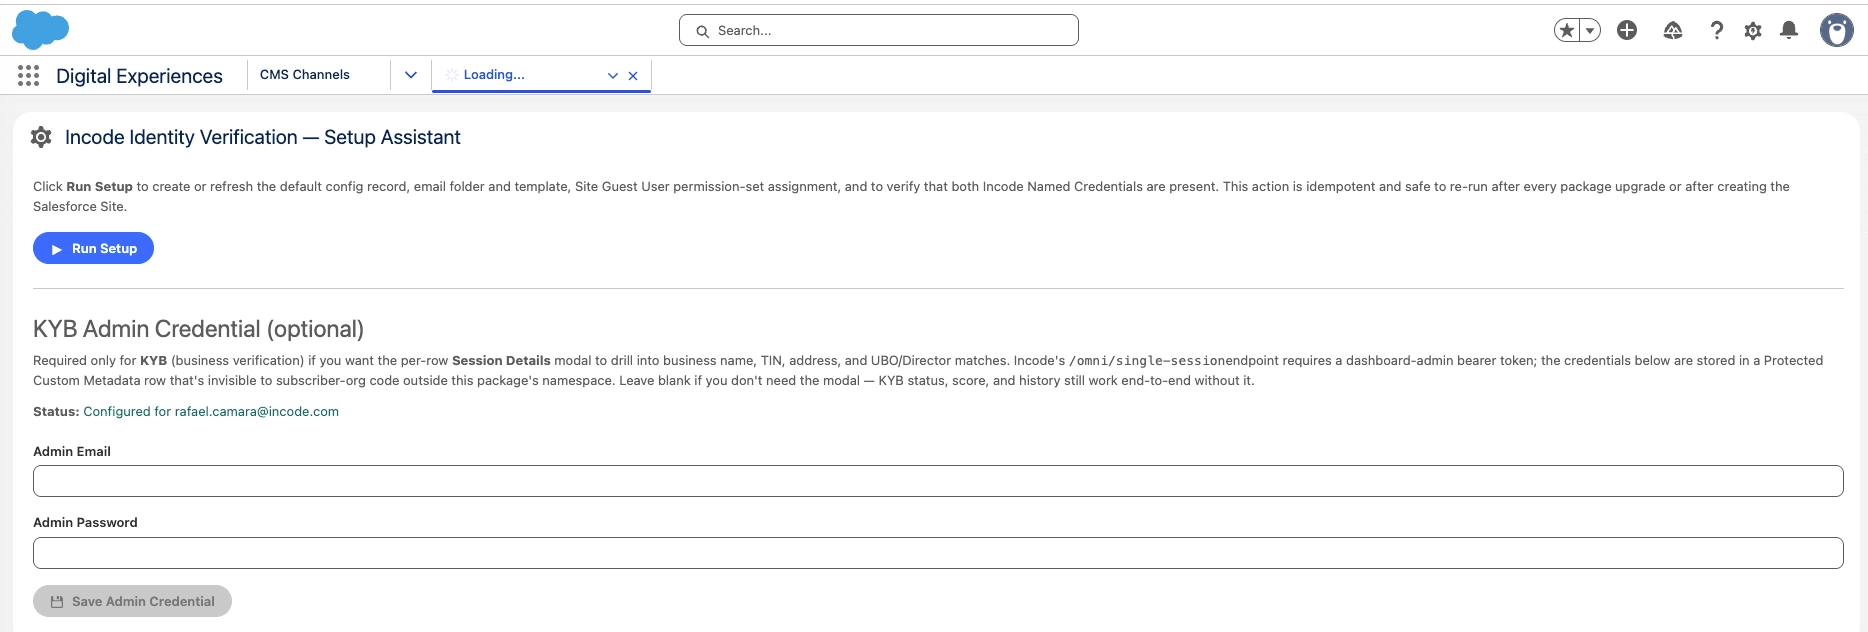
Open the App Launcher (top-left). Search for Incode Setup. You should see the Setup Assistant page. Click Run Setup.
Don't see the Incode Setup tab?You need the Incode Admin permission set assigned to your user. Setup → Permission Sets → Incode Admin → Manage Assignments → add yourself, then return here. The tab is hidden by default to avoid cluttering end-users' App Launcher.
What the Run Setup button does (all idempotent):
- Confirms the default Incode Config custom-setting record exists.
- Creates (if missing) two email templates inside the Incode Templates folder: Incode Verification Request (IDV) and Incode KYB Verification Request (KYB). The package automatically routes the email by verification type. Skipped with a warning if you did not create the folder in Step 3; the built-in fallback email is used in this case.
- Assigns the Incode_Webhook_Guest permission set to the Site Guest User. Requires the Site from Step 2 to exist.
- Verifies that Named Credentials
IncodeAPIandIncodeAPI_Productionare present (warns if either is missing).
You should see a list of Created or Already in place entries confirming each task. The post-install script ran the same tasks at install time, so on a fresh install some items will already be in place — that's expected.
KYB admin credentials (optional)
If you plan to process KYB verifications through Salesforce, the Setup Assistant will prompt you for an Incode admin email and password (the credentials of an admin user on your Incode dashboard). These are required only if you want the per-row Session Details modal to drill into business name, TIN, address, and UBO/Director matches.
How it works: The package uses these credentials to call Incode's /executive/log-in endpoint to obtain an access token, which is required to call /omni/single-session for the full KYB result. IDV flows don't require this because the package can call /omni/get/score directly with the onboarding session token.
Storage: Credentials are stored in a Protected Custom Metadata row inside your Salesforce org, invisible to subscriber-org code outside this package's namespace. They never leave your instance.
Skipping this step: Leave the fields blank if you don't need the modal — KYB status, score, and history still work end-to-end without it.
Step 5 — Assign Permission Sets
Two permission sets need to be assigned to internal users. The third (Incode_Webhook_Guest) was assigned to the Site Guest User automatically by Step 4.
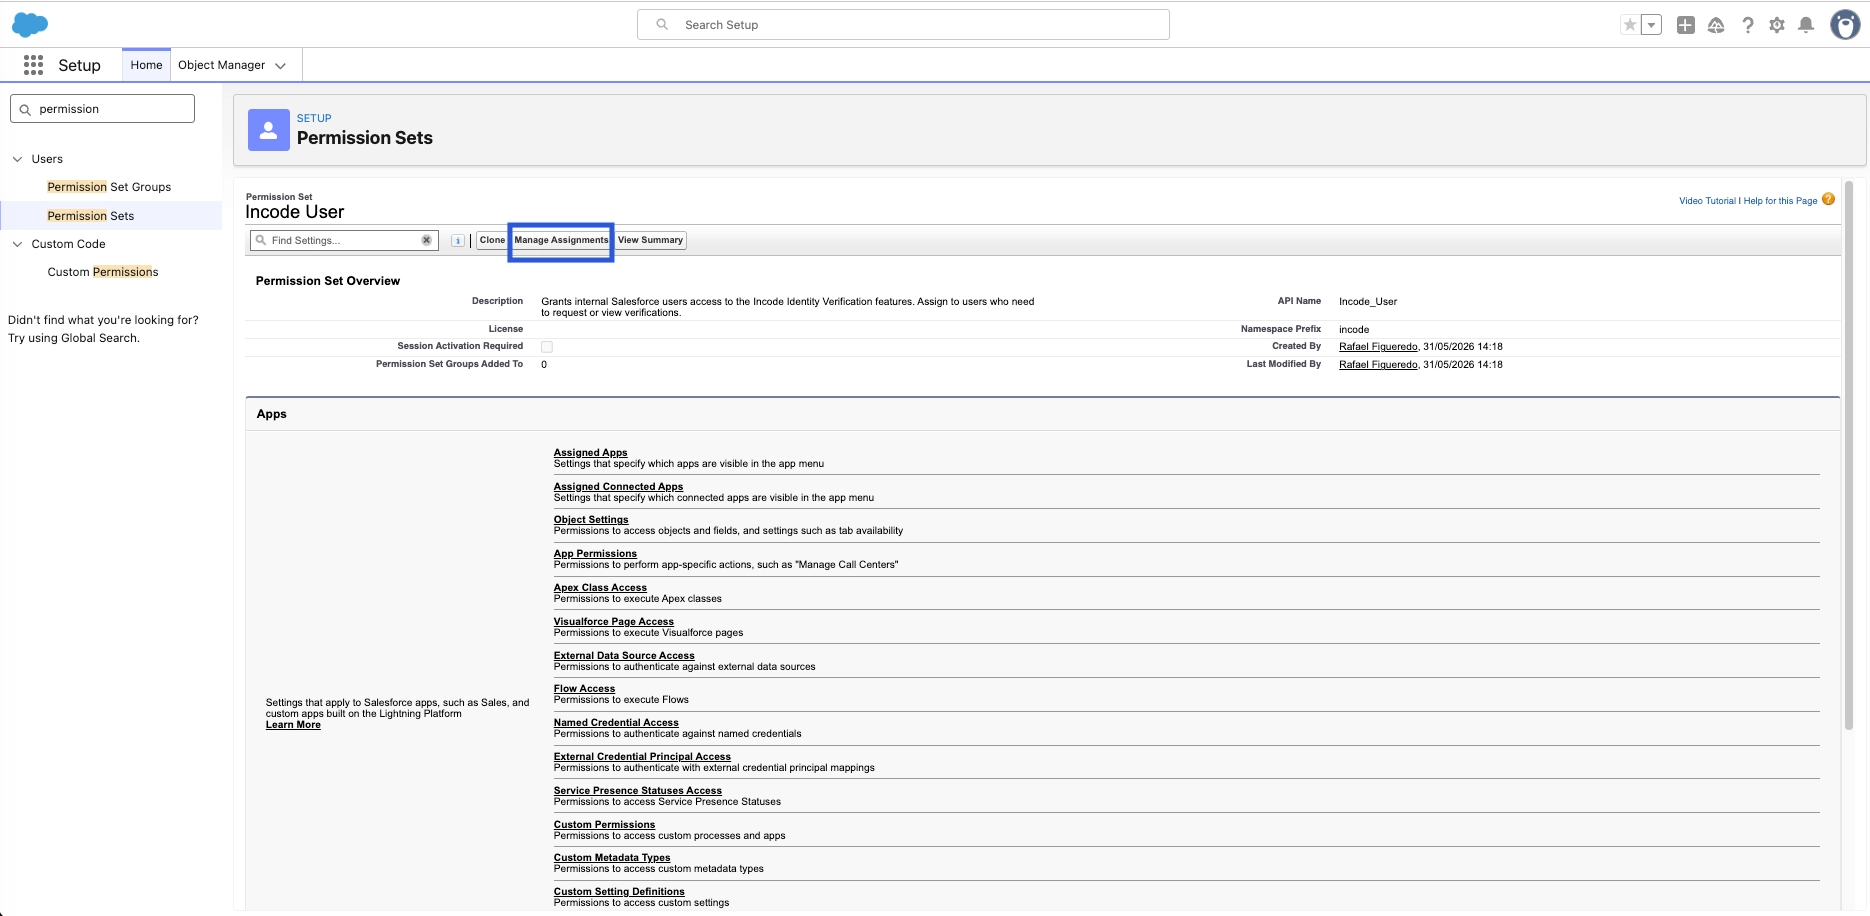
Incode_User (for Salesforce users who will request verifications)
- In Setup, type
Permission Setsin Quick Find and click the result. - Click Incode User from the list.
- Click Manage Assignments → Add Assignments.
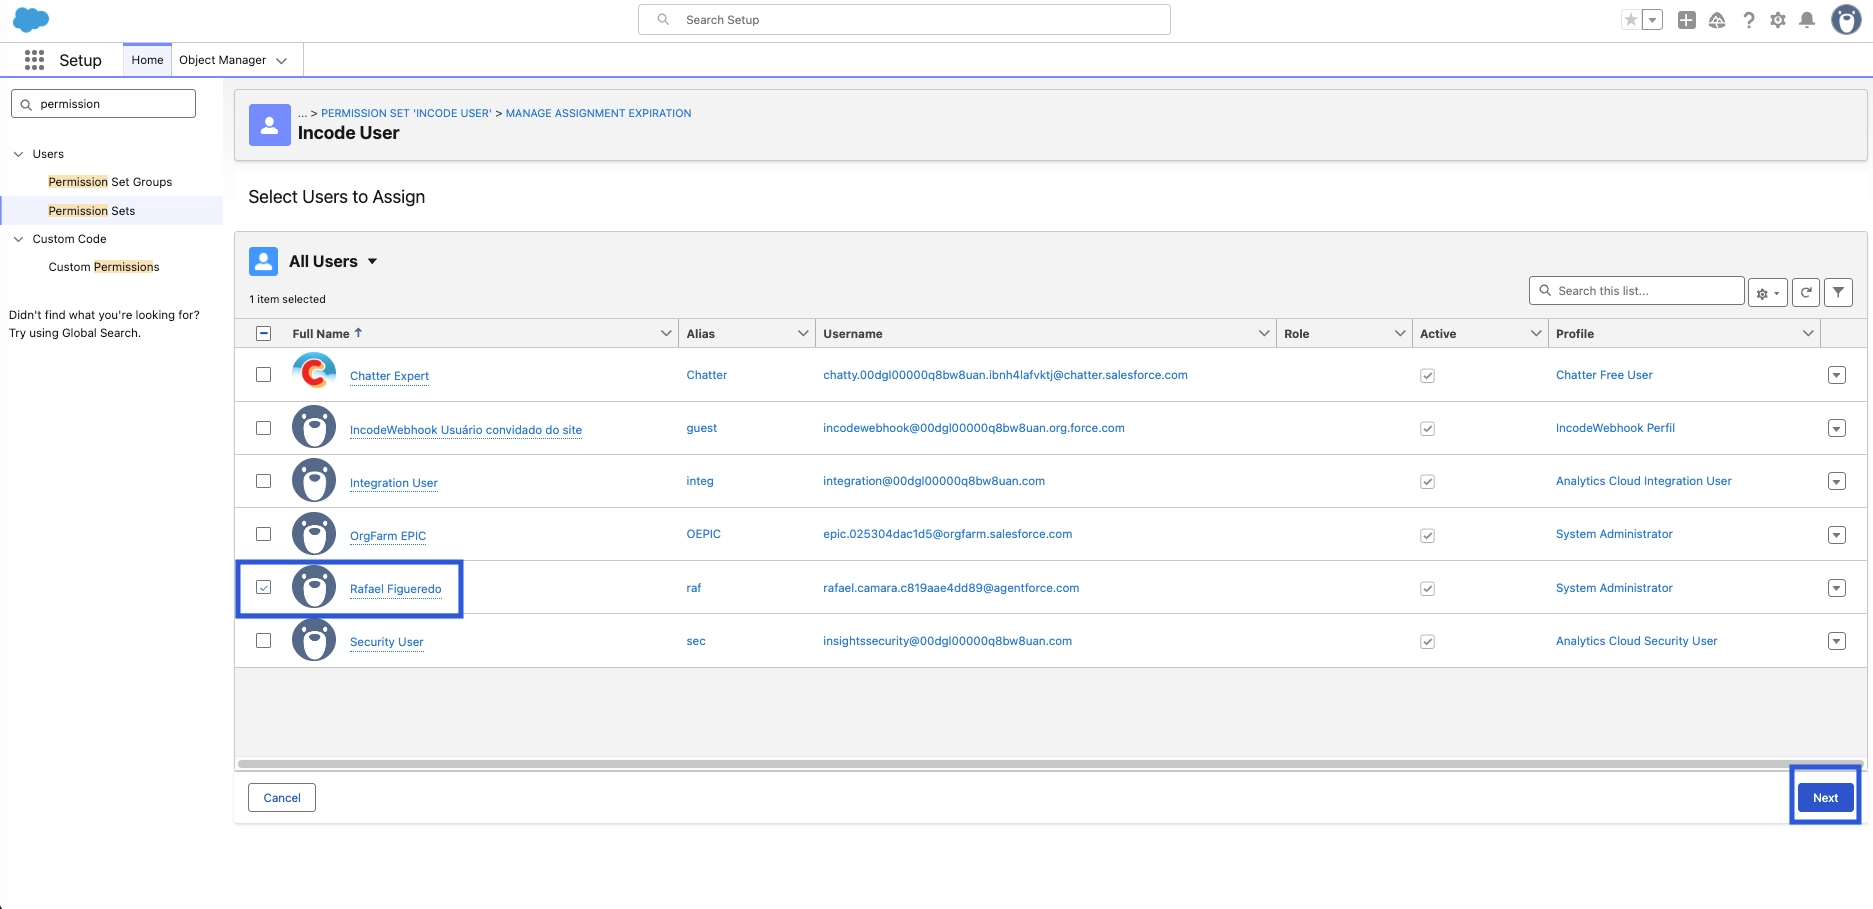
- Select all users who should be able to request identity verifications (e.g. your sales team, ops team).
- If no users appear in your list view, click Select a List View and choose Recently Viewed.
- Click Next.
- Note: Remember to set an assignment expiration if required.
TipYou can also assign permission sets from a user's record. Go to the user record → Permission Set Assignments → Edit Assignments.

Incode_Admin (for Salesforce admins who will run setup tasks)
Assign this to anyone who should see the Incode Setup tab. System Administrators have the underlying Customize Application permission they need to actually run the setup, but the tab itself is hidden by default until this permission set is assigned.
- Setup → Permission Sets → Incode Admin → Manage Assignments → Add Assignments → pick yourself (and any co-admins) → Assign.
Manual fallback for Incode_Webhook_Guest
Step 4 normally assigns this automatically. You only need this fallback if your Site's auto-generated profile name does not contain "Incode" (uncommon — usually means the Site label you chose in Step 2 did not contain "Incode"):
- Setup → Sites → click your Site → Public Access Settings → scroll to bottom → View Users.
- Click the Site Guest User → scroll to Permission Set Assignments → Edit Assignments.
- Move Incode Webhook Guest from Available to Enabled → Save.
NoteYou do not need to grant object or field permissions on the guest user profile. The webhook handler runs in system mode for data access and only updates package-owned records.
Step 6 — Add the Component to Record Pages
The "Incode Identity Verification" sidebar card needs to be added to your Contact, Lead, and/or Account record pages using the Lightning App Builder.
Repeat these steps for each record type you want to enable (Contact, Lead, Account).
For Contact pages:
-
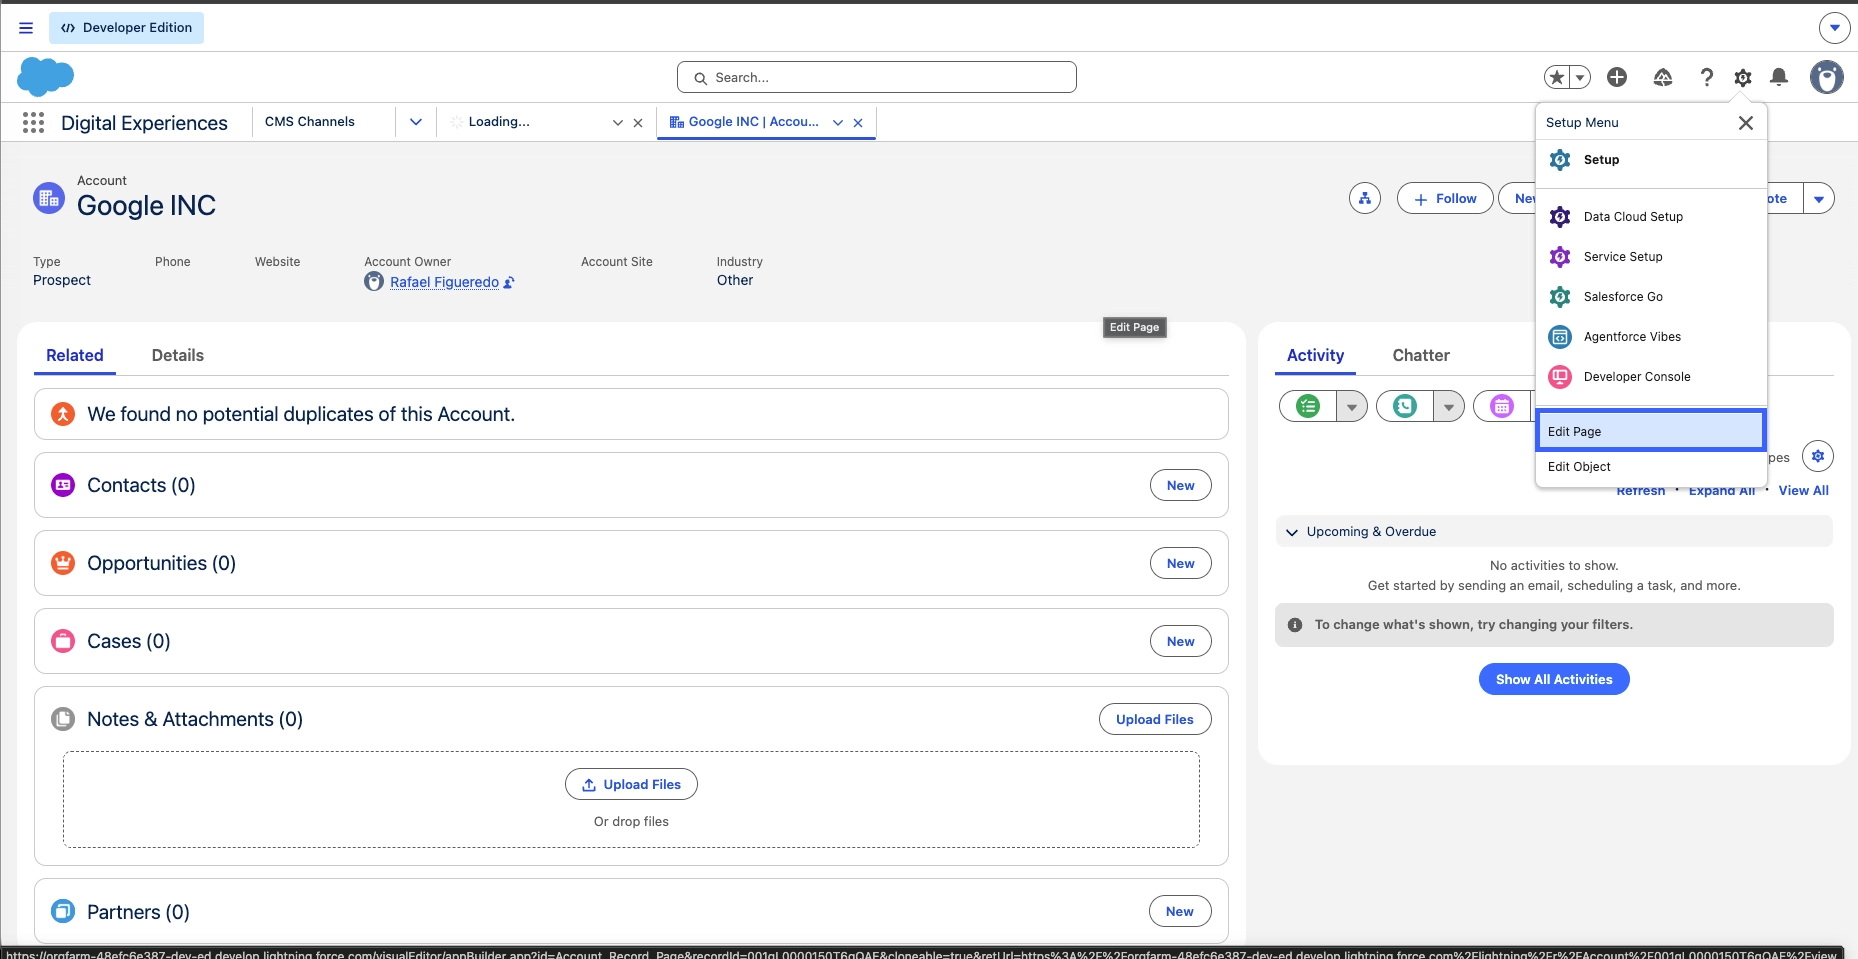
Open any Contact/Lead/Account record.
-
Click the gear icon in the top-right of the record page → Edit Page.
-
In the left panel, scroll down to Custom - Managed components. You should see Incode Verification.
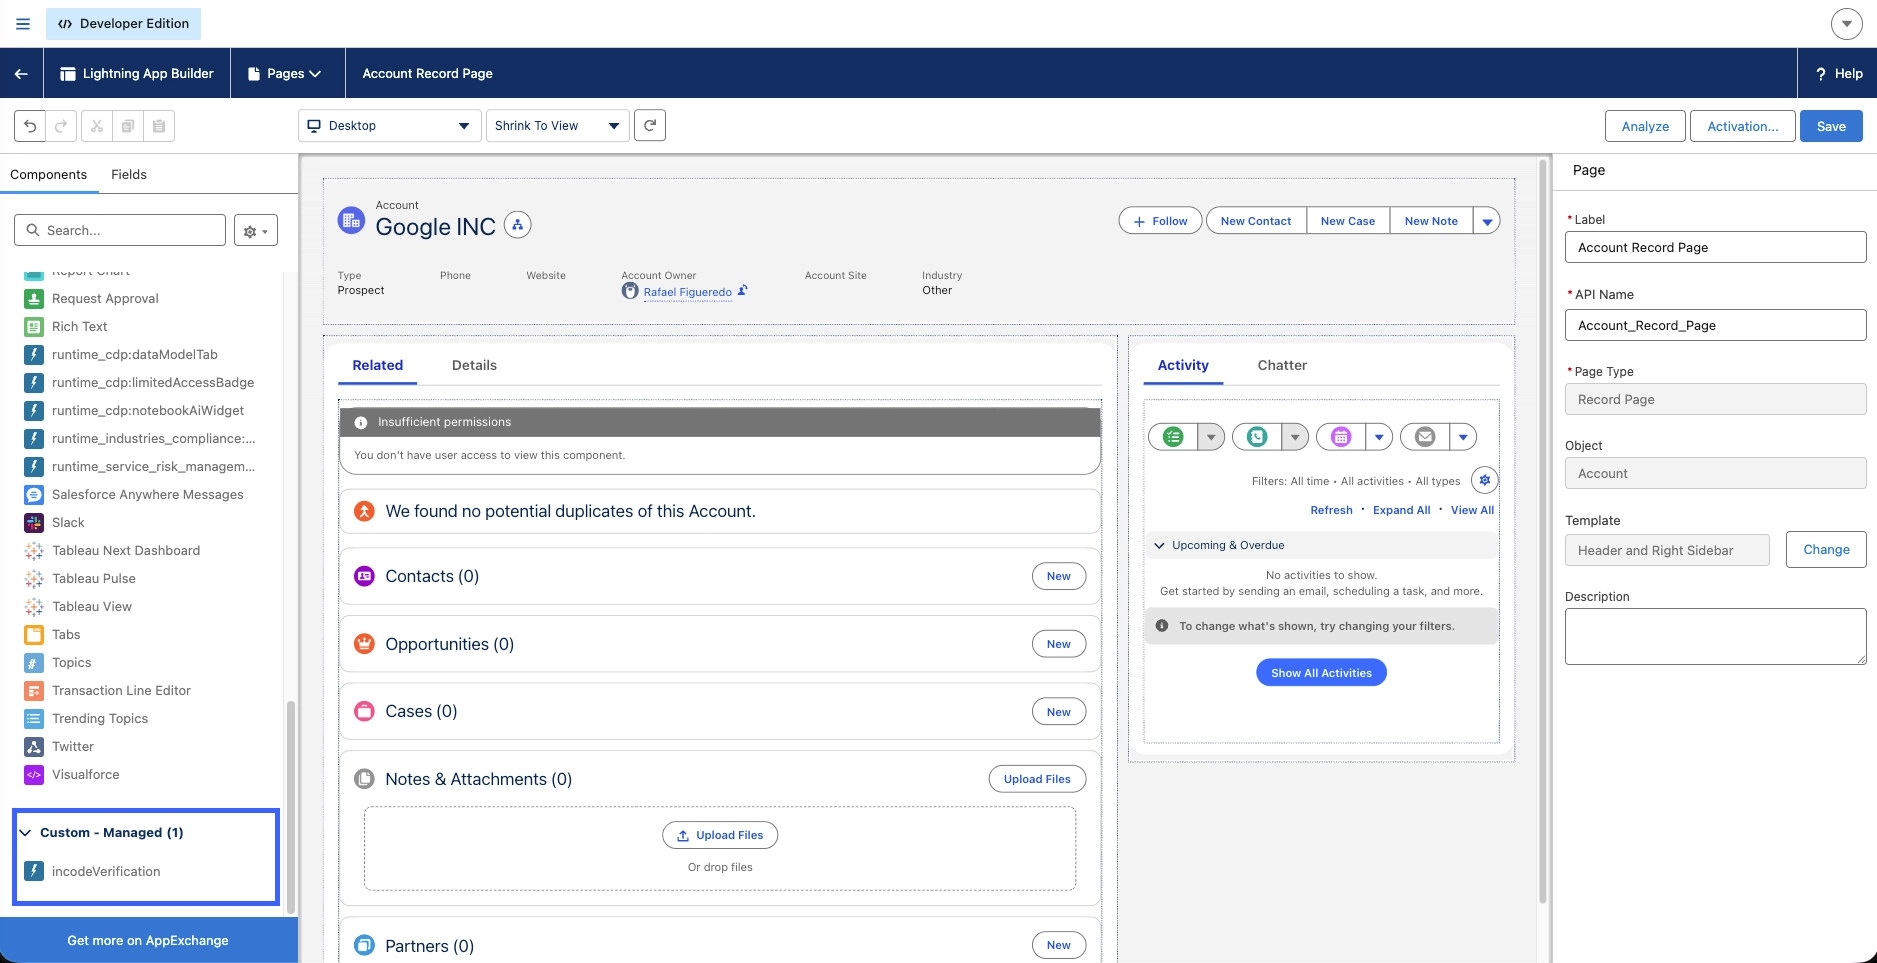
-
Drag Incode Verification onto the right-hand sidebar of the page layout.
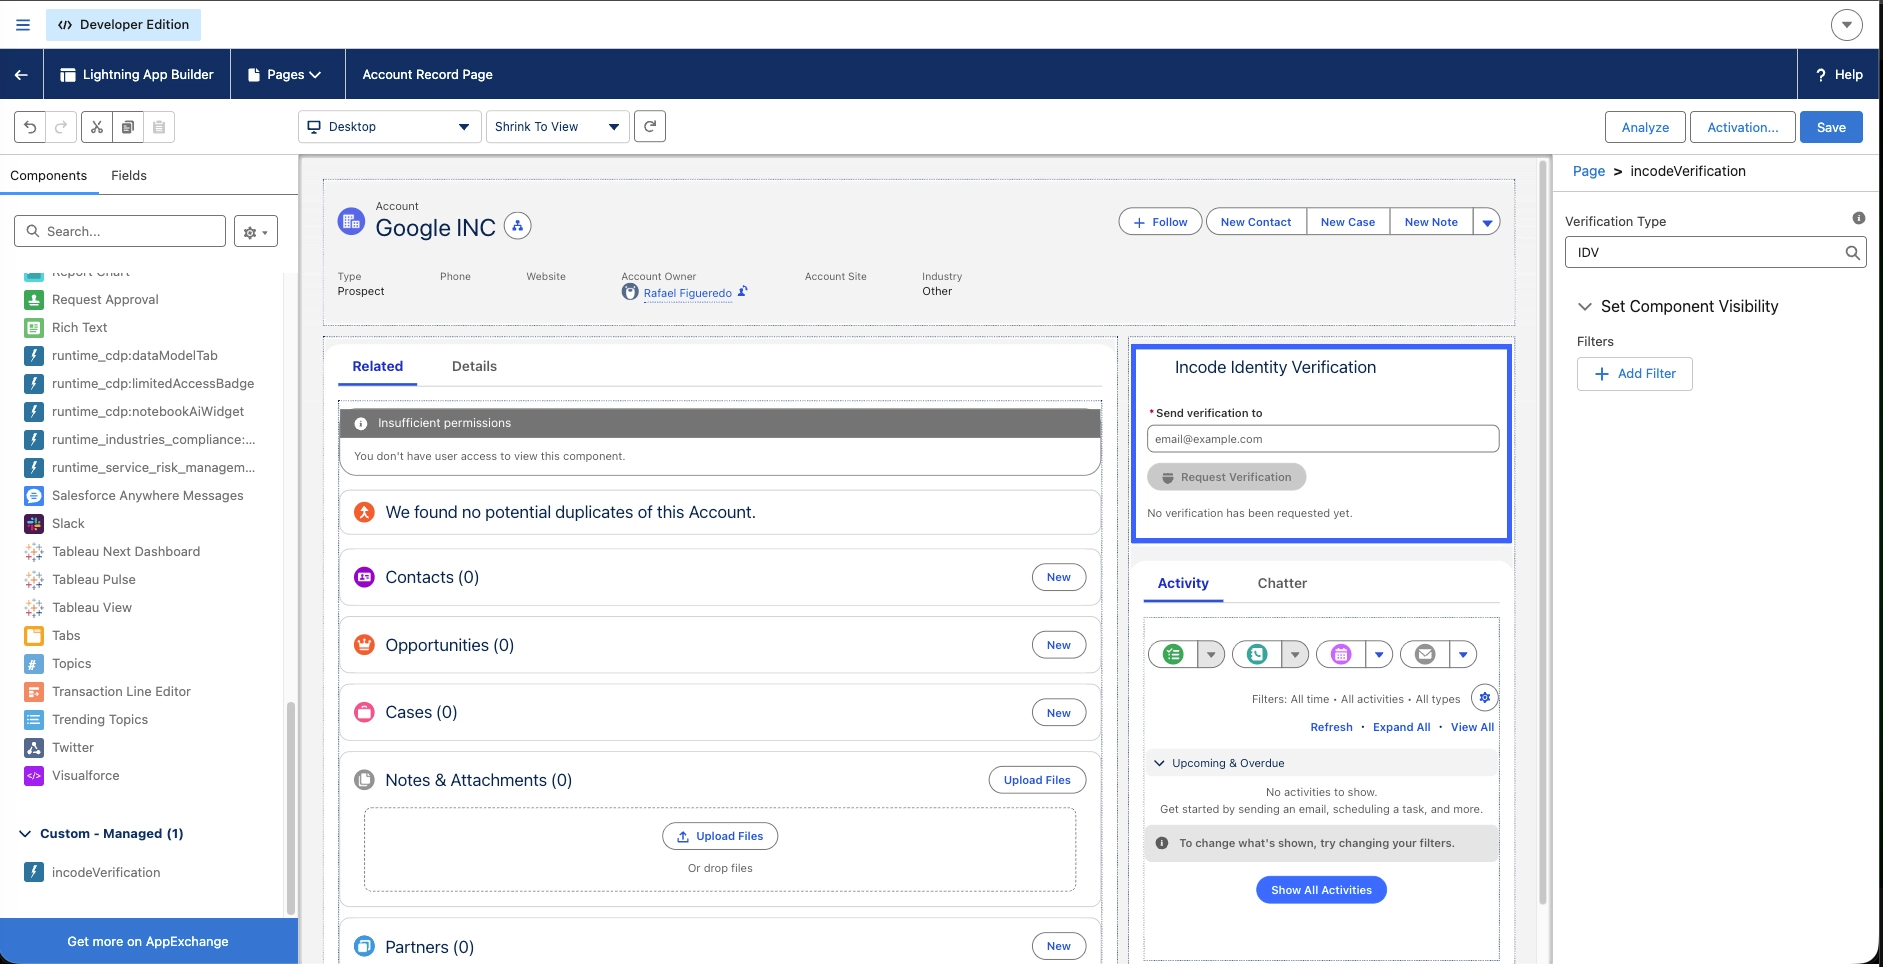
-
Select the verification type:
- IDV: For regular onboarding flows for individuals verification, ID, selfie, face match, etc.
- KYB: For business verification flows.
-
Click Save → Activate → choose Activate for all users.
-
Click Back (Left arrow) to return to the record.
NoteIf the component shows an error message about missing configuration, go back and check Step 1.
Repeat for the remaining pages as needed.
Step 7 — Test End-to-End
Before rolling out to your team, do a test run.
-
Open a Contact record.
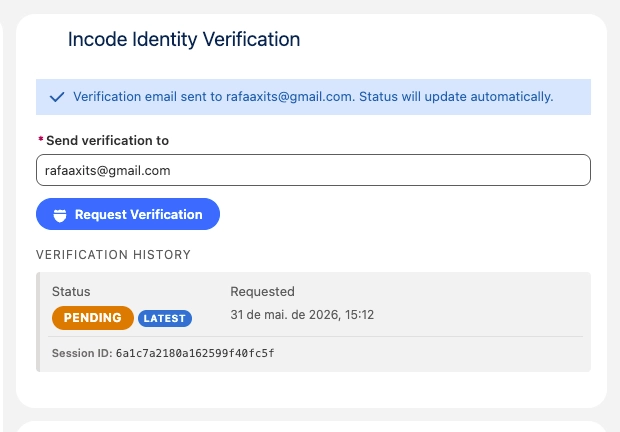
-
In the Incode Identity Verification sidebar card, confirm the email address (or type in a test address you have access to).
-
Click Request Verification.
-
The history table should update within seconds to show a Pending row.
-
Check the inbox — you should receive an email with a verification link.
-
Click the link, complete the verification (ID photo + selfie).
-
Return to the Salesforce record. Within ~10 seconds the status should update to Approved (green) or Declined (red). If Incode routes the session to manual review, the status will show Manual Review (orange) until a reviewer approves or rejects it in the Incode Dashboard, after which it flips to Approved or Declined.
If Store Score And Images is enabled, click any IDV history row to open the Session Details modal (Session Info / ID Verification / Capture Attempts). Images are saved to Salesforce Files the first time an internal user (with the
Incode_Userpermission set) opens the modal.
Step 8 — Troubleshooting Common Issues
"Request Verification" button shows an error immediately
Check Custom Settings (Step 1). API Key or Configuration ID is likely wrong or has extra spaces. Confirm the Demo/Production checkbox matches your environment.
"We can't send your email because your email address domain isn't verified"
Your sending email domain is not verified at the org level. Go back to Step 0 and complete the Email Domain Verification. This is different from your individual user email being verified — Salesforce requires the domain itself (e.g., yourcompany.com) to be verified via DNS TXT records before any emails can be sent from that domain.
Email is not received by the contact
Check Setup → Email → Deliverability — Access Level must be set to All Email (see Step 0). Also check spam.
"Pending" row appears in Verification History but no email arrives
Salesforce believes it sent the email but it never reached the recipient. The most common cause in sandbox/scratch orgs is an unverified sender email on the User record. Go to Setup → Test Deliverability → send a test email to yourself. If it fails with "The FROM address has not been verified", you need to verify the sending user's email (Step 0, "Verify the sending user's email"). Also check the recipient's spam folder and Setup → Email Log Files for delivery details.
Verification status is not updating after the contact completes the flow
Confirm the Site is Active (Step 2, Part A). Confirm the ONBOARDING_FINISHED event webhook is registered in the Incode Dashboard for the correct configuration (Step 2, Part B). Confirm Incode_Webhook_Guest is assigned to the Site Guest User — the easiest way is to click App Launcher → Incode Setup → Run Setup; it'll either confirm the assignment is in place or create it. Check Setup → Sites → click your Site → Site History for 4xx/5xx errors. If you see HTTP 401 errors in Site History, the X-Incode-Secret custom header in the Incode Dashboard is missing or does not match the Webhook Secret you entered in Custom Settings (Step 1). If the verification card itself shows the event suffixed with score-skipped: ..., see the next entry.
Verification card shows Event: ONBOARDING_FINISHED | score-skipped: …
The webhook arrived, but the package could not enqueue the async score reconciliation that decides Approved vs. Declined. The reason is shown after score-skipped::
no config— the Site Guest User cannot read the Incode Config custom setting. Re-install or upgrade the package so the latestIncode_Webhook_Guestpermset (which grants this access) is applied to the Site Guest User.API key blank— the API Key in Custom Settings (Step 1) is empty. Fill it in and re-test with a fresh verification.
Verification card shows Event: ONBOARDING_FINISHED | score-fetch-unknown
The webhook arrived and the package called Incode's /omni/get/score endpoint, but it returned no usable outcome (HTTP error, malformed response, or missing overall.status). Common causes:
- The Use Production API toggle in Custom Settings (Step 1) does not match the Incode environment that issued the webhook — e.g., the API Key is for Demo but the toggle is checked. Re-check Step 1.
- The Incode flow occasionally takes a few extra seconds to compute the score after firing the webhook. Re-try the verification — if every attempt shows this suffix, it is a configuration mismatch, not a timing issue.
Verification row is stuck at "Pending" for a session that Incode sent to manual review
This means the installed package predates v0.10.0, which made the Manual Review status writable on existing orgs. Upgrade to the latest package using the link at the top of this page — after the upgrade, existing Pending rows for manual-review sessions will update correctly when the reviewer approves or rejects in the Incode Dashboard.
The "Incode Setup" tab is not visible in the App Launcher
Assign the Incode Admin permission set to your user. Setup → Permission Sets → Incode Admin → Manage Assignments → Add Assignments. The tab is hidden by default to avoid cluttering end-users' App Launcher.
Incode Setup → Run Setup says "Site Guest User" warning even after I created the Site
The setup task looks up the Guest User via the Site's auto-generated profile name (which contains "Incode"). If your Site has a different profile name, fall back to the manual permset assignment instructions in Step 5.
Component shows a configuration error on the record page
Verify Custom Settings were saved (Step 1) and the logged-in user has the Incode_User permission set (Step 5).
Component is not visible on the record page
Must be added via Lightning App Builder. Go back to Step 6 and confirm you saved and activated the page.
Quick Reference Checklist
- Obtained API Key and Configuration ID from Incode
- Email domain verified in Setup → Email Domain Verification (Step 0)
- Email deliverability set to "All Email" (Step 0)
- Sending user's email verified (Step 0)
- Test Deliverability succeeded (Step 0)
- Custom Setting Incode Config: API Key, Configuration ID, and Production toggle filled in (Step 1)
- Salesforce Site created and activated (Step 2, Part A)
- Webhook URL registered in Incode Dashboard, ONBOARDING_FINISHED event selected, for the correct configuration (Step 2, Part B)
-
X-Incode-Secretcustom header configured in Incode Dashboard (if Webhook Secret was set in Step 1) - (Optional) Email folder
Incode_Templatescreated (Step 3) — or rely on the built-in fallback email - Incode Admin permission set assigned to yourself so you can see the Incode Setup tab
- Incode Setup → Run Setup clicked once — auto-creates the email template (if folder exists), assigns the Webhook Guest permset, verifies Named Credentials (Step 4)
- Incode_User permission set assigned to all relevant Salesforce users (Step 5)
- Incode Verification component added to Contact, Lead, and/or Account record pages (Step 6)
- End-to-end test completed successfully (Step 7)
- If any row is stuck at Pending for a session routed to manual review, upgrade to v0.10.0 or later (link at top) — pre-v0.10.0 installs cannot write the Manual Review status to existing orgs
For additional support, contact your Incode account team or raise a support request through the Incode customer portal.
Updated about 2 months ago